User:Farhad
| Farhad Norouzi | |
| Plan for Future | Go to Master of Computer Science |
|---|---|
| Occupation | BSD Student |
| Expected Graduation | May 2009 |
| fnorouzi@learn.senecac.on.ca | |
| Blog | http://farhadnorouzi.blogspot.com |
Farhad Norouzi is a 4th year college student, studying Bachelor of Software Development (BSD) Program Seneca College in Toronto, Canada. He expects to graduate in May 2009.
He got admission from a major university in Canada to continue his education in the Master of Computer Science from September 2009. He plans to do his research and thesis on Enterprise Applications.
He was elected Financial Officer of the for the school year 2008-2009.
He has enrolled in the DPS909 - Topics in Open Source Development Course for the current semester (Winter 2009) where he hopes he will learn the technological, social, and pragmatic aspects of developing open source software through direct involvement in the Eclipse WTP.
Contents
- 1 DPS909 -- Open Source Development
- 2 Web Tools Platform (WTP) Tutorials -- Using Eclipse to Develop WTP
- 2.1 Author
- 2.2 Acknowledgments
- 2.3 Overview
- 2.4 Necessary Elements to Set Eclipse WTP Development
- 2.5 Get Started
- 2.6 Check out WTP Source Code in CVS Repository
- 2.7 Set up Target Platform
- 2.8 Modify WTP Source Code
- 2.9 Run Modified Eclipse Web Application With New Code
- 2.10 Create Patch With Source Code Changes - Submit Patch to WTP Project
- 2.11 Summary
DPS909 -- Open Source Development
Students and Professors at Seneca College work closely with open source communities like Mozilla, Fedora, OpenOffice.org, and Web Tools Platform (WTP) Project to do real-world research. Open Source@Seneca
Winter 2009 -- Eclipse WTP
Students get introduced to the technological, social, and pragmatic aspects of developing open source software through direct involvement in the Eclipse WTP project. Students will learn to use the tools, techniques, and strategies of open source developers.DPS909 Eclipse WTP Weekly Schedule
Major Project -- Eclipse WTP -- Bug 240167 -- Normal -- P3
Bug ID
Bug Description
When the user deletes a Tomcat 5.5 server from the server view, the editor will not be closed.
Steps to Reproduce the Bug
1.I created a Tomcat 5.5 server, double click to open it in its editor.
2.Then I selected the server and deleted it from server view.
3.should the server editor be closed ?
4. if you have a java file open, and delete the file the editor is closed, otherwise
it would be odd to make changes to the file.
Web Tools Platform (WTP) Tutorials -- Using Eclipse to Develop WTP
Author
This tutorial is prepared by Jordan Anastasiade, Seneca College - Computer Studies (S@Y) on October 10, 2008 by adaptation from Mark Hutchinson, IBM February 21, 2005/June 2, 2006.
Acknowledgments
I deeply appreciate the support we have received from IBM Lab Toronto, Special thanks to Mr. Angel Vera for his invaluable help.
Overview
This tutorial explains how one could set Eclipse environment to develop or modify the Web Tools Platform (WTP) project elements.
While the example presented is insignificant, the tutorial explores in details the steps for building the WTP development environment,thus being valuable to new developers and contributors to WTP project.
Necessary Elements to Set Eclipse WTP Development
Before one could start working with WTP project, the development and target platforms must be defined on hardware platform.
Following elements are necessary to set the Eclipse environment for the Web Tools Platform (WTP) Development process:
- Download the development platform from Eclipse for RCP/Plug-in Developers. At the time of preparing this tutorial, the zip file is called eclipse-rcp-ganymede-SR1-win32.zip.
After downloading the zip file, define a working directory and unzip the downloaded file into that directory. For example, in this tutorial the development plug-in directory will be called <Eclipse_Base>.
- Download the target platform from the Web Tools Platform - committer downloads. At the time of preparing this tutorial, the maintenance (in progress) build name is WTP version 3.0.3.
Also, download the following files:
- Eclipse Platform (Platform, JDT) - file: eclipse-SDK-3.4.1-win32.zip
- EMF v2.5 Runtime Minimum executable code - file: emf-runtime-2.4.1.zip
- EMF XSD v2.5 Runtime Minimum executable code - file: xsd-runtime-2.4.1.zip
- Graphical Editing Framework (GEF) - file: GEF-SDK-3.4.1.zip
- Data Tools Platform (DTP) (required only for EJB or JPT development) - file: dtp-sdk_1.6.1.zip
- Very important file: the non-SDK package wtp
After downloading all those files, define a working directory for WTP and unzip the downloaded files into that directory (e.g. <IBM/WTP_Builds/3.0.3>).
Warning
The name of the files and respective links are probably going to be changed, replaced, or modified as the development environment requires, but the principles are constant.
One must download from the build only the files that are needed such as: the first five core development files must be the SDK files, but the files for the core WTP must be non-SDK.
The reason is simple: the latest SDK source will be taken from CVS repository as described further.
Get Started
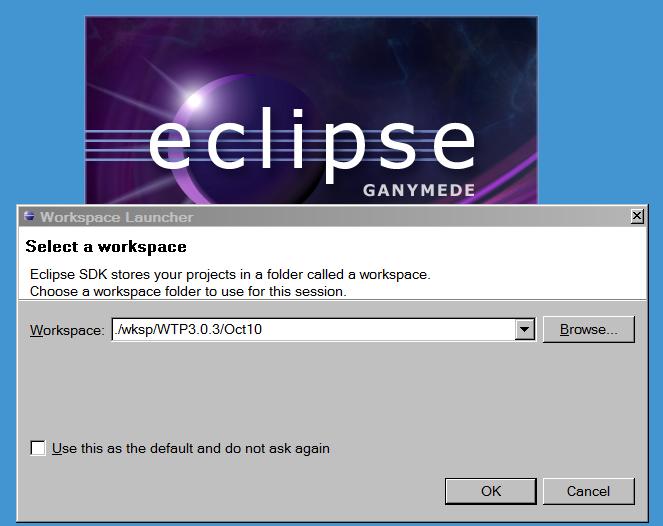
- Start Eclipse and define in the dialog Workspace Launcher the Workspace based on your preferences, possibly including the current date of development: <./wksp/WTP3.0.3/Oct10>.
- In this workspace develop a simple Dynamic Web Project with a web component (e.g. Servlet).
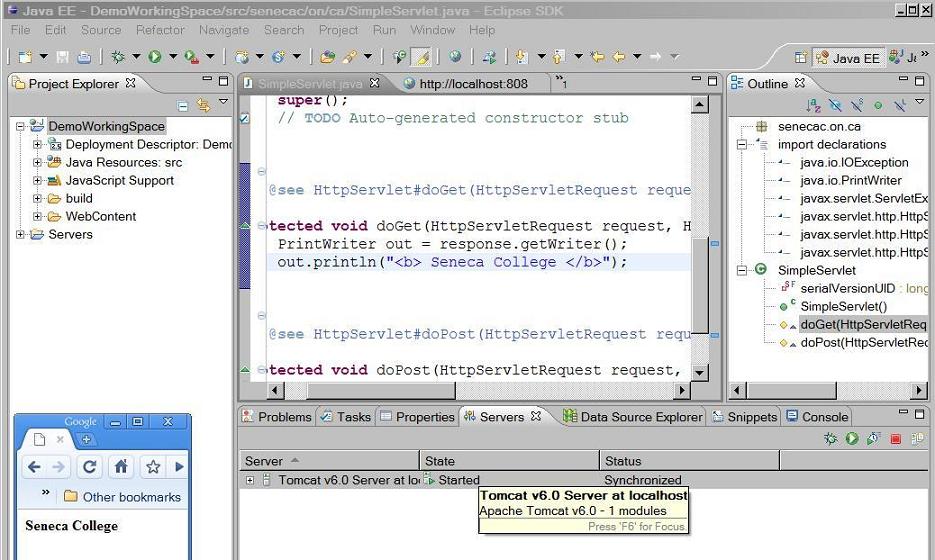
- Let us assume that one wants to fix a generic Bug / Enhancement defined as following:
- When a Web Application is running, in the server view the ToolTip window must display the date and time when the window is created.
Check out WTP Source Code in CVS Repository
- Go to <Eclipse_Base> directory and start the plug-in development environment.
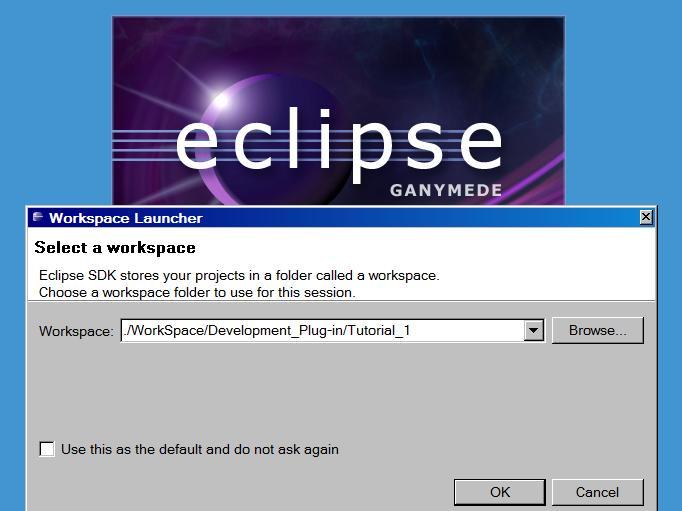
- Access the source code for the Eclipse Web Tools Platform from the Concurrent Versions System (CVS) repository. To access the CVS repository select:
- Window > Open Perspective > Other and select CVS Repository Exploring
- The CVS Repositories view is now on the left side of your screen. Select the Add CVS Repository icon
 or right click on the CVS Repositories view and click New > Repository Location.
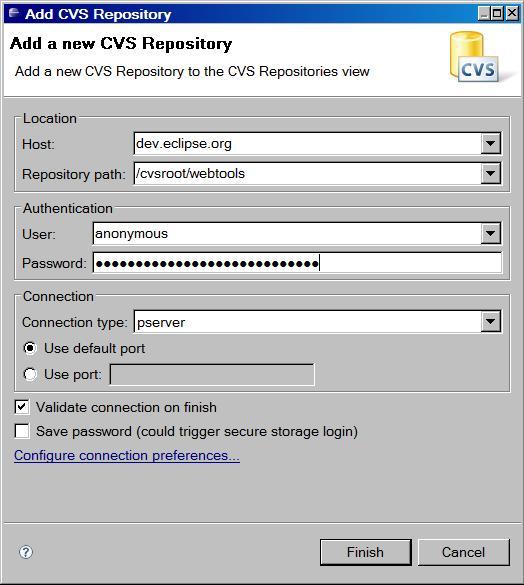
- In the Add CVS Repository dialog enter the following values and click on Finish:
- Host: dev.eclipse.org
- Repository Path: /cvsroot/webtools
- User: anonymous
- Password: <user's email>
- Navigate through the folders and find the plug-ins that you are interested in having the source for. The most recent code is in HEAD. The Web Tools Platform for working with servers plug-ins are found in the servertools folder.
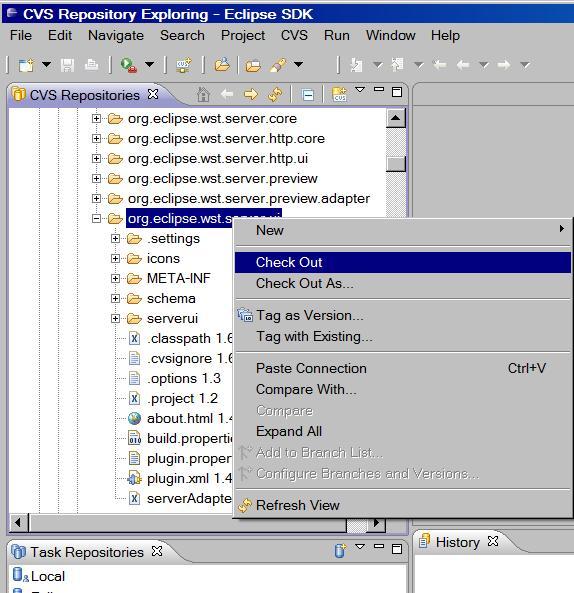
- For solving the problem previously defined one should look for the files to be checked out (e.g. HEAD->servertools->plugins->org.eclipse.wst.server.ui).
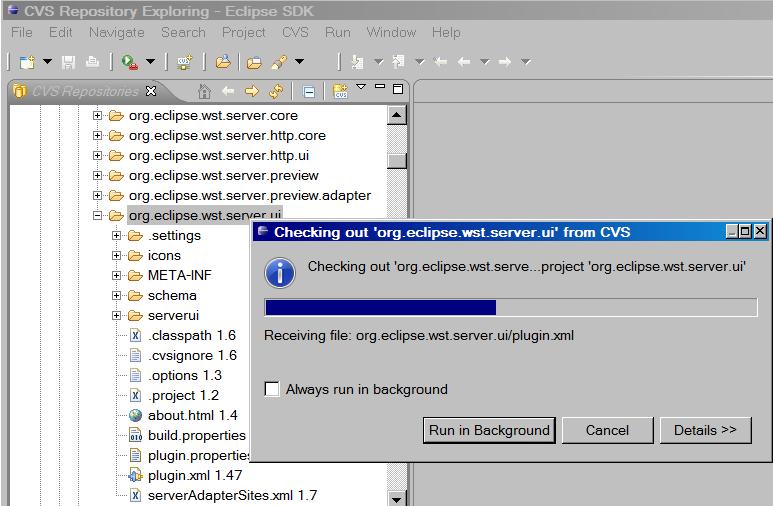
- Add the source into your local workspace by right clicking on that plug-in and selecting Check Out.
- The source code for the plug-in you downloaded is now in your workspace.
Set up Target Platform
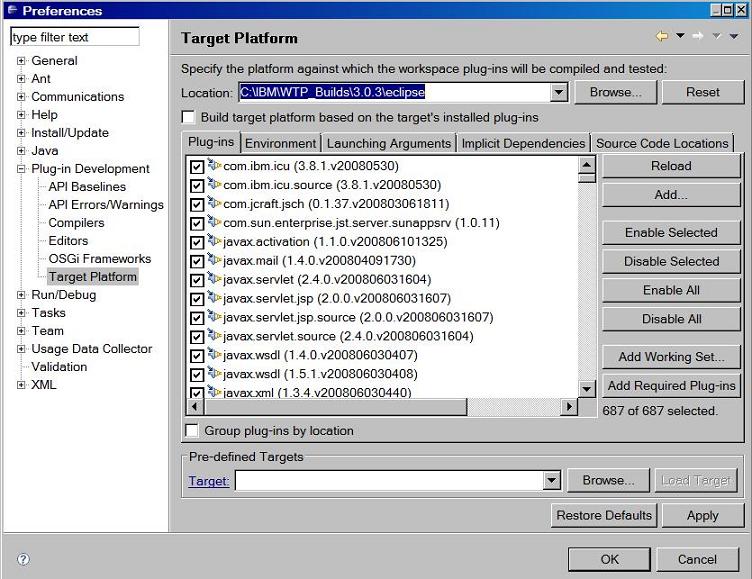
The specified target platform contains the eclipse plug-ins which your code will be compiled against. Having a target platform allows you to compile and run your modified code without having to bring all of the source code into your development workbench. The target platform should be the same platform you are developing for.
Following steps demonstrate how to set up your target platform:
- From your development workbench select Window > Preferences > Plug-in Development > Target Platform.
- Enter the location of the platform you wish to target.
Modify WTP Source Code
As an example, we are going to modify Tool Tip window content to include the date and time as required by the bug defined above.
- Change the perspective to Java perspective (Window > Open Perspective > Other and select Java).
- In the Java perspective, Package Explorer open the file ServerToolTip.java. org.eclipse.wst.server.ui->serverui->org.eclipse.wst.server.ui.internal that you just checked out.
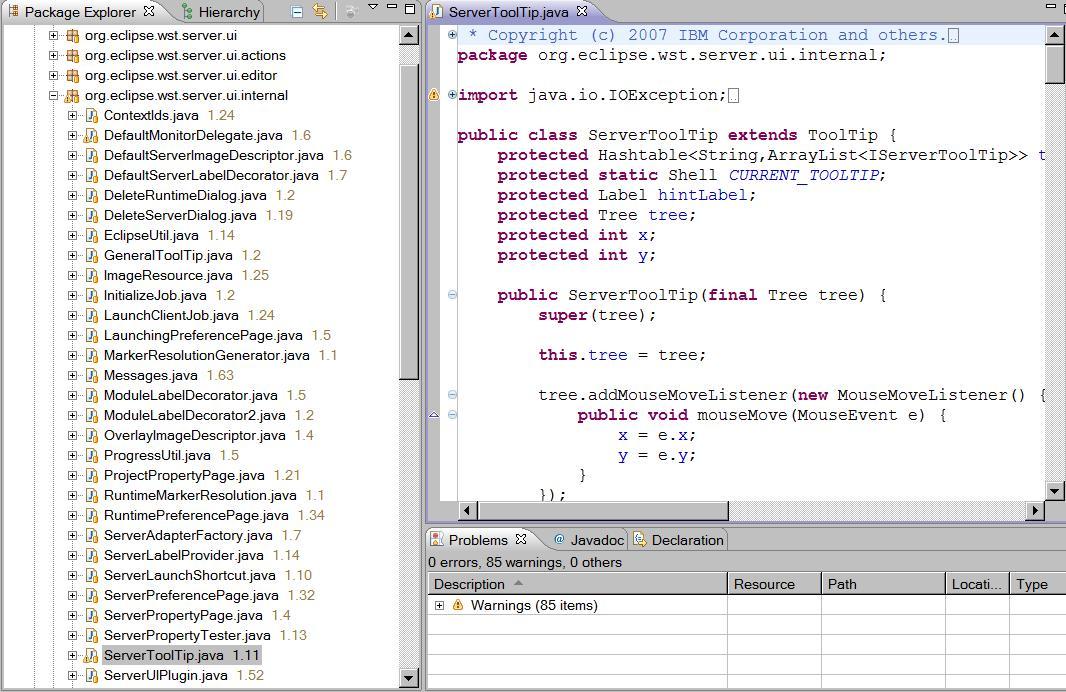
- Change the content of the file ServerToolTip.java for solving the problem previously defined. For example in our case:
- Add the line: import java.util.Date;
- In the method: protected Compsite createToolTipContentArea , add the following red line:
- font = new Font(display, fd);
- parent.addDisposeListener(new DisposeListener() {
- public void widgetDisposed(DisposeEvent e) { font.dispose(); } });
- hintLabel.setFont(font);
- sText.setText("" + new Date() + "");
- parseText(sText.getText(),sText);
- Save the file (or files) based on the changes required to solve your bug(s).
Run Modified Eclipse Web Application With New Code
- (a) Right click in the space the file you modified (i.e. ServerToolTip.java) or (b) use Run->Run Menu.
- (a) From the popup menu choose Run As->Run Configuration or (b) In the Run dialog select the Eclipse Application option, then select New.
- In the Run Configurations dialog enter the location of the desired workspace, and select Run. The location of the desire workspace is the directory on your system where you developed the simple Dynamic Web Project.
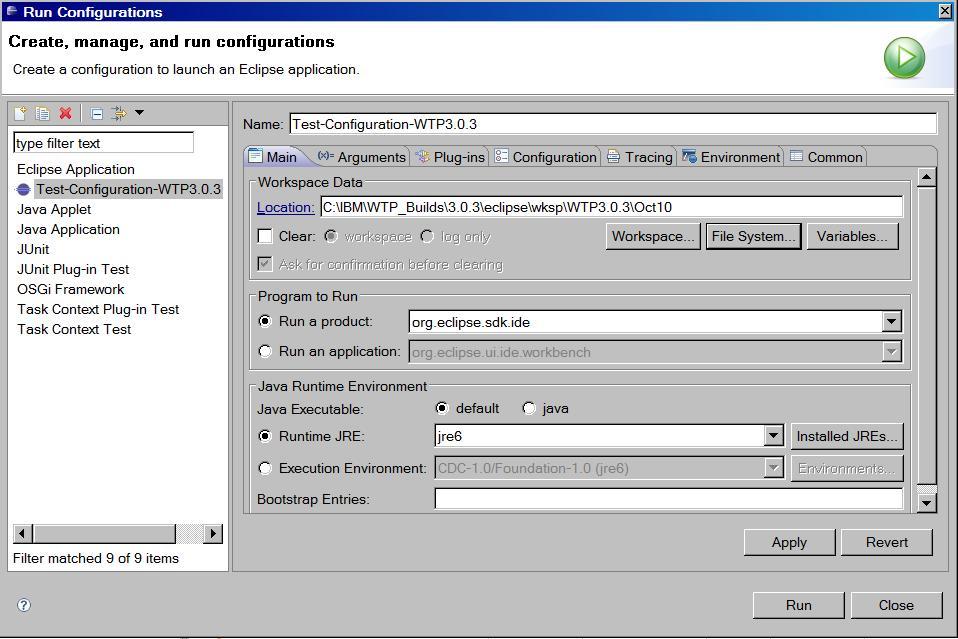
- When Eclipse runs it compiles the source code in your workspace, and starts the target platform. A second instance of Eclipse is now running and you are now able to test any code modifications you have made. Now test out your modification.
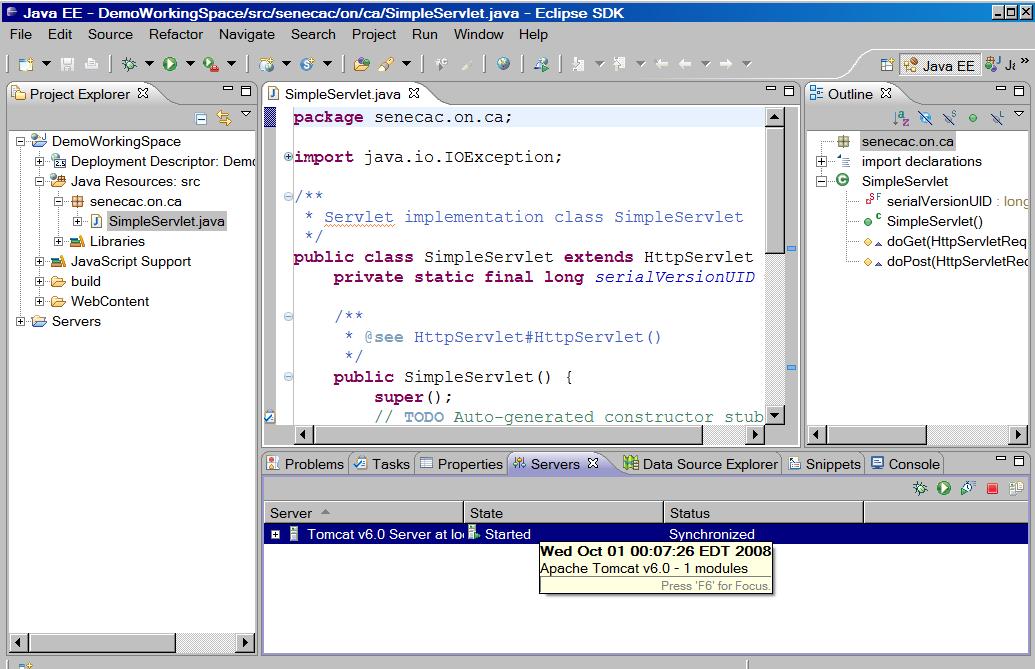
- The new Tool Tip window displays the date and time when it was created. Thus, our problem as previously defined is solved and the new code must be uploaded to CVS.
Create Patch With Source Code Changes - Submit Patch to WTP Project
To contribute an enhancement to WTP, one can submit the code changes as a patch. Before creating the patch one must synchronize the local state with the CVS source code state to ensure that the latest code was pulled in from the CVS repository (just in case someone else modified the code while they did their modifications).
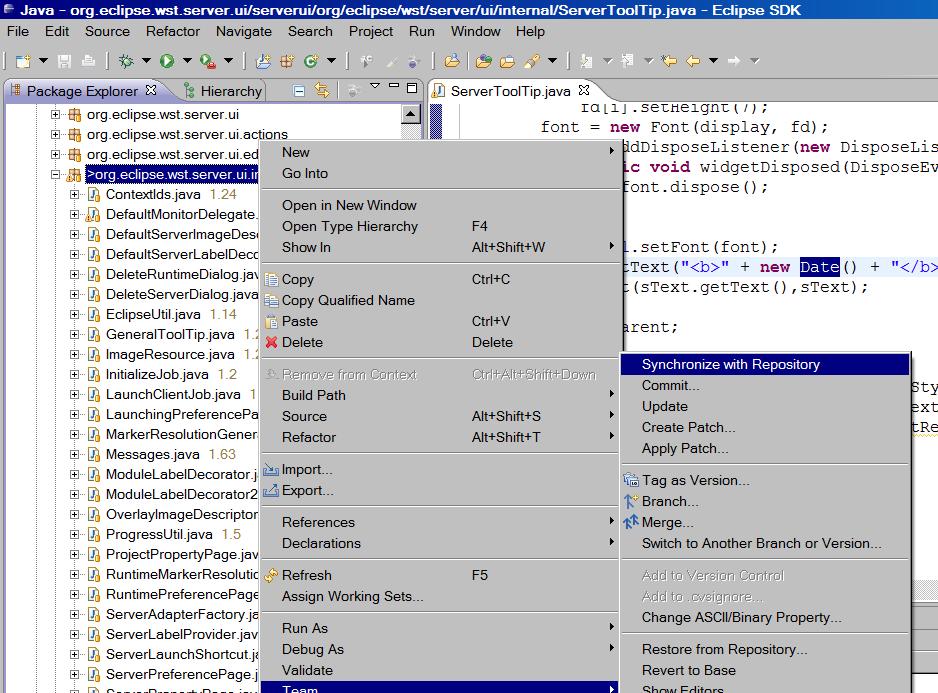
- In the Package Explorer view, right click on the modified plug-in project and select Team > Synchronize with Repository.
- To create the patch, in the Package Explorer view, right click on the modified plug-in project and select Team > Create Patch.
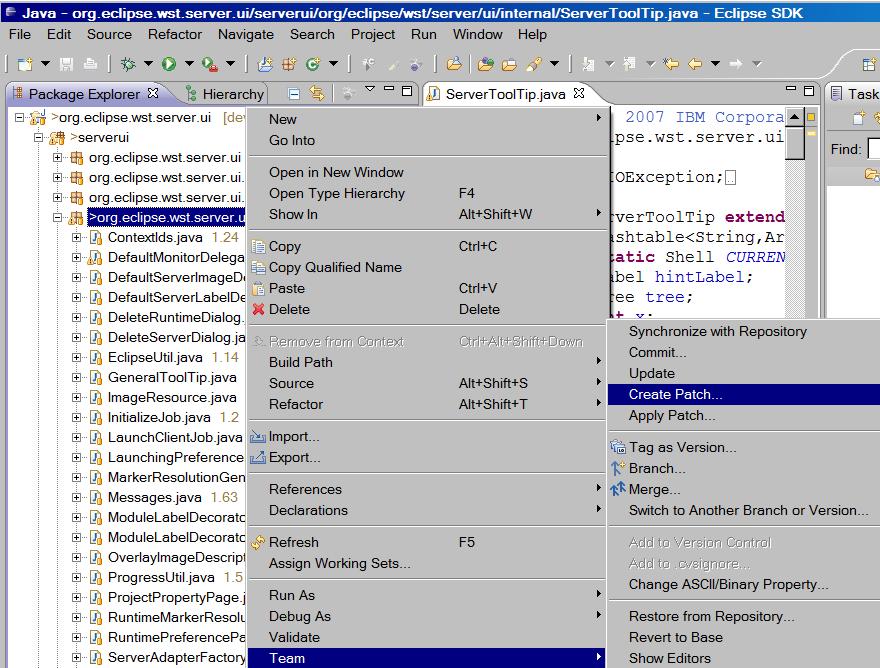
- Select Save in File System and enter the file name. Select Next.
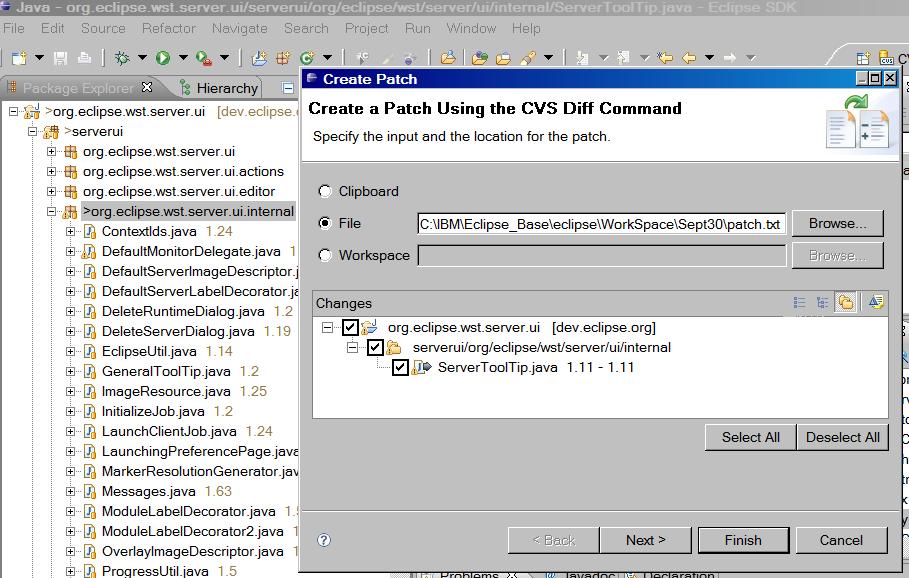
- Select Finish.
- The patch has been saved to your file system.
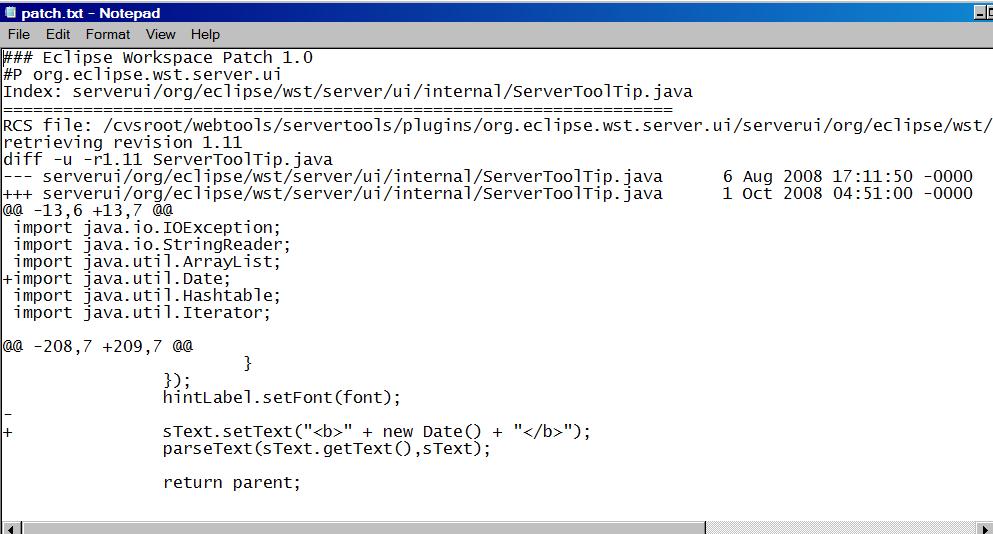
- If this were an actual feature enhancement the patch could be submitted to the webtools project using Bugzilla.
Summary
The tutorial is the first one from a series of WTP tutorials. In this tutorial one learned how to set up the Eclipse environment to start developing and maintaining Web Tools Platform plug-ins, by creating a simple addition to the user interface in th servertools part of WTP. The tutorial explained in details the procedure (i.e. the steps necessary) for setting up an Eclipse working environment for developing and maintaining WTP projects. (Please address any comments and suggestions at Jordan DOT Anastasiade AT gmail DOT com).