Image of
USB Device Containing the "Grabbed" work from all Workstation Accounts for
off-site printing and storage.
Purpose
The following sequence of steps, outlines how to transfer (or "grab") work from all Computer Lab workstations to the "Teacher" account unto a USB stick for off-site printing and storage.
This computer program was custom-created for the Westminster Computer Lab to make it easier for volunteer instructors to quickly obtain student work...
Procedures for "Grabbing" Student Work
NOTE: You are NOT required to power-on Workstations and log into student accounts to "grab" previously completed work on the student accounts...
FYI: Make certain to bring a USB device prior to running this program. SUGGESTION: It is common for people to buy USB devices that are designed to attach to your house keys, so you will always have your USB device...
YouTube Video
- If you want to see the visual steps to "Grabbing Student Work", here is a link to a customized YouTube video: http://www.youtube.com/watch?v=ftkDsCiwLUI
Written Instructions
- Below are the written instructions (in case you prefer to have a printout of these procedures):
- Start-up the computer server.
- Log into the Teacher account (on the server).
- Double-click the "Grab Work" icon that is located on the left-hand side of the Teacher account Desktop.
- If you are running this application for the first time during the computer session, you will be required to enter a password.
If you are prompted for a password, enter the same password that you used to log into the Teacher account.
- The first dialog box provides a brief purpose of the application. After reading the explanation, click OK or press ENTER to proceed.
- Another dialog box will ask you to plug in a USB device. You can plug your USB device at the front of the computer server (near the bottom).
NOTE: After a few moments, a folder window for your USB device will appear. Take the time to study the name (or label) of your USB device near the top of the folder window. Do NOT close this folder window, but instead minimize it, since you will want to verify the transfer (or "grabbing") of student work when the program is finished.
- Click OK or press ENTER to proceed to the next dialog box.
- You will then be prompted to select a storage device. Select the USB device that corresponds to the USB Device name you noted in Step #6, then click OK or press ENTER.
- When the next dialog box appears, you will be prompted for which accounts to "grab" work. Select the appropriate account(s), and then click OK.
- Once you have selected which accounts to grab the work, you must now select what type of work to grab. Select the application(s) to grab, and click OK or press ENTER.
NOTE: If you have select more than 1 category of account to grab work, you will be prompted each time for application to grab for each account category.
- After you select which types of applications to grab, then you will be given an option to remove the grabbed work. It is recommended to remove all grabbed work in order to save disk space.
NOTE:If the student work has not been completed during a session, you can select "NO" in order to backup, but leave in the computer account for future completion.
<li>When the program has finished, a final dialog box will appear to inform you that the grab has been completed. Click OK or press ENTER to end the program.
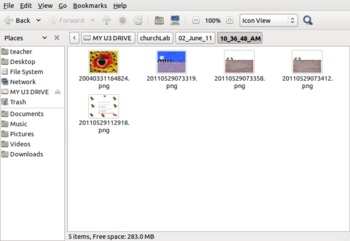
- Open the folder window (which was minimized in an earlier Step), and view the contents under the "churchLab" directory on your USB device. All work is date stamped, and further organised by a time-stamp directory (in case you are saving more than once in the same day...
- Safely remove your USB device from the computer. Your work should be backed up to your USB device.
|
|
NOTE: You need to take an AVIT Computer Lab Training Session prior to using the Teacher account. Upon completing the AVIT training session, you will be provided a password (along with a “Lab Manual”) for the Teacher account. You are NOT allowed to share this Teacher account password (or "Lab Manual) with any other individual.


