MAP524/DPS924 Lab 1
Contents
Lab 1: Build an Android App with Gradle
Due: in the lab period, need professor sign-off.
Part A: Setting up Android Studio on Linux
- Download the latest version of Android Studio.
- Unzip the file. You should get a directory named "android-studio".
- In a terminal step into the android-studio/bin directory and run the "studio.sh" script.
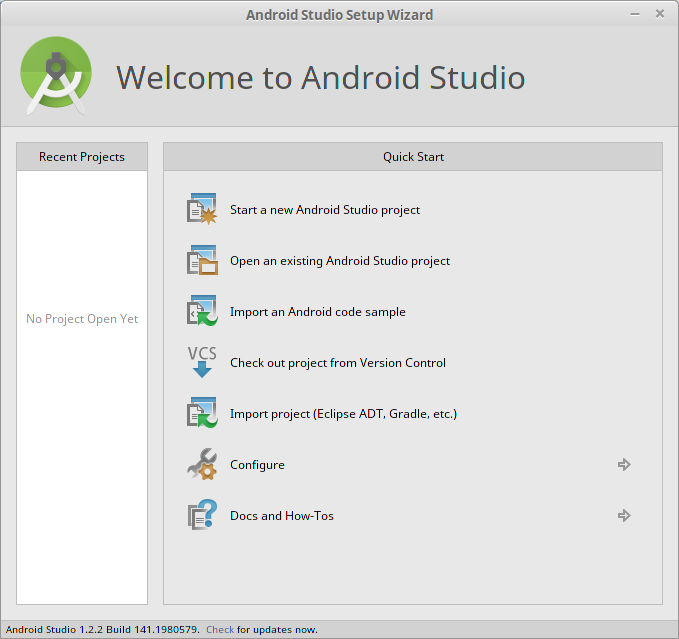
- Follow the instructions and install Android Studio. You should end up with something like this:
- At this point you should be able to install any updates, if there are any, by clicking "Check for updates" at the bottom of the window.
- You can now close Android Studio.
Part B: Configure your environment
- In a terminal window, edit your .bashrc file to set your PATH and other environment variables.
- You should now be able to run the gradle command without the ./ prefix. Try running this command to verify:
- Unless it complains it's not executable, use the "chmod +x " command to add execute permissions to that file.
- Try the following commands to ensure they work. If they don't then adjust your environment in step 1 or install missing software. Also read the output from the adb/android commands to get an idea of what they are used for:
java -version javac -version adb -h android -h
- We now need to create some basic source code so we can build it into an Android app. Use the mkdir command to create a source tree that looks like this (you can download the files you need here:
- Finally you'll need to create a Gradle build file inside your project directory. The name of this file is "build.gradle" and it looks like this:
- You can now use Gradle to build your app. Just run this command from inside your project directory.
- Before you move on to PART C, try "gradle --help" to see what else gradle can do. If the build was successful you can run the Bash tree command to get a bird's eye view of what files/directories were created by the build. Save this tree output, you'll need it for PART D of this lab.
export PATH=/home/$USER/android-studio/gradle/gradle-2.2.1/bin:$PATH:/home/$USER/Android/Sdk/tools:/home/$USER/Android/Sdk/platform-tools:/home/$USER/bin
export HISTTIMEFORMAT='%F %T '
export HISTSIZE=2000
gradle -h
.
├── build.gradle
├── local.properties
└── src
    └── main
        ├── AndroidManifest.xml
        ├── java
        │   └── org
        │       └── hello
        │           └── HelloActivity.java
        └── res
            ├── layout
            │   └── hello_layout.xml
            └── values
                └── strings.xml
buildscript {
    repositories {
        jcenter()
    }

    dependencies {
        classpath 'com.android.tools.build:gradle:1.0.0'
    }
}

apply plugin: 'com.android.application'

android {
    compileSdkVersion 22
    buildToolsVersion "22.0.1"

    defaultConfig {
           applicationId "org.hello"
           minSdkVersion 15
           targetSdkVersion 21
           versionCode 1
           versionName "1.0"
    }
}
gradle build
Part C: Start an Android Virtual Device (AVD) and install your app.
- Use this comand to list your virtual devices:
- If you used the default settings when setting up Android Studio - you should have one AVD already. You can now start your AVD with this command:
- If your AVD is too large on the screen you can use the scale option to make it smaller, like this:
- Finally, we can install our APK onto our AVD with this command:
- Now that our app is installed, we should be able to run it. Click on the app icon in the AVD to execute it.
- Modify your app by editing your HelloActivity.java file and change the text to be displayed to "Hello my name is Andrew Smith". You'll find your HelloActivity.java inside your project's java/org/hello folder.
- Back in your apps project directory rebuild your app as in step B7.
- Try to install the app using the adb command as in step C4. You should get an error message telling you that the app is already installed.
- Use this adb command to connect to your AVD:
- Now that you have a shell on the AVD you can list all installed packages using the pm command like this
- Use the pm command to remove your app. You'll have to use the full package name like this
- Exit the debug shell with the "exit" command or Ctrl+d.
- You can now repeat step C4 to install your package.
- Run your app to ensure it says "Hello my name is Andrew Smith" (but use your own name).
- Now take a screen shot of your running app with this command
- You can view the image file by using the Linux "display" command.
- When satisfied with using Android command line tools please move on to PART D of this lab.
android list avd
emulator -avd Nexus_5_API_22_x86 &
emulator -scale 0.4 -avd Nexus_5_API_22_x86
adb install build/outputs/apk/GradleProject-debug.apk
adb shell
pm list packages
pm uninstall org.hello
screenshot2 -e lab01.png
Part D: Wiki Account
Send an email to cdot-wiki-admin@senecacollege.ca asking that you have an account created for you on the wiki.
Part E: Submit
Make notes about what you learned in your labbook. Remember you can take your labbook with you to the test and exam, so write information in there that will help you answer questions related to this week's material.
When you're done - call me over and I will:
- Check your labbok for notes.
- Ask you some questions to make sure you understood the material this week.
- Look at your GradleProject files.
- See your GradleProject running in the emulator (or a real phone).
- Sign the front of your labbook for this lab.
