Difference between revisions of "Tutorial 1 - Using Your Matrix Account"
(→INVESTIGATION 1: ACCESSING YOUR MATRIX LINUX ACCOUNT) |
(→INVESTIGATION 1: ACCESSING YOUR MATRIX LINUX ACCOUNT) |
||
| Line 101: | Line 101: | ||
= INVESTIGATION 1: ACCESSING YOUR MATRIX LINUX ACCOUNT = | = INVESTIGATION 1: ACCESSING YOUR MATRIX LINUX ACCOUNT = | ||
| − | <span style="color:red;">'''ATTENTION''': The due date for successfully completing this tutorial (i.e. tutorial 1) is by Friday, November 5th | + | <span style="color:red;">'''ATTENTION''': The due date for successfully completing this tutorial (i.e. tutorial 1) is by Friday, November 5th at midnight (Week 8).</span><br><br> |
In this investigation, you will learn how to connect and login to your Matrix account by issuing a command from your computer's text-based terminal<br>and/or by downloading, installing a running a graphical Windows SSH graphical application. | In this investigation, you will learn how to connect and login to your Matrix account by issuing a command from your computer's text-based terminal<br>and/or by downloading, installing a running a graphical Windows SSH graphical application. | ||
Revision as of 15:33, 30 August 2021
Contents
USING YOUR MATRIX ACCOUNT
Main Objectives of this Tutorial
- Learn how to access your Matrix server account from a remote computer.
- Learn several ways to exit your Matrix Linux Account session.
- Understand the Linux command structure and how to get help with Linux command usage.
- Become efficient with Linux command line editing by using short-cut keys.
- Issue a checking program (i.e. Shell Script) to confirm that you accessed your Matrix account.
- Perform LINUX PRACTICE QUESTIONS for additional practice
Tutorial Reference Material
| Course Notes / Software |
Linux Command/Shortcut Reference | ||
| Slides:Windows SSH client Software: | Matrix Account Access
Command Line Editing |
General Linux Commands | |
KEY CONCEPTS
Purpose of Having a Matrix Linux Server Account
While attending Seneca College, you will be using many different computer systems. Some of these servers include:
| my.senecacollege.ca | Learning Content Management System (Link to Resources / Student Grades / Online Quizzes) |
| ict.senecacollege.ca | Course website for same material as ULI101 WIKI (see below) |
| wiki.cdot.senecacollege.ca | Student Notes / Tutorials / Practice Questions / Resources |
| matrix.senecacollege.ca | Linux Account for "hands-on Practice" and Assignment submission |
Although you need to study concepts (slides) throughout this course, you will also need to get hands-on practice running Linux commands as well as performing and submitting online.
This requires that you connect to a Linux server and become comfortable with issuing Linux commands.
In Unix/Linux, a shell is simply an interface to allow a user to communicate with the Linux computer system (server). Linux shells have evolved (improved) over a period of time. You will be using the Bash Shell which is considered to be user-friendly. By understanding how to issue Linux commands, you can create a file that contains Linux commands (called a shell script) later in this course to automate tasks to make you a more productive Linux user and system administrator.
Layout of the Matrix Linux Server
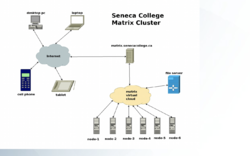
The Matrix server consists of several computers connected together to form a cluster.
A Linux cluster is a cost effective alternative to buying larger servers.
All registered students in this course should have an account on the Matrix server.
You will be using this account for the following reasons:
- Issuing Linux commands
- Becoming productive using the Linux command prompt (shell)
- Performing Linux Practice Tutorials (12)
- Performing Linux Practice Questions
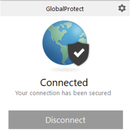
Connecting to the Seneca GlobalProtect Student VPN
Seneca College is "rolling-out" additional measures to improve network security. One of these measures is to implement multi-factored authentication. As of September 2020, all Seneca College students are required to connect to the Seneca GlobalProtect Student VPN in order to be able to connect to their Matrix Linux account.
Multi-factor authentication is an electronic authentication method in which a computer user is granted access to a website or application only after successfully presenting two or more pieces of evidence (or factors) to an authentication mechanism: knowledge (something the user and only the user knows). Reference: https://en.wikipedia.org/wiki/Multi-factor_authentication
You should have received an email message (also available in course announcements) regarding how to setup your Smart Phone to connect and valid via the Seneca GlobalProtect Student VPN. NOTE: If you haven't done this yet, please perform the steps provided in the following link:
https://employees.senecacollege.ca/spaces/77/it-services/wiki/view/3722/student-vpn
In the next investigation, you will learn how to connect to and login to your Matrix server account from a remote computer
such as your home desktop computer, laptop or tablet computer.
Connecting to Your Matrix Account
After connecting to the Seneca GlobalProtect Student VPN, you can open a command terminal
in your Newer Windows 10, Mac or Linux computer and issue the following command:
ssh senecauserid@matrix.senecacollege.ca
You can also click on the following link to download and install a graphical SSH application for your Windows machine:
http://www.sfsu.edu/ftp/win/ssh/SSHSecureShellClient-3.2.9.exe
INVESTIGATION 1: ACCESSING YOUR MATRIX LINUX ACCOUNT
ATTENTION: The due date for successfully completing this tutorial (i.e. tutorial 1) is by Friday, November 5th at midnight (Week 8).
In this investigation, you will learn how to connect and login to your Matrix account by issuing a command from your computer's text-based terminal
and/or by downloading, installing a running a graphical Windows SSH graphical application.
CONNECTING TO YOUR MATRIX ACCOUNT FROM A COMMAND LINE TERMINAL
You will now learn a quick and simple method of connecting to your Matrix account by opening
a text-based terminal (in any OS) and issuing the ssh command.
Perform the Following Steps:
- Before proceeding, make certain that your Seneca GlobalProtect Student VPN is connected.
If you haven't set this up, refer to the following link for instructions;
https://employees.senecacollege.ca/spaces/77/it-services/wiki/view/3722/student-vpn
NOTE: You only have to connect to your Seneca GlobalProtect student VPN once during the day,
or while you are logged into your computer. - Determine which operating system that your computer is using.
- Try connecting to your Matrix account using the instructions in the table below based on your current operating system.
| Newer Version of Windows 10: | MacOSX: | Linux: |
|---|---|---|
|
|
|
- When connecting securely for the first time, a dialog box will appear to share a "public key" with your Matrix account in order to make your interaction between your workstation and the remote Linux server secure within the network (i.e. encrypted to prevent unauthorized access by other users)
FYI: To make communications over a network secure, a computer generates two keys: a private key that is kept on the computer, and a public key, which can be shared with other computers. Transmissions from your computer uses the private key to encrypt (scramble) transmission to the remote computer, which in turn, uses the public key to decrypt (unscramble) the transmission. Likewise, the remote computer uses the public key to encrypt (scramble) transmissions and your computer uses the private key to decrypt (unscramble) those transmissions. - Type yes and press ENTER to share your public key.
Next, a dialog box will appear prompting you for your Matrix account password in order to gain entry to your Matrix account.
Your Matrix password is identical to your Seneca password. As you type the password, the text will be blocked-out or hidden
to prevent others from viewing the screen to obtain your password - Enter your Seneca password and press ENTER
- You mis-spelled the name of the server
- You mis-spelled your Matrix username (same username that you connect to my.senecacollege.ca)
- You have CAPS LOCK on by mistake (your username should be lowercase only).
- You mis-spelled your password (same password that you connect to my.senecacollege.ca)
If you continue to experience the same problems, click on the following link for IT service desk contact info:
IT service desk. - If you entered your password correctly, the Matrix Linux shell should appear where you can enter Linux commands.
The Matrix server has been configured to allow users to only interact with the Linux OS by issuing commands.
The main reason for this is to force students to learn how to issue Linux commands. - To exit your Matrix session, type the command exit followed by ENTER
NOTE: You should notice that you are returned to the original command prompt where you issued the ssh command. - Type the same command at the command terminal prompt: exit followed by ENTER
NOTE: You should notice that the you are disconnected and that the original terminal window has automatically closed. - Try accessing your Matrix account, and then exiting your Matrix account several times to become familiar with this process.
You will now learn an alternative method to access your Matrix account (if you have an MS Windows machine)
by downloading and running a graphical SSH application.
CONNECTING TO YOUR MATRIX ACCOUNT FROM A GRAPHICAL WINDOWS APPLICATION
You can also install and run a free MS Windows graphical SSH application in order to connect to your Matrix account.
You may find it useful when running a graphical SSH application to copy and paste text. There are several applications
that you can download and install, but we will be using the SSH Secure Shell Client application for this tutorial.
Perform the Following Steps:
- Click the following link to download and install the free SSH Secure Shell application on your Windows computer:
http://www.sfsu.edu/ftp/win/ssh/SSHSecureShellClient-3.2.9.exe
NOTE: If you can't download or run this link, check to see if you computer allows downloads from this site. - After the application has been installed, an application icon should appear on your desktop.
Double click the SSH Secure Shell Client application icon to run this application.
The main SSH Client window will appear. Let's learn how to connect to and login to our Matrix account using this graphical SSH application. - Click the Quick Connect button.
NOTE: The Connect dialog box allows the user to specify the server name and your account name to allow you to connect to the server. - Click on the textbox labelled Hostname and type the text: matrix.senecacollege.ca
NOTE: You can use the hostname matrix if you are at Seneca college.
If you where located outside Seneca's network, then you would need to enter
the full domain name: matrix.senecacollege.ca
You will be using the latter hostname since you will be connecting to your Matrix account remotely
and not within the college. - Click on the textbox labelled User Name and type your Seneca username (i.e. same as your Seneca userid).
- Click the Connect button.
- When connecting securely for the first time, a dialog box will appear to share a "public key" with your Matrix account in order to make your interaction between your workstation and the remote Linux server secure within the network (i.e. encrypted to prevent unauthorized access by other users).
- Click the Yes button to share your public key.
NOTE: In subsequent logins to your Matrix account, you may experience a welcome dialog box - simply click OK to proceed. - Next, a dialog box will appear prompting you for your Matrix account password in order to gain entry to your Matrix account. Your Matrix password is identical to your Seneca password. As you type the password, the text will be blocked-out or hidden to prevent others from viewing the screen to obtain your password
- Enter your password and click OK.
- Click OK at the Authentication Response dialog box.
NOTE: If you encounter an error message, this can occur for several reasons:- You mis-spelled the name of the server
- You mis-spelled your Matrix username (same username that you connect to my.senecacollege.ca)
- You have CAPS LOCK on by mistake (your username should be lowercase only).
- You mis-spelled your password (same password that you connect to my.senecacollege.ca)
If you continue to experience the same problems,
click on the following link for IT service desk contact info: IT service desk. - If you followed the login steps correctly, the SSH Linux shell should appear where you enter Linux commands.
The Matrix server has been configured to allow users to only interact with the Linux OS by issuing commands. There are various reasons for this, but the main 2 reasons are to force students to learn how to issue Linux commands as well as limitations to remote access to a graphical Linux server due to large number of users (students).
Configuring your Graphical Windows SSH Application
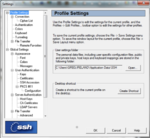
You can configure your Windows graphical SSH application to adjust elements such astext font type and text font size.
We will now show you how to configure just your SSH Secure Shell Client application,
(FYI: other SSH applications available in the Week 1 reference section also have the ability to configure settings).
Perform the Following Steps:
- Click on the Edit menu item, and then select Settings in the Edit drop-down menu.
- To change the font size, under the Global Settings section, click Font
- Select a larger font size and click OK
- You now should notice that you have customized your SSH shell terminal. You can use the settings screen
to also change your background and text colours if you are interested in doing so. - Try moving your mouse pointer to the bottom right-hand corner of the SSH application window,
then click and drag outwards to make the application window larger. - To exit your Matrix session, type the command exit followed by ENTER
NOTE: You should notice that the colour of the text changes slightly when disconnected
and you are unable to issue Linux commands from that window. - After you have disconnected from your account, close the SSH Secure Shell Client application window.
NOTE: You are STRONGLY ADVISED to use the exit command to properly terminate your Matrix session
PRIOR to closing the SSH or terminal application window!
In the next investigation, you will learn how to issue Linux commands, issue a checking program to confirm that you logged into your Matrix account, and how to setup and perform the first two sections of the online ULI101 assignment #1.


