|
|
| Line 100: |
Line 100: |
| | # If there is a kernel update, reboot your system. (There usually is on a first update after OS installation.) | | # If there is a kernel update, reboot your system. (There usually is on a first update after OS installation.) |
| | | | |
| − | = INVESTIGATION 3: Using Shell Scripting to Generate System Information Reports = | + | = INVESTIGATION 3: RUNNING YOUR ONLINE ASSIGNMENT 1 = |
| − | {|width="40%" align="right" cellpadding="10"
| |
| − | |- valign="top"
| |
| − | |
| |
| − | {{Admon/note|Bash Shell Scripting Reference Guide:|<br>'''<u>She-bang Line</u>'''<ul><li>Forces shell script to run in a specific Shell</li><li>Must be at beginning of first line (eg. '''#!/bin/bash''')<br><br></li></ul>'''<u>Variables</u>'''<blockquote>'''Environment'''<ul><li>System-wide or "global" variable</li><li>Usually appear in UPPERCASE letters</li><li>Can view with command: '''set | more'''</li><li>'''$''' in front to expand variable to value<li>Examples: '''USER''', '''PATH''', '''HOME''', '''SHELL'''</li></ul></blockquote><blockquote>'''User-defined''' <ul><li>Variable created by user (command line, scripting)</li><li>Examples:<br>''myVar="my value"; readonly myVar; export myVar''<br>''read -p "enter value: " myVar''</li></ul></blockquote><blockquote>'''Positional parameters'''<ul><li>Assign values with set command or shell script arguments</li><li>These variables are numbered (eg. $1, $2 ... $10}</li><li>Special parameters: $*, $@, $#, $$, $?<br></li></ul></blockquote>'''<u>Command Substitution</u>'''<ul><li>Useful method to expand output from a command to be used as an argument for another command.</li><li>Examples:<br>''file $(ls)''<br>''set $(ls);echo $#;echo $*''<br>''echo "hostname: $(hostname)"''<br><br></li></ul>'''<u>if / elif / else statements</u>'''<ul><li>If a command runs (even pipeline command like to grep to match) will be true (0); otherwise, false (non-zero), thus can use with logic statements.</li>Example:<br>''if echo $myVar | grep "match"''<br>''then''<br>''echo "Match"''<br>''fi''<br></li><li>The '''test''' command is used to test conditions. Square brackets '''[ ]''' is short-cut for test command (args contained inside with spaces). The '''exit''' command can be used to terminate the shell script with a false value.<br>Example:<br>''if [ $USER = "root" ]''<br>''then''<br> ''echo "You must be root" ''<br> ''exit1''<br>''fi''<br></li><li>For numberic comparison, use the '''test options''': '''-gt''','''-ge''', '''-lt''', '''-le''', '''-eq''', '''-ne'''<br>Example:<br>''if [ $grade -gt 79 ]''<br>''then''<br> ''echo "You get Good Mark"''<br>''elif [ $grade -gt 49 ]''<br>''then''<br> ''echo "You pass"''<br>''else''<br> ''echo "You fail"''<br>''fi''<br></li><li>For testing for file information, you can use '''-d''' to test if directory pathname exists, and '''-f''' if the file pathname exists. You can use '''!''' for negation.<br>Examples:<br>''if [ -d directory-pathname ]''<br>''then''<br> ''echo "directory exists"''<br>''fi''<br><br>''if [ ! - f file-pathname ]''<br>''then''<br> ''echo "File does not exist"''<br>''fi''</li></ul>}}
| |
| − | |}
| |
| | | | |
| | | | |
| − | It is very common for System Administrators to keep records regarding their installed computer systems. For example, it is necessary to have a record of all the hardware information for each machine in order to help fix computer hardware problems, and to assist when purchasing additional consistent computer hardware.
| + | x |
| − | | |
| − | Therefore, it makes sense to also have a record of the installed computer software as well. This can contain information regarding the Linux operating system, installed software, and network connectivity information.
| |
| | | | |
| | | | |
| Line 119: |
Line 112: |
| | # Make certain to '''<u>record output</u>''' from these commands (except for the '''ps -ef''' output) in your lab1 logbook. | | # Make certain to '''<u>record output</u>''' from these commands (except for the '''ps -ef''' output) in your lab1 logbook. |
| | | | |
| − | | + | x |
| − | <table cellspacing="0" cellpadding="5" width="50%" style="border-top: thin solid black;margin-left:60px;">
| |
| − | <caption>'''Linux/Unix System Information Utilities'''</caption>
| |
| − | <tr valign="top>
| |
| − | | |
| − | <td style="border-bottom: thin solid black;font-weight:bold;background-color:#ffffff;">Command(s)</td>
| |
| − | <td style="border-bottom: thin solid black;font-weight:bold;background-color:#ffffff;">Purpose</td>
| |
| − | </tr>
| |
| − | <tr valign="top">
| |
| − | <td width="20%" style="border-bottom: thin solid black;"><b><code><span style="color:#3366CC;font-size:1.2em;">uname -rv</span></code></b><br><b><code><span style="color:#3366CC;font-size:1.2em;">hostname</span></code></b><br><b><code><span style="color:#3366CC;font-size:1.2em;">ps -ef</span></code></b></td>
| |
| − | <td width="20%" style="border-bottom: thin solid black;">Basic Linux OS information such as '''kernel''' version, '''host-name''' of Linux server, and all '''processes''' that are running on the system after installation.</td>
| |
| − | </tr>
| |
| − | <tr valign="top">
| |
| − | <td width="20%" style="border-bottom: thin solid black;"><b><code><span style="color:#3366CC;font-size:1.2em;">rpm -q -a | wc -l'''</span></code></b><br><b><code><span style="color:#3366CC;font-size:1.2em;">rpm -q -a -l | wc -l'''</span></code></b><br><b><code><span style=" pointer-events:none;cursor:default;color:#3366CC;font-size:1.2em;">rpm -q -l gedit | wc -l</span></code></b></td>
| |
| − | <td width="20%" style="border-bottom: thin solid black;">Obtain number of installed packages in the rpm database. Option '''-q''' is to "query" information, option '''-a''' means for all installed packages, option '''-l''' means all files installed as opposed to just the application.</td>
| |
| − | </tr>
| |
| − | | |
| − | <tr valign="top">
| |
| − | <td width="20%" style="border-bottom: thin solid black;"><b><code><span style="pointer-events: none;cursor: default;color:#3366CC;font-size:1.2em;">ifconfig</span></code></b><br><b><code><span style="pointer-events: none;cursor: default;color:#3366CC;font-size:1.2em;">route -n</span></code></b><br><b><code><span style="pointer-events: none;cursor: default;color:#3366CC;font-size:1.2em;">nslookup</span> (at prompt, enter command: server) </code></b></td>
| |
| − | <td width="20%" style="border-bottom: thin solid black;">Obtain network connectivity confirmation including: '''IP ADDRESS''', '''Netmask''', '''routing''' (default gateway), and the default '''Domain Name Server'''.</td>
| |
| − | </tr>
| |
| − | </table>
| |
| − | | |
| − | | |
| − | :You may have learned about creating and running Bash Shell Scripts in your ULI101 course. Shell scripts help Linux users and system administrators to automate repetitive tasks to become more efficient and to help them save time. You will be reviewing and building a basic Bash Shell script to generate information reports for your newly-installed Linux host machine.
| |
| − | | |
| − | | |
| − | <ol><li value="4">Refer to the Bash Shell Scripting Guide prior to proceeding with this section. As you continue, you are required to make Bash Shell scripting notes in your lab1 logbook.</li>
| |
| − | <li>Create a directory called bin in your root home directory to store your shell scripts by issuing the command:<br><b><code><span style="color:#3366CC;font-size:1.2em;">mkdir /root/bin</span></code></b></li>
| |
| − | <li>Change to that newly-created '''bin''' directory</li>
| |
| − | </ol>
| |
| − | | |
| − | | |
| − | :'''NOTE:''' Although it is possible to copy and paste, is it highly recommended to manually enter the following Bash Shell scripting content to become familiar with writing Bash Shell scripting code. Remember: you will be required to create a Bash Shell script on your final exam, so you need the practice!
| |
| − | | |
| − | | |
| − | <ol>
| |
| − | <li value="7">Launch a text editor (such as <b><code><span style="color:#3366CC;font-size:1.2em;">vim</span></code></b> or <b><code><span style="color:#3366CC;font-size:1.2em;">nano</span></code></b>) to create a Bash Shell script called: <b><code><span style="color:#3366CC;font-size:1.2em;">myreport.bash</span></code></b> in your current directory.</li>
| |
| − | <li>Copy and paste the text below into your vi editing session for your file report.bash<br> (how do you copy and paste efficiently in Linux?)<br></li></ol>
| |
| − | | |
| − | <code style="color:#3366CC;font-family:courier;font-size:.9em;margin-left:20px;font-weight:bold;">
| |
| − | <br>
| |
| − | #!/bin/bash<br>
| |
| − | <br>
| |
| − | # Author: *** INSERT YOUR NAME ***<br>
| |
| − | # Date: *** CURRENT DATE ***<br>
| |
| − | #<br>
| |
| − | # Purpose: Creates system info report<br>
| |
| − | #<br># USAGE: ./myreport.bash<br>
| |
| − | <br>
| |
| − | if [ $USER != "root" ] # only runs if logged in as root<br>
| |
| − | then<br> echo "You must be logged in as root." >&2<br>
| |
| − | exit 1<br>
| |
| − | fi<br>
| |
| − | </code>
| |
| − | <br>
| |
| − | <ol><li value="9">Save your editing session, assign the '''myreport.bash''' file read and execute permissions (at least for the owner) and run by typing:<br><b><code><span style="color:#3366CC;font-size:1.2em;">./myreport.bash</span></code></b></li><li> Did it work?</li><li>Reopen your text-editing session for '''/root/bin/myreport.bash''' and add the following lines of code to the bottom of the shell script file:</ol>
| |
| − | <br>
| |
| − | <code style="color:#3366CC;font-family:courier;font-size:.9em;font-weight:bold;">
| |
| − | # Create report title<br>
| |
| − | <br>
| |
| − | echo "SYSTEM REPORT" > /root/report.txt<br>
| |
| − | echo "Date: $(date +'%A %B %d, %Y (%H:%M:%p)')" >> /root/report.txt<br>
| |
| − | echo >> /root/report.txt<br>
| |
| − | </code>
| |
| − | <br>
| |
| − | <ol><li value="8">Save and run the bash shell script. View the contents of the file called '''report.txt''' that was generated (I hope you are using the up arrow key to issue previously issued commands in order to save time!). Notice how the redirection symbol > is used at the beginning of the report, and then the other redirection symbol >> is used to help "grow" the report with the other content.</li><li>The only remaining content of the report would be the system information. We can use a shell scripting trick called "command substitution" $( .. ) in order place results from an command to be used by another command (like echo). Re-edit the shell script and add the following code at the bottom of the shell script file:</li></ol>
| |
| − | <br>
| |
| − | <code style="color:#3366CC;font-family:courier;font-size:.9em;font-weight:bold;">
| |
| − | echo "Hostname: $(hostname)" >> /root/report.txt<br>
| |
| − | echo >> /root/report.txt<br>
| |
| − | echo "Kernel Version: $(uname -rv)" >> /root/report.txt<br>
| |
| − | echo >> /root/report.txt<br>
| |
| − | </code>
| |
| − | <br>
| |
| − | <ol><li value="10">Save, run the script, and view the ''report.txt'' contents (are you using tip that was given to save time?).</li><li>Edit the shell script and include output from the <b><code><span style="color:#3366CC;font-size:1.2em;">ps aux</span></code></b> and <b><code><span style="color:#3366CC;font-size:1.2em;">ifconfig</span></code></b> commands (with appropriate titles). Remember to redirect that output to add to the bottom of the file!</li><li>Save, run and confirm that the shell script is working correctly.</li><li>What would be the use of keeping this shell script as a Linux system administrator?</li></ol>
| |
| − | <ol><li value="14">Here are some more "complex" Bash Shell scripts, that perform the same task. Although you are not require to understand some of these other tricks, it is recommended that you view the contents of the scripts and save them for future consideration or examples.</li><li>The <b><code>wget</code></b> command can be used to quickly download files from the Internet. Issue the following command:<br><b><code><span style="pointer-events: none;cursor: default;color:#3366CC;font-size:1.2em;">wget https://ict.senecacollege.ca/~ops235/labs/text-report.bash</span></code></b></li><li>Verify that the file '''text-report.bash''' was downloaded to your current directory.</li><li>Assign read and execute permissions for this file by issuing the command: <b><code><span style="color:#3366CC;font-size:1.2em;">chmod u+rx text-report.bash</span></code></b></li><li>Run this Bash Shell script by issuing the command: <b><code><span style="color:#3366CC;font-size:1.2em;">./text-report.bash</span></code></b></li><li>Check to see if it created a report in your current directory. What is the purpose of the report?</li><li>Use the <b>vi</b> text editor to view the contents of the file <b>text-report.bash</b>. Can you understand how this script works?<br><br></li><li>Use the <b><code>wget</code></b> command to download, study, and run the following shell scripts on-line:<br><b><code><span style=" pointer-events:none;cursor:default;color:#3366CC;font-size:1.2em;">https://ict.senecacollege.ca/~ops235/labs/report.bash<br> https://ict.senecacollege.ca/~ops235/labs/report3.bash</span></code></b><br><br></li><li>Try to understand what these Bash Shell scripts do.</li><li>You have completed lab1. Proceed to Completing The Lab, and follow the instructions for "lab sign-off".</li></ol>
| |
| − | | |
| − | '''Answer Investigation 2 observations (all parts and questions) in your lab log book.'''
| |
| | | | |
| | = LAB 1 SIGN-OFF (SHOW INSTRUCTOR) = | | = LAB 1 SIGN-OFF (SHOW INSTRUCTOR) = |
LEARNING ABOUT YOUR MATRIX SERVER ACCOUNT
Main Objectives of this Practice Tutorial
- Understand the purpose of the Matrix server and the advantages of combining Linux servers to form a cluster.
- List the steps to connect to your Matrix server account in the computer labs at Seneca College.
- List the steps to connect to your Matrix server account from a computer outside of Seneca College.
- Working with the Linux Command Prompt (Linux shell)
- Changing your Matrix Account Password
- Exiting your Matrix Linux Account
- Performing Review Questions for Additional Practice
Purpose of Having a Matrix Account

A
shell is simply an interface / interpreter to allow a user to communicate with the Linux computer system.
Although you need to study concepts throughout this course, you will also need to learn to issue and memorize simple as well as more advanced Linux commands. This requires that you practice issuing Linux commands on a frequent basis to become more comfortable when working the Unix and Linux command-line environments.
Just like with other operating systems like MS Windows, it is important to learn how to open a command prompt in order to issue Linux commands to perform common Linux OS tasks. In Unix/Linux, a shell is simply an interface / interpreter to allow a user to communicate with the Linux computer system (server). Linux shells have evolved (improved) over a period of time. You will be using the Bash Shell which is considered to be user-friendly.
The Matrix server has been configured to allow users to only interact with the Linux OS by issuing commands. There are various reasons for this, but the main 2 reasons are to force students to learn how to issue Linux commands as well as limitations to remote access to a graphical Linux server due to large number of users (students).
Later in the course, your instructor may discuss other ways of accessing graphical versions of Linux, and how to launch a shell terminal.
Layout of the Matrix Server

The Matrix server consists of several Virtual Computers all connected together to form a
cluster. A cluster is a cost effective alternative to larger servers.
The Matrix server consists of several Virtual Computers connected together to form a cluster. A cluster is a cost effective alternative to buying larger servers.
All registered students in this course have access to an account on the Matrix server.
You will be using this account for the following reasons:
- Issuing Linux commands
- Becoming productive using the Linux command prompt (shell)
- Performing Linux Practice Tutorials
- Performing Linux Assignments (3)
- Practice Issuing Linux Command Review Questions
In the next section, you will learn how to connect to and login to your Matrix server account both at the college and from a remote computer such as your home computer or your laptop computer.
INVESTIGATION 1: ACCESSING YOUR MATRIX LINUX ACCOUNT
In this section, you will learn how to access your Matrix Linux account by two different methods:
- From within a workstation within a Seneca College lab
- From your own computer within or outside Seneca College
Part 1: Accessing your Matrix Account from a Seneca College Lab
x
- Perform the Following Steps:
- Although the images may be a little out of date (i.e. not exact), you can refer to this listing of installation screenshots for general reference:
[installation screen-shots ]
- Power up the computer in your Seneca lab in Windows.
x
Part 2: Access your Matrix Account From your own computer within or outside Seneca College
x
- Perform the following steps:
- Select from the installation menu: Install CentOS 7.
- Next, you will be prompted for a language. In the first screen, select language English with subselection English-Canada and then click the Continue button on the bottom right-hand screen.
INVESTIGATION 2: USING YOUR MATRIX ACCOUNT
Linux Commands Used (click for online help):
Logging Out of Linux Account
|
Change Password
|
x
- Perform the following steps:
- Open Terminal.
- Login as root:
su -
- Type:
yum update
- Follow the prompts.
- If there is a kernel update, reboot your system. (There usually is on a first update after OS installation.)
INVESTIGATION 3: RUNNING YOUR ONLINE ASSIGNMENT 1
x
- Perform the Following Steps:
- Study the Linux commands and their purpose to note computer software information for your installed c7hostVM. You should take time to issue each of these commands to view the output, and record this chart in your lab1 logbook.
- Login to your c7hostVM, open a Bash Shell terminal, and login as root by issuing the command:
su -
- Make certain to record output from these commands (except for the ps -ef output) in your lab1 logbook.
x
LAB 1 SIGN-OFF (SHOW INSTRUCTOR)
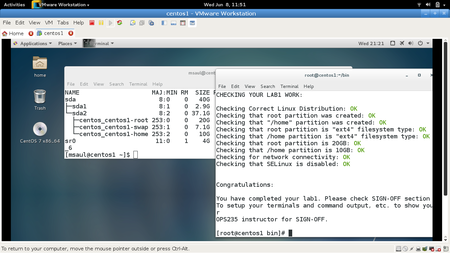
Students should be prepared with
all required commands (system information) displayed in a terminal (or multiple terminals) prior to calling the instructor for signoff.
Shell scripting is so essential for Linux administration that this course has created a shell script for every lab for this course that a student must download and run in order to check their work.
If you have performed the lab correctly, then you will get a series of OK messages and you can proceed with the SIGN-OFF for lab1. On the other hand, if there were errors, then a WARNING message will appear with general suggestions that you will need to fix on your c7hostVM in order to have your OPS235 sign-off in this lab in order to proceed to the next lab.
- Perform the Following Steps:
- Make certain that your c7host VM is running, open the Bash Shell terminal and issue the command:
su - and enter root's password.
- Change to the /root/bin directory.
- Download the checking script by issuing the following Linux command:
wget https://ict.senecacollege.ca/~ops235/labs/lab1-check.bash
- Give that downloaded shell script file execute permissions (for the file owner).
FYI: Your checking script will not work unless you issued "su -" instead of just "su".
- Run the shell script and if any warnings, make fixes and re-run shell script until you receive "congratulations" message.
- Arrange evidence (command output) for each of these items on your screen, then ask your instructor to review them and sign off on the lab's completion:
- ✓ Run the lab1-check.bash script in front of your instructor (must have all OK messages)
- ✓ Proof that c7host VM is set for virtualization (Refer to: INVESTIGATION 1 - Part 1 - Step #29)
- ✓ Lab1 logbook containing the values for:
- IP address, MAC address, Default route (gateway) and
DNS name server IP Address
Practice For Quizzes, Tests, Midterm & Final Exam
- Define the term Virtual Machine.
- List the major screens (steps) in the installation of Centos7 full install DVD.
- What key-combination is used to toggle the view of your running VM from "window-mode" to "full-screen-mode"?
- List the steps for disabling SELinux.
- List 2 ways that you can access your root account
- What is the difference between the commands su and su - ?
- What is the home directory for the user "root"?
- How do you determine the host name of your GNU/Linux workstation?
- What command can display the NIC's MAC address?
- What command is used to get a list of running processes on your newly-installed system?
- Write the Linux command to download the on-line file: http://linux.server.org/package.tar.gz
- Write a Bash Shell Script to prompt the user for a directory, and then display the file types for all files in that specified directory (hint: use the read command and then use the file command and command substitution with the ls command). Test the Bash Shell script by adding execute permissions and run the Bash Shell Script.
- Modify the previously created shell script to perform error checking after prompting for a directory to test if the specified directory does not exist. If it does NOT exist (i.e. true), display an error message indicating that the directory does NOT exist, and issue the command exit 1 to terminate the Bash Shell Script. Test the Bash Shell script by adding execute permissions and run the Bash Shell Script.


