Teams Winter 2011/team9/Lab2
Contents
Overview
For our OSGi tutorial we will be creating a simple task manager that will allow you to add and delete new tasks in a small java interface.
Creating the Service Interface
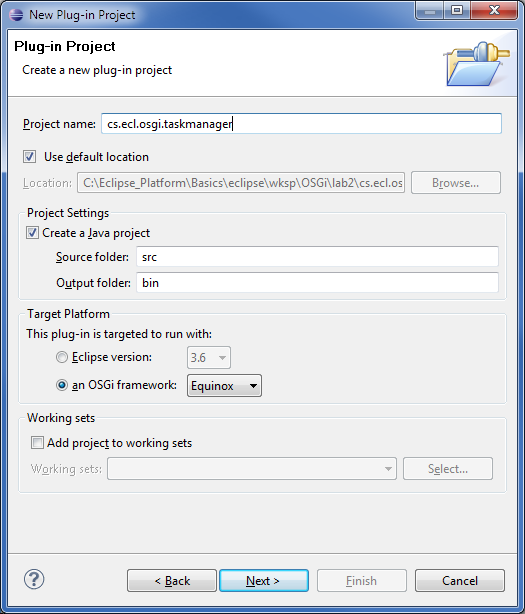
The first step in our OSGi tutorial will be creating our TaskManager interface. Create a new plug-in project by right-clicking the Package Explorer and selecting New -> Project... -> Plug-in Project, then name it cs.ecl.osgi.taskmanager and make sure that you select the OSGi Equinox as your platform then press Next.
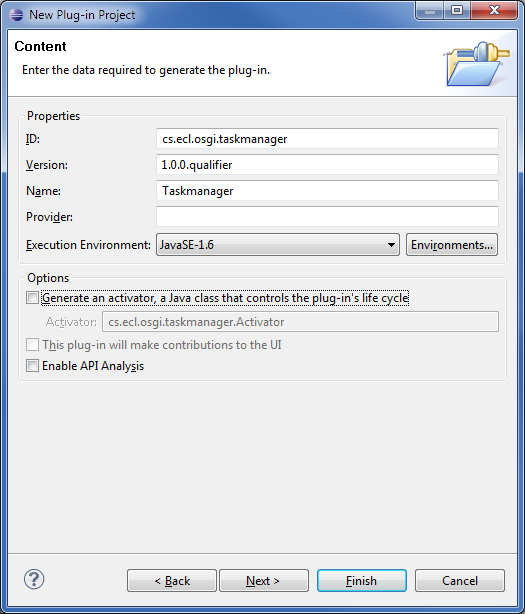
Since we will not be needing an activator for the service interface, make sure to uncheck the Generate an activator... option.
Now, right-click your cs.ecl.osgi.taskmanager package and create a new interface called TaskManager. Then enter the following:
package cs.ecl.osgi.taskmanager;

public interface TaskManager {
    boolean addTask(String name);
    String removeTask(int index);
}
Before going on to our next step we must define our MANIFEST.MF file to export the package we just created. To do this, double-click the MANIFEST.MF file and select the Runtime tab. From here, you just select Add... and then find our package cs.ecl.osgi.taskmanager.
Implementing the Service Provider
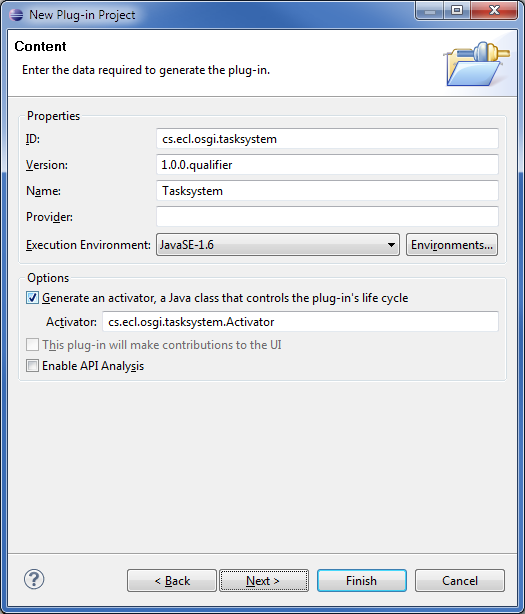
Now we will be creating another project but this time the project will be used as the service provider. Like our example above, create a new plug-in project and name it cs.ecl.osgi.tasksystem. This time make sure that you check the Generate an activator... option on the second step of the create project screen.
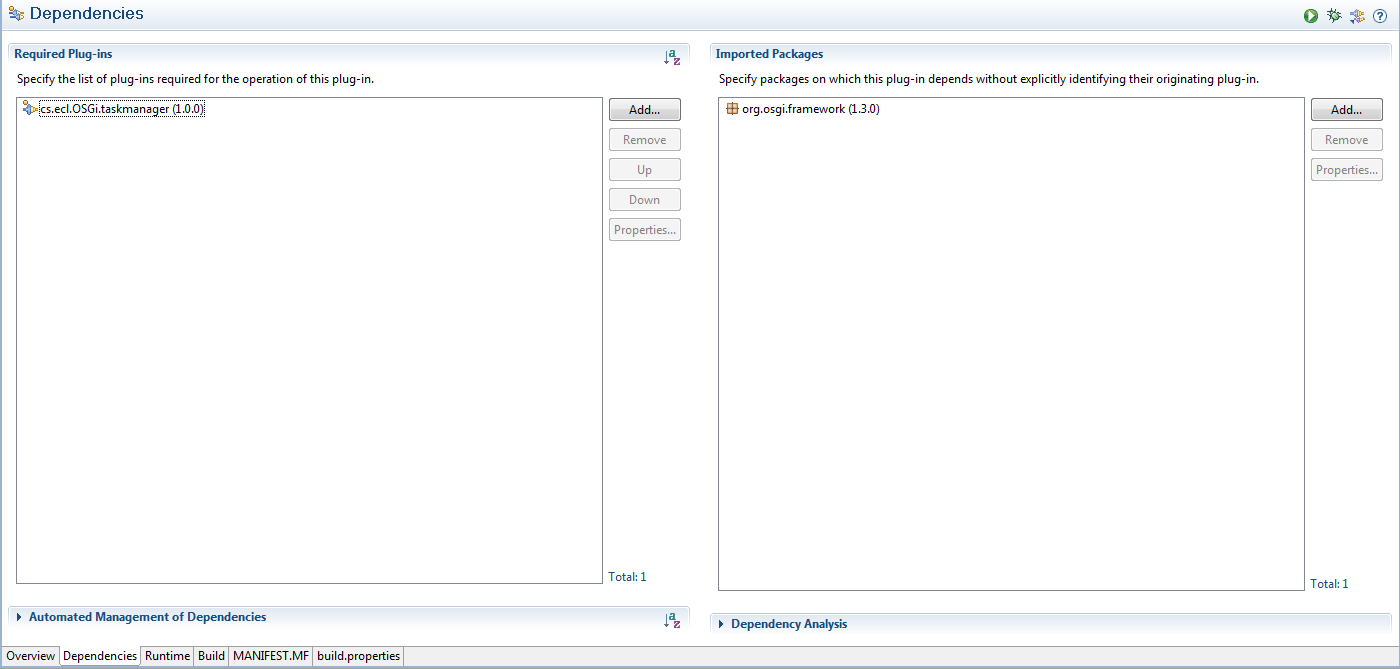
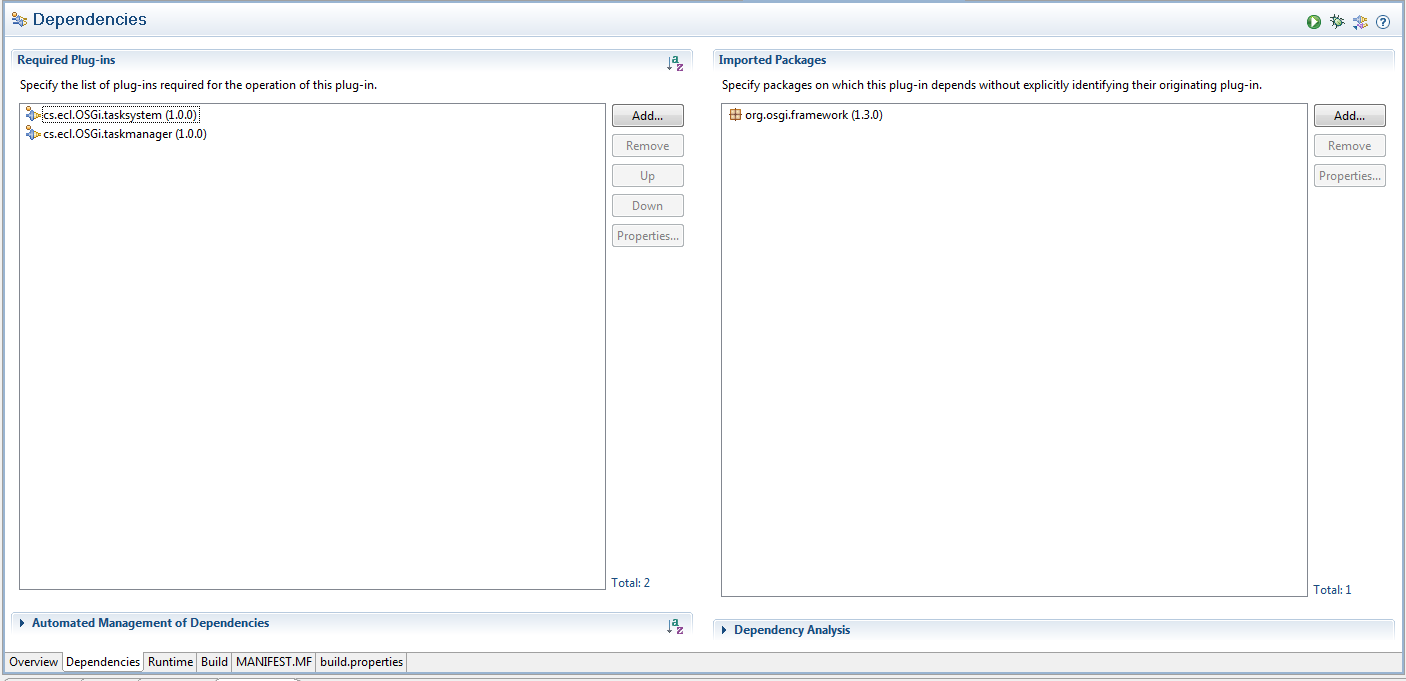
We will now be using the service interface we created above, so double-click the MANIFEST.MF file and go to the Dependencies tab. Now add the following dependencies as shown below. Use the Add... options and filter to search for the package.
We will now create a class to act as the system for adding and removing tasks. Essentially, this will be the core of our service. In our example, we decided to keep this class in a separate package so, let's do this by right-clicking on the cs.ecl.osgi.tasksystem package and selecting New -> Package; name this new package cs.ecl.osgi.tasksystem.internals.
Now within the new package, create a new class called SimpleTaskSystem that implements the service interface, TaskManager, that we created before. The class should look like this:
package cs.ecl.osgi.tasksystem.internals;

import java.util.ArrayList;
import java.util.List;

import cs.ecl.osgi.taskmanager.TaskManager;

public class SimpleTaskSystem implements TaskManager {

    public static List<String> tasks = new ArrayList<String>();
    public static List<Boolean> complete = new ArrayList<Boolean>();

    @Override
    public boolean addTask(String name) {
        boolean success = false;
        if(tasks.add(name)) {
            complete.add(false);
            success = true;
        }
        return success;
    }
    @Override
    public String removeTask(int index) {
        String taskName = "";
        taskName = tasks.remove(index);
        if( taskName != "") {
            complete.remove(index);
        }
        return taskName;
    }
}
Using the Package Explorer find the Activator.java class and open it by double-clicking. Now we will implement the service provider (TaskManagerSystem) we just created. The code should look like this:
package cs.ecl.osgi.tasksystem;

import org.osgi.framework.BundleActivator;
import org.osgi.framework.BundleContext;

import cs.ecl.osgi.taskmanager.TaskManager;
import cs.ecl.osgi.tasksystem.internals.SimpleTaskSystem;

public class Activator implements BundleActivator {

    private static BundleContext context;

    static BundleContext getContext() {
        return context;
    }

    /*
     * (non-Javadoc)
     * @see org.osgi.framework.BundleActivator#start(org.osgi.framework.BundleContext)
     */
    public void start(BundleContext bundleContext) throws Exception {
        Activator.context = bundleContext;

        TaskManager tm = new SimpleTaskSystem();
        context.registerService(TaskManager.class.getName(), tm, null);
        System.out.println("Task Manager registered!");
    }

    /*
     * (non-Javadoc)
     * @see org.osgi.framework.BundleActivator#stop(org.osgi.framework.BundleContext)
     */
    public void stop(BundleContext bundleContext) throws Exception {
        Activator.context = null;
        System.out.println("Task Manager stopped!");
    }

}
Creating the Service Consumer
Now that we have the service finished, we need to create a user interface that will act as the service consumer. This basically refers to something that will be using our service, task system. To start, let's create another Plug-in Project as we've done before and name it cs.ecl.osgi.tasksystem.client. Once again, make sure that we generate an activator for this new project.
Now we will be adding the dependencies again. As shown in the previous step, make sure that the following plug-ins are required.
Let's create the graphical user interface (GUI) for the project. Create a new class that looks like the following:
package cs.ecl.osgi.tasksystem.client;

import java.awt.*;
import java.awt.event.*;
import javax.swing.*;

import cs.ecl.osgi.taskmanager.TaskManager;

public class TaskDialog extends JPanel {

    JLabel label;
    JFrame frame;
    DefaultListModel taskListModel;
    JList taskList;
    String addTaskString = "Add Task";
    String deleteTaskString = "Delete Task";
    String instructions = "<html><B>Add New Task:</B> Type a task in the textbox below and press the \"Add Task\" button. <P>" +
                          "<B>Delete Task:</B> Select a task and press the \"Delete Task\" button.<P><P></html>";
    JTextField taskName;
    JButton deleteTaskButton;
    JButton addTaskButton;

    static TaskManager tm;

    public TaskDialog(JFrame frame) {
        super(new BorderLayout());
        this.frame = frame;

        JPanel taskPanel = createTaskPanel();
        taskPanel.setBorder(BorderFactory.createEmptyBorder(20, 20, 5, 20));

        JPanel taskAddPanel = createTaskAddPanel();
        JPanel headerPanel = getHeaderPanel();

        // GUI Layout

        add(headerPanel, BorderLayout.NORTH);
        add(taskPanel, BorderLayout.CENTER);
        add(taskAddPanel,BorderLayout.PAGE_END);
    }
    private JPanel getHeaderPanel() {
        JPanel headerPanel = new JPanel();
        headerPanel.setLayout(new BoxLayout(headerPanel, BoxLayout.Y_AXIS));


        JLabel instructionsLabel = new JLabel(instructions, JLabel.CENTER);
        Font font = new Font("Serif", Font.PLAIN, 24);
        instructionsLabel.setFont(font);

        label = new JLabel("<html><FONT COLOR=GREEN>Start adding Tasks...</FONT></html>", JLabel.CENTER);

        headerPanel.add(instructionsLabel);
        headerPanel.add(label);

        return headerPanel;
    }

    private JPanel createTaskPanel() {
        JPanel taskPanel = new JPanel();
        taskPanel.setLayout(new BoxLayout(taskPanel, BoxLayout.LINE_AXIS));

        taskListModel = new DefaultListModel();

        // create JList then add it to scroll pane
        taskList = new JList(taskListModel);
        taskList.setSelectionMode(ListSelectionModel.SINGLE_SELECTION);
        taskList.setSelectedIndex(0);
        taskList.setVisibleRowCount(50);
        JScrollPane taskListScrollPane = new JScrollPane(taskList);

        taskPanel.add(taskListScrollPane);

        return taskPanel;
    }

    private JPanel createTaskAddPanel() {
        JPanel taskAddPanel = new JPanel();
        taskAddPanel.setLayout(new BoxLayout(taskAddPanel, BoxLayout.LINE_AXIS));

        taskName = new JTextField(100);

        addTaskButton = new JButton(addTaskString);
        addTaskButton.setActionCommand(addTaskString);
        addTaskButton.addActionListener(new ActionListener() {
            public void actionPerformed(ActionEvent e) {
                String task = taskName.getText();
                if(tm.addTask(task)) {
                    taskListModel.addElement(task);
                    taskName.setText("");
                    label.setText("<html><FONT COLOR=GREEN>\"" + task + "\"" + " has been added to your to do list.</FONT></html>");
                }
            }
        });

        deleteTaskButton = new JButton(deleteTaskString);
        deleteTaskButton.setActionCommand(deleteTaskString);
        deleteTaskButton.addActionListener(new ActionListener() {
            public void actionPerformed(ActionEvent e) {
                if(taskList.getSelectedIndex() != -1) {
                    // ******  uncomment this line to handle multiple indicies  ******
                    //int [] arr = taskList.getSelectedIndices();
                    //for(int i=0; i< arr.length; i++) {
                    //    tm.removeTask(arr[i]);
                    //    taskListModel.removeElementAt(arr[i]);
                    //    label.setText("\"" + task + "\"" + " has been added to your to do list.");
                    //}
                    // ****** comment the following lines to handle single item selects  ********
                    int selectedIndex = taskList.getSelectedIndex();
                    String taskName = tm.removeTask(selectedIndex);
                    taskListModel.removeElementAt(selectedIndex);
                    label.setText("<html><FONT COLOR=RED>\"" + taskName + "\"" + " has been removed from your to do list.</FONT></html>");

                }
            }
        });

        taskAddPanel.add(deleteTaskButton);
        taskAddPanel.add(Box.createHorizontalStrut(5));

        taskAddPanel.add(Box.createHorizontalStrut(5));
        taskAddPanel.add(taskName);
        taskAddPanel.add(addTaskButton);
        taskAddPanel.setBorder(BorderFactory.createEmptyBorder(5,5,5,5));

        return taskAddPanel;
    }

    /**
     * Create the GUI and show it. For thread safety, this method should be
     * invoked from the event-dispatching thread.
     */
    private static void createAndShowGUI(TaskManager tm) {

        // Make sure we have nice window decorations.
        JFrame.setDefaultLookAndFeelDecorated(true);
        JDialog.setDefaultLookAndFeelDecorated(true);

        // Create and set up the window.
        JFrame frame = new JFrame("To Do List");
        frame.setDefaultCloseOperation(JFrame.EXIT_ON_CLOSE);

        // Set up the content pane.
        Container contentPane = frame.getContentPane();
        contentPane.setLayout(new GridLayout(1, 1));
        contentPane.add(new TaskDialog(frame));
        TaskDialog.tm = tm;
        // Display the window.
        frame.pack();
        frame.setVisible(true);
    }

    public static void runDialog(final TaskManager tm) {
        // Schedule a job for the event-dispatching thread:
        // creating and showing this application's GUI.
        javax.swing.SwingUtilities.invokeLater(new Runnable() {
            public void run() {
                createAndShowGUI(tm);
            }
        });
    }

}
Once again, we will need to edit the activator for this new project to make use of the GUI we created for our project. To do this, find the Activator.java class for our new project (cs.ecl.osgi.tasksystem.client) and add the following:
package cs.ecl.osgi.tasksystem.client;

import org.osgi.framework.BundleActivator;
import org.osgi.framework.BundleContext;
import org.osgi.framework.ServiceReference;

import cs.ecl.osgi.taskmanager.TaskManager;

public class Activator implements BundleActivator {

    private static BundleContext context;
    private TaskManager tm;

    static BundleContext getContext() {
        return context;
    }

    /*
     * (non-Javadoc)
     * @see org.osgi.framework.BundleActivator#start(org.osgi.framework.BundleContext)
     */
    public void start(BundleContext bundleContext) throws Exception {
        Activator.context = bundleContext;

        ServiceReference reference = context.getServiceReference(TaskManager.class.getName());
        if(reference != null) {
            tm = (TaskManager) context.getService(reference);

            if(tm != null) {
                // start GUI
                TaskDialog.runDialog(tm);
                context.ungetService(reference);
            } else {
                System.err.println("Task Manager could not be used!");
            }
        } else {
            System.err.println("The Task Manager System could not be found!");
        }
    }

    /*
     * (non-Javadoc)
     * @see org.osgi.framework.BundleActivator#stop(org.osgi.framework.BundleContext)
     */
    public void stop(BundleContext bundleContext) throws Exception {
        Activator.context = null;
    }

}
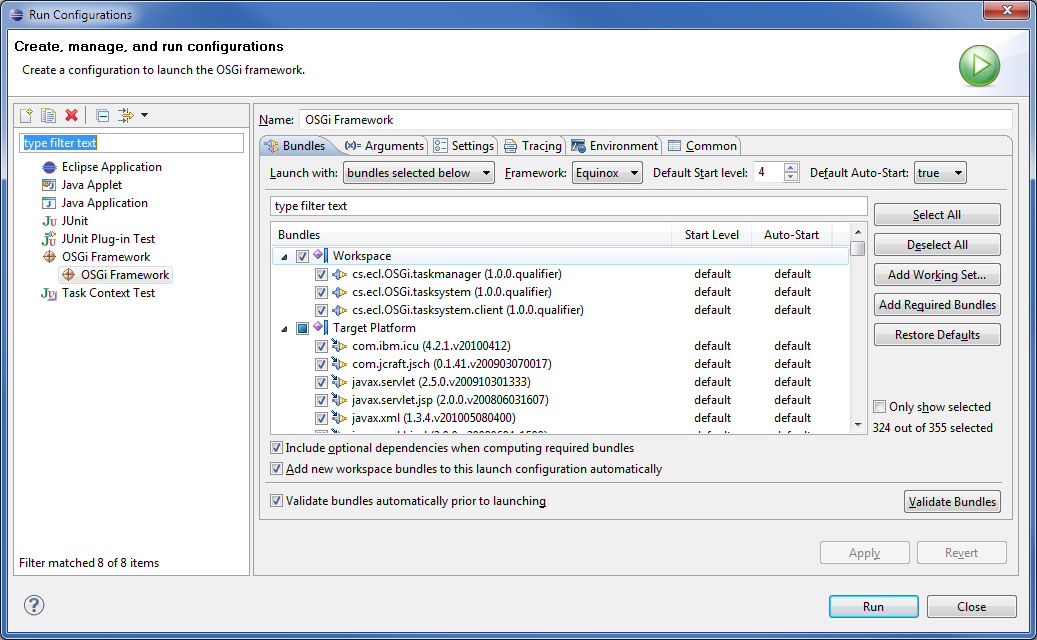
We are now finished. To run our application, right-click the MANIFEST.MF file and select the Run As... -> Run Configurations. Now make sure that all the required bundles in our workspace are selected and that the Validate bundles automatically prior to launching is checked.
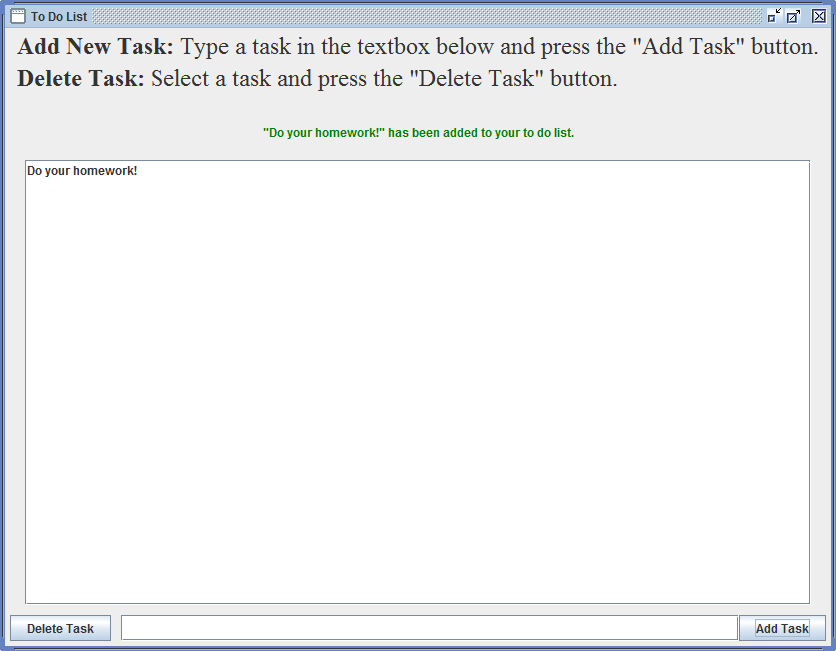
If everything was done correctly, you should be able to run the project and see our new application.
