Difference between revisions of "Teams Winter 2011/team1/Android/Add Contact"
| Line 111: | Line 111: | ||
== 6.5. Add Contact in Action == | == 6.5. Add Contact in Action == | ||
6.5.1. Select the 'Add Contact' in the menu<br/> | 6.5.1. Select the 'Add Contact' in the menu<br/> | ||
| − | [[Image: menu.png | | + | [[Image: menu.png | 200px]]<br/><br/> |
| − | [[Image: add_1.png | | + | [[Image: add_1.png | 200px]]<br/> |
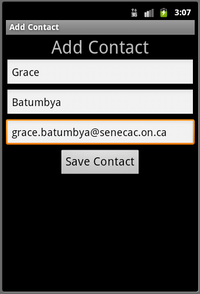
6.5.2. Enter information of the new contact<br/> | 6.5.2. Enter information of the new contact<br/> | ||
| − | [[Image: add_2.png | | + | [[Image: add_2.png | 200px]]<br/> |
6.5.3. The new contact will be appear in the list of contacts.<br/> | 6.5.3. The new contact will be appear in the list of contacts.<br/> | ||
| − | [[Image: added.png | | + | [[Image: added.png | 200px]]<br/> |
Revision as of 11:14, 28 March 2011
Contents
6. Add Contact
6.1. Create 'add' layout
6.1.1. Right click on layout -> New -> Android XML File .
6.1.2. Enter add.xml for the file name and check Layout:
6.1.3. Using Linear Layout, create this layout for adding contact information:
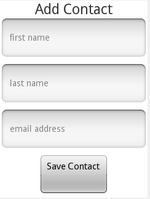
6.1.4. This is the xml implementation:
<?xml version="1.0" encoding="utf-8"?>
<LinearLayout xmlns:android="http://schemas.android.com/apk/res/android"
    android:layout_width="match_parent" android:layout_height="match_parent"
    android:orientation="vertical">
    <TextView android:layout_width="wrap_content"
        android:layout_height="wrap_content" android:id="@+id/titleTextView"
        android:gravity="center_vertical" android:textSize="30dp"
        android:layout_gravity="center" android:text="@string/addContact_textView"></TextView>

    <EditText android:layout_width="match_parent"
        android:layout_height="wrap_content" android:layout_marginBottom="3dp" android:hint="@string/hint_first_name" android:id="@+id/firstName"></EditText>

    <EditText android:layout_width="match_parent"
        android:layout_height="wrap_content" android:isScrollContainer="true"
        android:layout_marginBottom="3dp" android:hint="@string/hint_last_name" android:id="@+id/lastName"></EditText>

    <EditText android:layout_width="match_parent"
        android:layout_height="wrap_content" android:layout_marginBottom="3dp" android:hint="@string/hint_email" android:id="@+id/email"></EditText>

    <Button android:layout_width="wrap_content"
        android:layout_height="wrap_content" android:id="@+id/saveContact_button"
        android:text="@string/saveButton" android:gravity="center_horizontal"
        android:layout_gravity="center_horizontal" android:textSize="20dp"></Button>
</LinearLayout>
6.2. Create Add Contact Activity
This class will be responsible for taking care of adding new contact to the contact list. 6.2.1. Create a new class called AddContactActivity.java in the same package as the main activity file.
package cs.ecl.team1.android;

import android.app.Activity;

public class AddContactActivity extends Activity {
6.2.2. Add some fields to save the added information to 'Add Contact' by user.
    private String firstName;
    private String lastName;
    private String email;
6.2.3. On clicking the Save Contact button, the info from EditTexts will be assigned to the corresponding fields.
    firstName = ((EditText) findViewById(R.id.firstName)).getText().toString();
    lastName = ((EditText) findViewById(R.id.lastName)).getText().toString();
    email = ((EditText) findViewById(R.id.email)).getText().toString();
6.2.3. The activity will be finished by calling finish() function from which the super will be called. In finish(), a new Intent is created to be able to pass data back to the calling activity.
    @Override
    public void finish() {
        Intent i = new Intent();
        if (firstName.equals("") && lastName.equals("") && email.equals("")) {
            setResult(0);
        }
        else {
            i.putExtra("firstName", firstName);
            i.putExtra("lastName", lastName);
            i.putExtra("email", email);
            setResult(RESULT_OK, i);
        }
        super.finish();
    }
6.3. Add Contact Activity to the Android Manifest
6.3.1. Just add this line to the list of activities in AndroidManifest.xml
<activity android:label="Add Contact" android:name="AddContactActivity"></activity>6.4. Implement Add Contact in the main activity class
6.4.1. First step is to create an instance of Intent to pass the current object to the activity and then start the activity for the Add Contact when it's selected from the menu items.
    case R.id.item1:
       Intent i = new Intent(this, AddContactActivity.class);
       startActivityForResult(i, CREATE_CONTACT);    // to process the result that is returned from the AddContactActivity
       break;
6.4.2. In startActivityForResult(), two things need to be checked first, resultCode and the name of the activity, if these two were fine, the new student with the added values will be added to the list of students, otherwise there will be an alert message displayed to the user.
    @Override
    protected void onActivityResult(int requestCode, int resultCode, Intent intent) {
        if (resultCode == Activity.RESULT_OK && requestCode == CREATE_CONTACT) {
            studentList.addElement(new Student(intent.getExtras().getString("firstName"),
                    intent.getExtras().getString("lastName"), intent.getExtras().getString("email")));
        }
        else {
            AlertDialog alertDialog = new AlertDialog.Builder(this).create();
            alertDialog.setMessage("No contact was added!");
            alertDialog.show();
        }
        displayData(studentList);
    }
6.5. Add Contact in Action
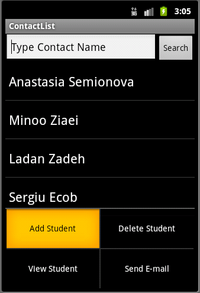
6.5.1. Select the 'Add Contact' in the menu
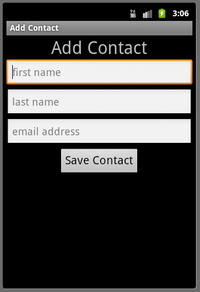
6.5.2. Enter information of the new contact
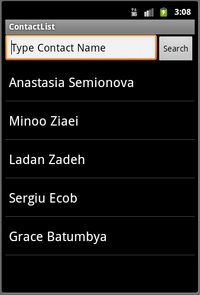
6.5.3. The new contact will be appear in the list of contacts.
