Difference between revisions of "Seneca BigBlueButton web gateway - Joining a meeting"
(→Initial audio setup) |
(→Joining a meeting) |
||
| (6 intermediate revisions by 2 users not shown) | |||
| Line 1: | Line 1: | ||
=Joining a meeting= | =Joining a meeting= | ||
| − | To join a Big Blue Button meeting you need a Flash enabled browser | + | To join a Big Blue Button meeting you need a Flash enabled browser, essentially any browser you can watch Youtube videos on. <br /> |
| − | It is highly recommended | + | :''NOTE: Real player and Flash conflict on Firefox 13. If you have them both installed on your computer and your flash videos do not work, read this article for a solution: https://support.mozilla.org/en-US/kb/flash-113-doesnt-load-video-firefox''<br /> |
| − | Note that if you are using a USB headset, you should set | + | It is highly recommended that you use a headset with Big Blue Button. Using a headset will prevent an echo effect between voice participants.<br /> |
| − | == | + | Note that if you are using a USB headset, you should set the default speakers of your system to your headset. |
| − | # Copy and paste the URL into a browser (i.e. Firefox, Chrome, Internet Explorer, etc...) | + | ==Guests without a Seneca ID (Using a guest URL)== |
| + | # Copy and paste the URL that was given to you into a browser (i.e. Firefox, Chrome, Internet Explorer, etc...) | ||
# You will see the following page: | # You will see the following page: | ||
#:[[File:Guestlogin.png]] | #:[[File:Guestlogin.png]] | ||
| − | # Enter a name that | + | # Enter a name that other participants in the meeting can recognize you with. |
| − | # Enter the password sent to you with the URL | + | # Enter the password sent to you with the URL. |
# Click on Login | # Click on Login | ||
==Seneca Users== | ==Seneca Users== | ||
| − | # | + | # Login to https://bbb.senecac.on.ca using your Seneca ID and password. |
| − | #: | + | #: Note: You may get a warning about the SSL certificate! The reason you are getting this message is that this server is a demo server and the SSL certificate on it is self-signed. You are safe to proceed as there is no actual risk to you or your User id and password as they are being passed through a secure layer. |
| − | # | + | # After logging in, if you don't see the list of ongoing meetings, click on the "Join" link. |
#:[[File:SenecanJoin.png]] | #:[[File:SenecanJoin.png]] | ||
| − | + | # From the list of meetings, select the one you were invited to. | |
| − | + | # Enter the password you were sent along with the invitation. | |
| − | + | # Click on "Join Meeting. | |
=Initial audio setup= | =Initial audio setup= | ||
| − | Now you | + | Now that you have joined the meeting, Flash needs to identify which microphone you wish to use. <br /> |
| − | + | :It is highly recommended you use a headset, it will prevent an echo effect for the voice participants in the meeting.<br /> | |
| − | :It is highly recommended | + | :Note that if you are using a USB headset, you should set the default speakers of your system to your headset. |
| − | :Note that if you are using a USB headset, you should set | ||
==Allow Flash to use the audio/video of the system== | ==Allow Flash to use the audio/video of the system== | ||
| − | *When | + | *When the screen below appears, click on "Allow" so Flash can have access to the audio/video for your system (Note that older versions of chrome hang at this section, if you are using chrome and this happened, either update your chrome, or use another browser) |
*:[[File:FlashAllow.png]] | *:[[File:FlashAllow.png]] | ||
| − | * | + | *At this stage, if you have a microphone plugged in, you should be able to hear your own voice from the speakers and the bar moving when talking. |
| − | *Then | + | *If you have a microphone plugged in and you can't hear yourself, select Change Microphone. Then select the microphone of your head set (or the preferred microphone of the system) and close the prompt. |
*:[[File:SelectMic.png]] | *:[[File:SelectMic.png]] | ||
| − | + | *Finally click on "Join Audio" To join the meeting. | |
| − | + | ||
| − | *Finally click on "Join Audio" To | + | =Basic Icons (buttons) of Big Blue Button= |
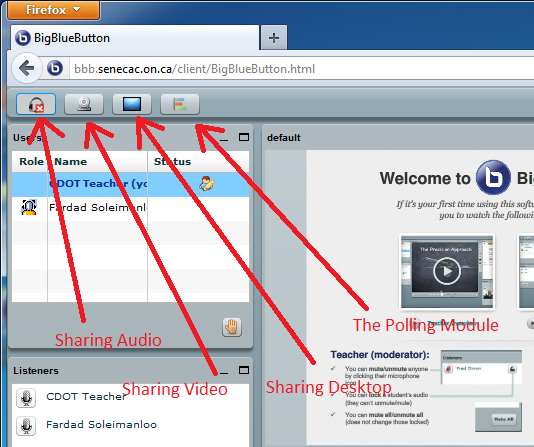
| − | + | There are four buttons in the top-left corner of the meeting window. | |
| − | There are four buttons | + | : Note: If you are not a moderator (presenter) then you will only see the first two |
| − | [[File:BBBIcons.png]] | + | :[[File:BBBIcons.png]] |
| − | *Sharing Audio: Enables and disables the | + | *Sharing Audio: Enables and disables the Flash audio. Note that this is NOT a mute button. if the audio is disabled and enabled again, you will get the prompt for selecting a microphone and joining the audio again. |
| − | *Sharing Video: Enables and disables sharing of your | + | *Sharing Video: Enables and disables sharing of your webcam if you have one connected. Clicking the button will not immediately share your image to others, it only activates your webcam. To share (display) your webcam you must click on the "Play" button in the bottom left of the webcam window. |
| − | *Sharing Desktop: | + | *Sharing Desktop: Shares a selection of your desktop to others (only if you are a presenter). |
| − | *The Polling Module: Manages and posts polling questions with multiple answers to others and | + | *The Polling Module: Manages and posts polling questions, with multiple answers, to others and returns feedback to you by showing the votes from attendees. It also, if enabled, posts the polls to a mobile friendly URL in case you are using Big Blue Button in a combined (remote and local) lecture or meeting. |
Latest revision as of 17:49, 27 June 2012
Contents
Joining a meeting
To join a Big Blue Button meeting you need a Flash enabled browser, essentially any browser you can watch Youtube videos on.
- NOTE: Real player and Flash conflict on Firefox 13. If you have them both installed on your computer and your flash videos do not work, read this article for a solution: https://support.mozilla.org/en-US/kb/flash-113-doesnt-load-video-firefox
It is highly recommended that you use a headset with Big Blue Button. Using a headset will prevent an echo effect between voice participants.
Note that if you are using a USB headset, you should set the default speakers of your system to your headset.
Guests without a Seneca ID (Using a guest URL)
- Copy and paste the URL that was given to you into a browser (i.e. Firefox, Chrome, Internet Explorer, etc...)
- You will see the following page:
- Enter a name that other participants in the meeting can recognize you with.
- Enter the password sent to you with the URL.
- Click on Login

Seneca Users
- Login to https://bbb.senecac.on.ca using your Seneca ID and password.
- Note: You may get a warning about the SSL certificate! The reason you are getting this message is that this server is a demo server and the SSL certificate on it is self-signed. You are safe to proceed as there is no actual risk to you or your User id and password as they are being passed through a secure layer.
- After logging in, if you don't see the list of ongoing meetings, click on the "Join" link.
- From the list of meetings, select the one you were invited to.
- Enter the password you were sent along with the invitation.
- Click on "Join Meeting.

Initial audio setup
Now that you have joined the meeting, Flash needs to identify which microphone you wish to use.
- It is highly recommended you use a headset, it will prevent an echo effect for the voice participants in the meeting.
- Note that if you are using a USB headset, you should set the default speakers of your system to your headset.
Allow Flash to use the audio/video of the system
- When the screen below appears, click on "Allow" so Flash can have access to the audio/video for your system (Note that older versions of chrome hang at this section, if you are using chrome and this happened, either update your chrome, or use another browser)
- At this stage, if you have a microphone plugged in, you should be able to hear your own voice from the speakers and the bar moving when talking.
- If you have a microphone plugged in and you can't hear yourself, select Change Microphone. Then select the microphone of your head set (or the preferred microphone of the system) and close the prompt.
- Finally click on "Join Audio" To join the meeting.


Basic Icons (buttons) of Big Blue Button
There are four buttons in the top-left corner of the meeting window.
- Note: If you are not a moderator (presenter) then you will only see the first two

- Sharing Audio: Enables and disables the Flash audio. Note that this is NOT a mute button. if the audio is disabled and enabled again, you will get the prompt for selecting a microphone and joining the audio again.
- Sharing Video: Enables and disables sharing of your webcam if you have one connected. Clicking the button will not immediately share your image to others, it only activates your webcam. To share (display) your webcam you must click on the "Play" button in the bottom left of the webcam window.
- Sharing Desktop: Shares a selection of your desktop to others (only if you are a presenter).
- The Polling Module: Manages and posts polling questions, with multiple answers, to others and returns feedback to you by showing the votes from attendees. It also, if enabled, posts the polls to a mobile friendly URL in case you are using Big Blue Button in a combined (remote and local) lecture or meeting.