Difference between revisions of "OPS445 Online Lab1"
Eric.brauer (talk | contribs) (→Submitting Your Lab Work Through Blackboard) |
Eric.brauer (talk | contribs) (→LAB 1 SIGN-OFF Upload the following files individually to Blackboard) |
||
| Line 433: | Line 433: | ||
</ol> | </ol> | ||
| − | =LAB 1 SIGN-OFF Upload the following files individually to Blackboard= | + | =LAB 1 SIGN-OFF= |
| + | Again, you will be asked to submit the lab in one of two ways: | ||
| + | |||
| + | ==Upload the following files individually to Blackboard== | ||
:'''Run the CheckLab1.py script and capture the result''' | :'''Run the CheckLab1.py script and capture the result''' | ||
| − | <source>python3 ./CheckLab1.py -f -v &> | + | <source>python3 ./CheckLab1.py -f -v &> lab1_output.txt</source> |
: Submit the following files individually to Blackboard: | : Submit the following files individually to Blackboard: | ||
::<span style="color:green;font-size:1.5em;">✓</span> <code>lab1_[seneca_id].txt</code> | ::<span style="color:green;font-size:1.5em;">✓</span> <code>lab1_[seneca_id].txt</code> | ||
::<span style="color:green;font-size:1.5em;">✓</span> <code>gitlog.txt, repo_tree.txt, lab1a.py, lab1b.py lab1c.py, lab1d.py</code> | ::<span style="color:green;font-size:1.5em;">✓</span> <code>gitlog.txt, repo_tree.txt, lab1a.py, lab1b.py lab1c.py, lab1d.py</code> | ||
| + | |||
| + | ==Complete the GitHub Submission== | ||
| + | :'''Run the CheckLab1.py script and capture the result''' | ||
| + | <source>python3 ./CheckLab1.py -f -v &> lab1_output.txt | ||
| + | git add lab1_output.txt | ||
| + | git commit -m "completed lab" | ||
| + | git push | ||
| + | </source> | ||
= Lab Review = | = Lab Review = | ||
Revision as of 20:57, 31 August 2021
Introduction to git, github.com, and Python
Contents
- 1 Lab Objectives
- 2 Overview
- 3 Reference
- 4 Glossary
- 5 Unit Feedback Script : CheckLabX.py
- 6 Investigation 1 - Set Up A Development Environment
- 7 Investigation 2 - Python on Matrix =
- 8 Investigation 3 - git and github.com
- 9 Investigation 3 - exploring and using Python's built-in functions
- 10 Investigation 4 - exploring Python's built-in Data Objects
- 11 Investigation 5 - exploring on how to get Python to do maths
- 12 LAB 1 SIGN-OFF
- 13 Lab Review
Lab Objectives
- Using the "git clone" command to clone a repository into a new directory
- Set up account on github.com for creating, tracking, and managing a repository
- configure and explore a virtual machine and IDE
- configure and explore the Python interpreter on matrix.senecacollege.ca
Overview
- In this lab, you will create an account on github.com and follow the Github "Hello World guide" to create a new public repository on github to and explore the basic workflow of using github to track and manage revisions of software or other contents. The essential operations provided by Github includes
- creating new repository,
- creating a new branch,
- making changes to files,
- creating a pull request, and
- opening and merging a pull request.
- You will then use the git client (git clone) on matrix.senecacollege.ca to access and download the contents of the repository you created on github. Note: if you have your own Linux VM ready, you can also install and use the git client on your VM.
- You will also use the git client on matrix.senecacollege.ca to clone the repository on github.com which hosts the Python scripts for lab 1.
- Finally, study, create and execute simple Python scripts.
- In this lab, you will create an account on github.com and follow the Github "Hello World guide" to create a new public repository on github to and explore the basic workflow of using github to track and manage revisions of software or other contents. The essential operations provided by Github includes
Reference
Glossary
- git - a distributed revision control system with rich command set that provides both high-level operations and full access to git's internals.
- github.com - a code hosting platform for version control and collaboration that lets people work together on software projects from anywhere.
Unit Feedback Script : CheckLabX.py
Investigation 1 - Set Up A Development Environment
Task 1: Create a Linux Virtual Machine
In order to proceed in the course you're going to need a Linux-based development environment. The requirements for this development environment are:
- it has a version of Python 3 installed,
- it has a version of git installed,
- it has a web browser installed, and
- it has a text editor with modern development tools installed. (syntax highlighting, linting, etc.)
We will demonstrate the steps for setting up a Fedora Virtual Machine with Visual Studio Code installed.
- Install Virtual Machine Software such as VMWare Workstation.
- Download the Fedora Workstation ISO file from The Fedora Website.
- Use the steps you've already learned to create a new virtual machine from this ISO file. Your virtual machine should have 20GB of hard drive space, and you can leave all other hardware specs as default.
- Start up your virtual machine, and at the graphical start menu select 'Install Fedora on your computer.'
- Your installer will now be displayed. Set the correct timezone, and click on the 'Installation Destination' button under 'System'. Click the 'Done' button in the top-left to accept the automatic storage configuration.
- Allow the installation to complete. Click the 'Finish Installation' button when it appears, and then reboot your machine.
- When the Virtual Machine has rebooted, you should see a welcome screen along with some more configuration options. Disable Location, as this seems to cause crashes when running as a VM. Skip the step to connect online accounts.
- Enter your name, and a password. Don't forget this password, as you will need it to become root.
Task 2: Verify Python
Fedora should have the required software (with the exception of VS Code) already installed. We will verify this before moving on.
- Open a terminal by clicking on the 'Activities' button in the top-left corner, and then clicking the 'Show Applications' buttons in the task bar below.
- Enter the command python3 --version and verify that the installed version is at least python 3.4. If no version of Python is installed, run sudo dnf install python3.
- Enter the command git --version and verify that the installed version is at least git 1.2. If no version of Python is installed, run sudo dnf install git.
- Run sudo dnf update to update the system software.
Task 3: Install Visual Studio Code and Extensions
Visual Studio Code has an excellent Debugger for Python, and so it is the recommended editor for this course. However, you may use a different editor at your discretion. Pycharm Community also has a very good debugger, works on Fedora, and is free for students.
- We will need to add the Microsoft Repository to our list of accepted repositories. These instructions are The Microsoft page: Copy the following command into your terminal:
sudo rpm --import https://packages.microsoft.com/keys/microsoft.asc
sudo sh -c 'echo -e "[code]\nname=Visual Studio Code\nbaseurl=https://packages.microsoft.com/yumrepos/vscode\nenabled=1\ngpgcheck=1\ngpgkey=https://packages.microsoft.com/keys/microsoft.asc" > /etc/yum.repos.d/vscode.repo'
- You may need to enter your sudo password once again. When that process is complete, run:
sudo dnf check-update
sudo dnf install code
- Launch Visual Studio Code. Click 'Activities' and type 'code', you should see the launcher for Visual Studio Code appear.
- Now install the Python extension. Press Control+Shift+x to open Extensions in the sidebar. (Or click on the Extensions icon on left side of the window).
- Type 'Python' into the search bar, and click 'Install' when you find the extension created by Microsoft. You may wish to explore other extensions to customize your workspace.
Task 4: Verify The Python Interpreter
A few background information about the Python programming language
- The Python Interpreter understanding the Python language and this is why we are going to learn this programming language in this course.
- The Python Language supports both object-oriented programming and procedural programming paradigms.
- The Python programming environment consists of a few basic components: language keywords, symbols, modules, and data objects.
- The Python Interpreter supports two mode of operations: script mode and interactive mode.
- In interactive mode, the Python interpreter allows us to run python code one statement at a time. Currently, there are two major versions of the Python interpreter available: version 2 and version3.
- To start an interactive Python version 2 shell, type "python" at the command prompt. Python 2 is deprecated and should not be used for any new projects.
- To start an interactive Python version 3 shell, type "python3" at the command prompt.
- To exit from the interactive Python shell, press Ctrl+d.
Task 5 - Create directory structure for Labs and Assignments
Create directory structure using BASH commands
- Lets setup and reserve the following directories for storing and organizing files for labs and assignments. Execute the following commands at the command prompt:
  mkdir ~ops445/lab1
  mkdir ~/ops445/lab2
  mkdir ~/ops445/lab3
  mkdir ~/ops445/lab4
  mkdir ~/ops445/lab5
  mkdir ~/ops445/lab6
  mkdir ~/ops445/lab7
  mkdir ~/ops445/lab8
  mkdir ~/ops445/lab9
  mkdir ~/ops445/a1
  mkdir ~/ops445/a2
Investigation 2 - Python on Matrix =
Matrix can not provide a graphical user interface, but it is a useful alterntative for Python development and testing. We will recommend that you use Matrix for Lab 8 and 9, once you have become familiar with the fundamentals on your virtual machine.
If you connect to the VPN using your host Windows machine, you should be able to connect using your Linux virtual machine as well. If you are running natively, you should talk to your instructor for other options.
Part I - Python Versions on Matrix
- You can access the Python Interpreter on Matrix from a Linux machine or a Windows 10 machine.
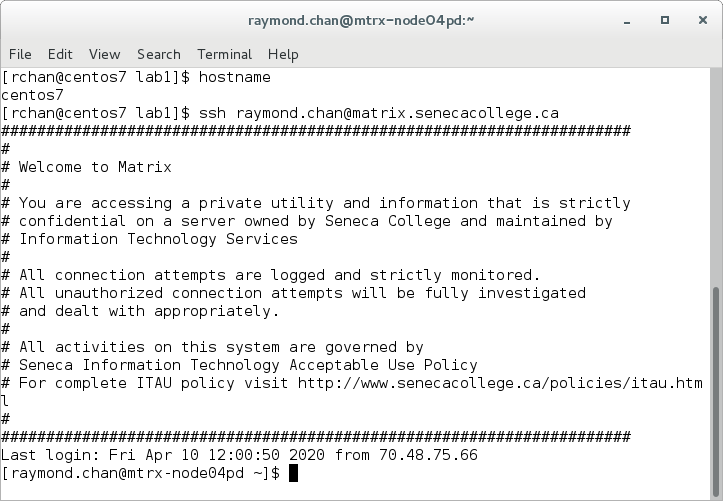
Login to matrix.senecacollege.ca from a Linux machine
- To login to matrix.senecacollege.ca you must have a active Seneca user account.
- The following is a screen shot showing the login from a CentOS Linux (host or vm) system with an active Seneca user name:

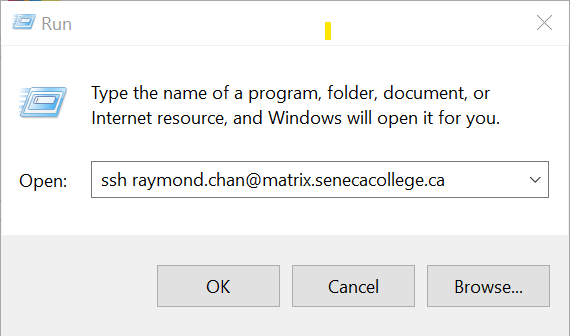
Login to matrix.senecacollege.ca from a Windows 10 machine
- Please follow the instruction at Seneca Student VPN to download and install the GlobalProtect VPN client and connect to the Seneca VPN to your Windows Machine.
- Login to matrix.senecacollege.ca with your Seneca user name from Windows 10's run box.

Identify and explore Python versions on Matrix
- Once you are on matrix.senecacollege.ca, run the python command to start a Python version 2 interactive shell at the command prompt. The last line displayed should be >>>. the >>> sign is referred to as the Python interactive shell prompt.
- python
- at the >>> prompt, type help('keywords') and record the output
- at the >>> prompt, type help('symbols') and record the output
- type exit() at the >>> prompt to exit from the Python interactive shell.
- Run the python3 command to start a Python version 3 interactive shell session at the command prompt.
- python3
- at the >>> prompt, type help('keywords') and record the output
- at the >>> prompt, type help('symbols') and record the output
- type exit() at the ">>>" prompt to exit from the Python interactive shell.
- Once you are on matrix.senecacollege.ca, run the python command to start a Python version 2 interactive shell at the command prompt. The last line displayed should be >>>. the >>> sign is referred to as the Python interactive shell prompt.
- Compare the list of keywords and symbols for Python version 2 and version 3. Which keyword(s) is/are remove from version 2 in version 3?
Investigation 3 - git and github.com
Task 1: Create a Github.com account
- Start your web browser and go to github.com and use your own email to sign up for a new github account if you don't already have one.
[Note: Please be aware that Seneca's spam filter block email from github.com by default, if you use your Seneca email to sign up for an account on github.com, you might have to re-configure your email spam filter to allow confirmation email from github.com to reach your inbox.]
- Start your web browser and go to github.com and use your own email to sign up for a new github account if you don't already have one.
Task 2: Create a project and make a pull request on GitHub
- Follow the Github "Hello World Guide" here to perform the following activities:
- Create a repository
- Create a branch
- Make and commit changes
- Open a pull request, and
- Merge your pull request
- Please make the following changes when following the guide:
- name the new repository using your Seneca user name instead of "hello-world".
- add your full name, and OPS435 section to the README file, do not post any other personal information there.
Task 3: Clone a Github.com repository into a new directory on a Linux system
If your professor is asking you to submit labs on GitHub, follow their instructions now to clone the lab1 repository.
Otherwise, download the sample.py script from https://github.com/rayfreeping/ops435-lab1 repository to ~/ops445/lab1 directory
- Study and Explore the sample.py python script and identify the following sections:
- the shebang line
- the script level docstring
- the import section to import functions from the standard library module
- the function definition section
- the main script section
- Also identify the following items appear in the sample.py script:
- the Python keywords
- the decision code segment
- the looping code segment
- the run time error (exception) handling code segment
- Run the sample script with the following given command line options and study its output:
-
python3 sample.py
-
python3 sample.py test
-
python3 sample.py 2>/dev/null
-
python3 sample.py test 2>/dev/null
-
- Study and Explore the sample.py python script and identify the following sections:
Investigation 3 - exploring and using Python's built-in functions
Part I - Interactive (leaning) mode: using the Python Interactive Shell
- In this mode, you can instruct the Python Interpreter to execute python statement or python expression one at a time, call a function, or display the representation of a python data object.
- To start the Python version 3 Interactive shell, type the command at the Linux command prompt.
[raymond.chan@mtrx-node05pd lab1]$ python3
- You should get a startup message similar to the following:
[raymond.chan@mtrx-node05pd lab1]$ python3
Python 3.6.8 (default, Apr  2 2020, 13:34:55)
[GCC 4.8.5 20150623 (Red Hat 4.8.5-39)] on linux
Type "help", "copyright", "credits" or "license" for more information.
>>>
- Note that when you see the >>> Python interactive shell prompt, which indicates that the Python Interpreter is listening and waiting to carry out your instruction written in the Python language. Try the following commands at the python command prompt, and record their outputs for future reference:
- >>> copyright
- >>> credits
- >>> license
- >>> help
- The output of the last command should tell you how to enter the interactive help, or how to get help on a Python Object. You should see the following message when entering the interactive help utility:
Welcome to Python 3.6's help utility!

If this is your first time using Python, you should definitely check out
the tutorial on the Internet at https://docs.python.org/3.6/tutorial/.

Enter the name of any module, keyword, or topic to get help on writing
Python programs and using Python modules.  To quit this help utility and
return to the interpreter, just type "quit".

To get a list of available modules, keywords, symbols, or topics, type
"modules", "keywords", "symbols", or "topics".  Each module also comes
with a one-line summary of what it does; to list the modules whose name
or summary contain a given string such as "spam", type "modules spam".

help>
- Please note that the prompt changed from >>> to help>. Try the suggestion and feel free to explore the interactive help utility. Simple press the Enter key to get out of the interactive help utility.
- At the >>> prompt, type dir() to call the built-in function named dir without passing any function argument to it. The dir() function will return a list of data object names known to the Python interpreter at that moment. You should get a list of items similar to the following:
>>> dir()
['__annotations__', '__builtins__', '__doc__', '__loader__', '__name__', '__package__', '__spec__', 'x']
>>>
- We are interested in the object named __builtins__ at this moment. We can ask the Python interpreter to tell us more about the __builtins__ object by passing its name __builtins__ as the function argument to the dir() function:
>>> dir(__builtins__)
['ArithmeticError', 'AssertionError', 'AttributeError', 'BaseException', 'BlockingIOError',
...
ValueError', 'Warning', 'ZeroDivisionError', '_', '__build_class__', '__debug__', '__doc__',
'__import__', '__loader__', '__name__', '__package__', '__spec__', 'abs', 'all', 'any',
'ascii', 'bin', 'bool', 'bytearray', 'bytes', 'callable', 'chr', 'classmethod', 'compile',
'complex', 'copyright', 'credits', 'delattr', 'dict', 'dir', 'divmod', 'enumerate', 'eval',
'exec', 'exit', 'filter', 'float', 'format', 'frozenset', 'getattr', 'globals', 'hasattr',
'hash', 'help', 'hex', 'id', 'input', 'int', 'isinstance', 'issubclass', 'iter', 'len',
'license', 'list', 'locals', 'map', 'max', 'memoryview', 'min', 'next', 'object', 'oct',
'open', 'ord', 'pow', 'print', 'property', 'quit', 'range', 'repr', 'reversed', 'round',
'set', 'setattr', 'slice', 'sorted', 'staticmethod', 'str', 'sum', 'super', 'tuple',
'type', 'vars', 'zip']
- The above output shows a list of the so-called built-in run-time error codes and bulit-in function names. We are going to learn how to use them effectively in order to save our coding effort when writing Python programs/scripts.
- Let starts with the following built-in functions:
- print()
- help()
- type()
- We can learn more about the above built-in functions within the Python interactive shell. Study the output of the following command at the >>> prompt and keep a record of them for future reference:
>>> help(help)

>>> help(print)

>>> help(type)

>>> type(type)

>>> type(help)

>>> type(print)
Part II - Script (execution) mode: creating Python script
- In this part we will start writing our very first python script. The scripts we are going to try will be very basic and it is use to help us practice the language syntax and explore the foundational coding skills, such as:
- sending text to the screen,
- storing value in an data object,
- In this part we will start writing our very first python script. The scripts we are going to try will be very basic and it is use to help us practice the language syntax and explore the foundational coding skills, such as:
Task 1 - Python script using builtin Functions
Creating the "Hello World" Python Script
You will learn to create a simple python script in this section. This python script will just call the Python builtin function print() to send the text "hello world" to the screen. The "hello world" is an old traditional first program students usually are taught to create, which is based on the first programming example from the first C programming text co-written by Dennis Ritchie, the creator of the C programming language and Brian Kernighan. You will learn how to run the Python script in the Python3 shell as well as to learn how to run the Python script from the bash shell.
- Perform the following steps:
- Create a new Python file in your ~/ops445/lab1 directory. Call it lab1a.py. The first Python code we will write is going to call the print() function. A function is code that has been defined somewhere. Functions can take arguments, use these arguments in some way, and then usually, but not always, return a result. The first function we will use is the "print()" functions, it's sole purpose is to send data to the screen.
- Add the following line into your source code file:And run it from the command-line:
print()
You will notice that nothing is printed even though we called the "print()" function. This is because we didn't pass any arguments to it, lets try again.python3 ./lab1a.py
- Modify your call to print() to include an argument ('hello world'):This time we should now see that the python function "print()" has sent something to the screen - the words 'hello world'. In Python a word or a bunch of characters like 'hello world' is called a 'string'. In the above example, a string was passed as an argument to the print function. These words are important for understanding and talking about different aspects of code.
print('hello world') - Note that there are similarities between the Python print() function and the Bash echo command, but Python is more picky than bash (which is a good thing). Try to run print without the brackets or without the quotes to see what happens.
- Create a new Python file in your ~/ops445/lab1 directory. Call it lab1a.py. The first Python code we will write is going to call the print() function. A function is code that has been defined somewhere. Functions can take arguments, use these arguments in some way, and then usually, but not always, return a result. The first function we will use is the "print()" functions, it's sole purpose is to send data to the screen.
- Write the following code into our Python file. Note the she-bang line at the top of the file to run this script in the python3 environment. You will need to add this she-bang line for all python scripts you create for this course.
#!/usr/bin/env python3 '''Description: This program will output "hello world" to the screen.''' # Any line that starts with a "#" is also known as a comment, # these lines are ignored by the python interpreter even if # they contain code. The very first line is called a Shebang line, # it is used to tell the system which interpreter to # use(python2, python3, bash, etc). print('Hello world') - Another way of running a Python program is executing it directly, e.g.: Note that the file will need execute permissions even though you ran it just fine earlier. Why is that?
./lab1a.py
Submitting Your Lab Work Through GitHub
If you cloned your lab through GitHub, perform the following now:
 cd ~/ops445/lab1/
 pwd #confirm that you are in the right directory
 ls lab1a.py #confirm that you have the lab1a.py script in your directory
 python3 ./CheckLab1.py -f -v lab1a
Before moving on to the next step make sure you identify any and all errors in "lab1a.py". When the check script tells you everything is "ok", you may commit your changes.
 git add lab1a.py
 commit -m "Added lab1a"
 git push
Your first script is now submitted. The process for each part of the lab will be similar.
Submitting Your Lab Work Through Blackboard
If you did not clone your lab through GitHub, you may download the check script by following these steps:
Download the check script and check your work. Enter the following commands from the bash shell. cd ~/ops445/lab1/
pwd #confirm that you are in the right directory
ls lab1a.py #confirm that you have the lab1a.py script in your directory
ls CheckLab1.py || wget https://ict.senecacollege.ca/~raymond.chan/ops445/labs/LabCheckScripts/CheckLab1.py
python3 ./CheckLab1.py -f -v lab1aBefore moving on to the next step make sure you identify any and all errors in "lab1a.py". When the check script tells you everything is "ok", you may proceed to the next step.
Investigation 4 - exploring Python's built-in Data Objects
- In Python, a data object is used to store data for use later in the program. This data can be a string, integer, decimal number, characters, etc. We will only be covering string and integer objects in this lab. You will learn and use other Python built-in data object types in future labs.
String Objects
- String objects contain text to be used in your program. Examples of strings could be user-names, full-names, item descriptions, etc. We will now demonstrate how to assign a string to an object and how to display contents stored in a string object.
- Perform the following steps:
- Create a python script (called lab1b.py) and first - start with a few simple things to try:
- Let's make a new object containing a value:
name = 'Thomas'
- Print the value to the screen:
print(name)
- Think about why this does something different:
print('name') - Now lets try something new, we are going to print out the string and concatenate/combine it with another string. The plus sign can be used to join two strings together. However, make sure that the name of your object is always outside the quotes, or it will not resolve to a value.
print('I have a friend named ' + name) - To gain practice, complete your Python script with the following content and details:
- The script should have a Shebang line like you did for your lab1a.py python script
- The script should use a single object called "name"
- The value of the "name" object should be "Isaac"
- The script, when executed, should print out "How old are you Isaac?"
- Sample run: Try the checking script as you are working through a script to sometimes get hints.
 cd ~/ops445/lab1/
 ./lab1b.py
 How old are you Isaac?
- Download and run the checking script. Enter the following commands from the bash shell:
cd ~/ops445/lab1/
pwd #confirm that you are in the right directory
ls CheckLab1.py || wget https://ict.senecacollege.ca/~raymond.chan/ops435/labs/CheckScripts/CheckLab1.py
python3 ./CheckLab1.py -f -v lab1b
- Before proceeding, make certain that you identify any and all errors in "lab1b.py". When the check script tells you everything is "ok", you may proceed to the next step.
Integer Objects
- In Python, integer objects are used to store an integer numbers that can be used for mathematical operations (discussed in the next section). Integers do NOT contain decimals, and they can be signed (+ or -) or unsigned. Here we will store integers in a object, perform math operations, and display the results.
- Perform the following steps:
- Create a python script (called lab1c.py) and first - start with a few simple things to try:
- Lets create two new objects, num1 and num2, to play with.
num1 = 5
num2 = 10
- You can print the values in those integer objects:
print(num1)
print(num2)
- Now we will make a new object called "sum", and try some math:This will add the values contained in the integer objects together and assign the result to the object named "sum". However you will note that there is no data show up on the screen. Let's inspect the contents of the new object named "sum":
sum = num1 + num2
Does this value look right? Are you sure?print(sum)
- Now lets try printing this sum out with a string:What happened? Did you receive an error? This may have been the first time you've seen this error, but it won't be the last. What we tried to do is combine a string with a number, and this won't work.
print('The sum is: ' + sum)
In order concatenate a sting and an integer object, we will have to use another builtin function called "str()" to convert an integer object to a string first. The "str()" function will return a string of your number and provide it as a argument to "print()". This function will not change the value of your object, your object is still an integer object. - Issue the following:What did you notice this time?
print('The sum is: ' + str(sum)) - To gain practice, complete your python script with the following features:
- The script should have a Shebang line.
- The script should have an object called name
- The script should have an object called age
- The value of the name object should be Isaac
- The object age should contain a integer
- The value of the age object should be 72
- The script, when executed, should print out "Isaac is 72 years old!"
- Example run:
cd ~/ops445/lab1/
./lab1c.py
Isaac is 72 years old!
Try the check script as you are working through a script to sometimes get hints.
- Download and run the checking script. Enter the following commands from the bash shell:
cd ~/ops445/lab1/
pwd #confirm that you are in the right directory
ls CheckLab1.py || wget https://ict.senecacollege.ca/~raymond.chan/ops435/labs/LabCheckScripts/CheckLab1.py
python3 ./CheckLab1.py -f -v lab1c
- Before moving on to the next step make sure you identify any and all errors in "lab1c.py". When the check script tells you everything is "ok", you may proceed to the next step.
Investigation 5 - exploring on how to get Python to do maths
- In the previous section, you performed a couple of simple mathematical operations. In this section, you will learn some additional mathematical operations.
- Perform the following steps:
- Try some of the following to see what happens in Python:NOTE: You must be careful when combining more complex math operators together. Python uses PEMDAS (Parentheses, Exponents, Multiplication and Division, Addition and Subtraction) to resolve math.
print(10 + 5)    # addition
print(10 - 5)    # subtraction
print(10 * 5)    # multiplication
print(10 / 5)    # division
print(10 ** 5)   # exponents
- Go over the below examples and see if you understand each situation:
print(10 + 5 * 2)		# multiplication happens before addition
print((10 + 5) * 2) 		# parentheses happen before multiplication
print(10 + 5 * 2 - 10 ** 2)	# first exponents, then multiplication, then addition and subtraction from left-to-right
print(15 / 3 * 4)		# division and multiplication happen from left-to-right
print(100 / ((5 + 5) * 2))	# the inner most parentheses are first performing addition, then parentheses again with multiplication, finally the division
- To gain practice, complete your script with the following content and details:
- The script should have a Shebang line.
- The object x should contain a integer with the value 10
- The object y should contain a integer with the value 2
- The object z should contain a integer with the value 5
- The script, when executed, should print out "10 + 2 * 5 = 20" (the printout should change if the values in the objects change)
- Example run: Try the checking script as you are working through a script to sometimes get hints.
cd ~/ops445/lab1/
./lab1d.py
10 + 2 * 5 = 20
- Try some of the following to see what happens in Python:
- Download and run the checking script. Enter the following commands from the bash shell:Before moving on to the next step make sure you identify any and all errors in "lab1d.py".
cd ~/ops445/lab1/
pwd #confirm that you are in the right directory
ls CheckLab1.py || wget https://ict.senecacollege.ca/~raymond.chan/ops435/master/LabCheckScripts/CheckLab1.py
python3 ./CheckLab1.py -f -v lab1d
- When the check script tells you everything is "ok", you may proceed to the next step.
LAB 1 SIGN-OFF
Again, you will be asked to submit the lab in one of two ways:
Upload the following files individually to Blackboard
- Run the CheckLab1.py script and capture the result
python3 ./CheckLab1.py -f -v &> lab1_output.txt- Submit the following files individually to Blackboard:
- ✓
lab1_[seneca_id].txt - ✓
gitlog.txt, repo_tree.txt, lab1a.py, lab1b.py lab1c.py, lab1d.py
- ✓
Complete the GitHub Submission
- Run the CheckLab1.py script and capture the result
python3 ./CheckLab1.py -f -v &> lab1_output.txt
git add lab1_output.txt
git commit -m "completed lab"
git push
Lab Review
- What is a git repository?
- What kinds of data can be stored in a git repository?
- What is a git branch?
- What is the name of the definitive branch in a git repository?
- What is a "pull request" related to a branch in a git repository?
- Write Python code that when run, will perform the following tasks:
- Contain a she-bang line
- Display a greetings message to the user
- display an empty line (hint: use the special character \n to print the a new-line character)
- Display text, "Your current directory is:" (You are NOT required to display quotation marks)
- Display the current working directory pathname (using an appropriate command)
- Display another empty line
- How do you execute a Python script when you are within the interactive python3 shell? (Hint: make use of a function provided by the os python module.)
- How do you execute a Python script when you are in the Bash Shell (i.e. NOT within the python3 shell)?
- Write the pipeline command to check if the CheckLab1.py checking script exists, and download it from the location:
https://ict.senecacollege.ca/~raymond.chan/ops445/labs/LabCheckScripts/CheckLab1.py