Difference between revisions of "OPS345 Lab 3"
(→THIS PAGE IS A DRAFT, NOT A REAL COURSE PAGE) |
|||
| Line 3: | Line 3: | ||
''' The current schedule for OPS345 is here: [[OPS335_Weekly_Schedule]] | ''' The current schedule for OPS345 is here: [[OPS335_Weekly_Schedule]] | ||
| − | + | In the last lab we created the '''ww''' instance: | |
| − | * | + | * With a static private IP (10.3.45.11) |
| − | * | + | * We set up port forwarding for the SSH protocol so that incoming TCP packets to port 2211 on router are forwarded to TCP port 22 on ww. |
| + | |||
| + | = Storage for the web server = | ||
| + | |||
| + | In this lab we'll configure ww to function as a web server. The most important piece of learning in this lab is managing one type of storage available on AWS: '''Elastic Block Storage (EBS)'''. | ||
| + | |||
| + | An EBS volume looks like any other block storage device (e.g. a harddrive partition) to an operating system in an AWS instance. But of course it's not a partition or a harddrive or an LVM logical volume, its actual implementation details are internal to AWS and of no concern to us, the users. The concept should be familiar to you because it's so similar to how in OPS245 you've created a virtual harddrive in VMware and attached it to an existing VM. | ||
| + | |||
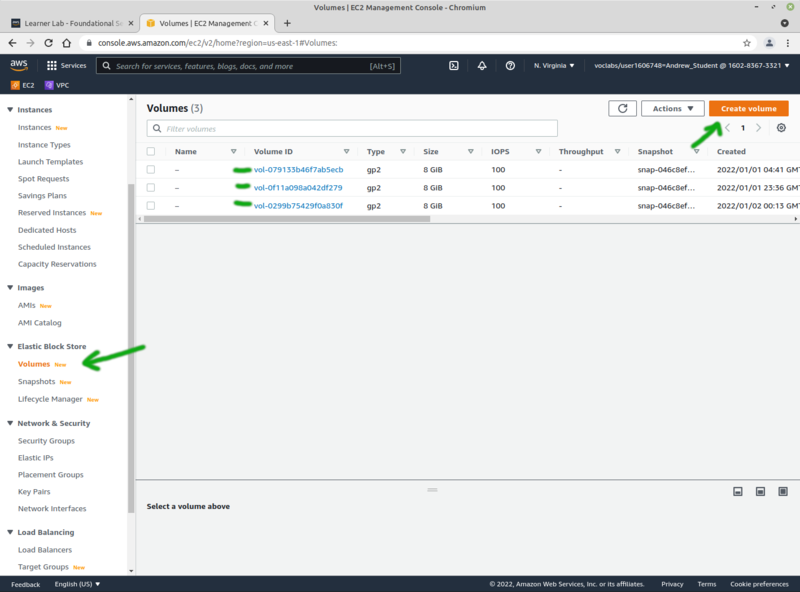
| + | * First go to Volumes under Elastic Block Store. Notice that some volumes are already there. These are the virtual harddrives which your existing VMs have been installed on, where they store all the operating system files, the contents of the home directories, and anything else "on the harddrive". | ||
| + | * Click "Create volume". | ||
| + | |||
| + | [[File:AWSCreateVolume.png|800px|border|center]] | ||
| + | |||
| + | * Don't neglect to click the "Info" link on each option. Remember that even though it may sound incomprehensible at first: you will pick up some knowledge every time you read this stuff, and eventually this will become easier to understand. | ||
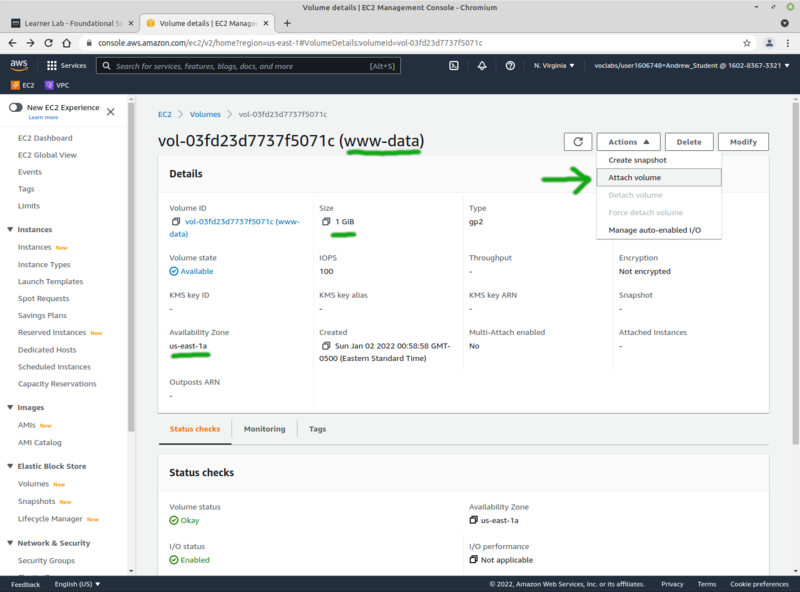
| + | * Set the size to '''1GB'''. This is the minimum allowed and is more than enough for what you need. | ||
| + | * Set its Name to '''www-data'''. | ||
| + | * Now you need to attach it to the ww VM. | ||
| + | |||
| + | [[File:AWSAttachVolume.png|800px|border|center]] | ||
| + | |||
| + | * The name of the device doesn't really matter. Mine turned out to be /dev/sdf. | ||
| + | |||
| + | Note that you don't need to shut down your VM nor even reboot it. The action you performed is the equivalent of plugging in a hot-pluggable storage device into a Linux desktop or laptop. | ||
| + | |||
| + | * In your ww terminal check that the new device showed up and is the correct size: | ||
| + | |||
| + | [[File:AWSVolumeAttached.png|800px|border|center]] | ||
| + | |||
| + | |||
| + | |||
| + | |||
* before starting the service, we'll configure the server to store all webpages on a separate volume: https://docs.aws.amazon.com/AWSEC2/latest/UserGuide/ebs-attaching-volume.html | * before starting the service, we'll configure the server to store all webpages on a separate volume: https://docs.aws.amazon.com/AWSEC2/latest/UserGuide/ebs-attaching-volume.html | ||
| − | |||
| − | |||
** attach to www (note reboot is not required) | ** attach to www (note reboot is not required) | ||
* ls /dev/xvd* -l # note /dev/xvdf | * ls /dev/xvd* -l # note /dev/xvdf | ||
Revision as of 02:13, 2 January 2022
THIS PAGE IS A DRAFT, NOT A REAL COURSE PAGE
The current schedule for OPS345 is here: OPS335_Weekly_Schedule
In the last lab we created the ww instance:
- With a static private IP (10.3.45.11)
- We set up port forwarding for the SSH protocol so that incoming TCP packets to port 2211 on router are forwarded to TCP port 22 on ww.
Storage for the web server
In this lab we'll configure ww to function as a web server. The most important piece of learning in this lab is managing one type of storage available on AWS: Elastic Block Storage (EBS).
An EBS volume looks like any other block storage device (e.g. a harddrive partition) to an operating system in an AWS instance. But of course it's not a partition or a harddrive or an LVM logical volume, its actual implementation details are internal to AWS and of no concern to us, the users. The concept should be familiar to you because it's so similar to how in OPS245 you've created a virtual harddrive in VMware and attached it to an existing VM.
- First go to Volumes under Elastic Block Store. Notice that some volumes are already there. These are the virtual harddrives which your existing VMs have been installed on, where they store all the operating system files, the contents of the home directories, and anything else "on the harddrive".
- Click "Create volume".
- Don't neglect to click the "Info" link on each option. Remember that even though it may sound incomprehensible at first: you will pick up some knowledge every time you read this stuff, and eventually this will become easier to understand.
- Set the size to 1GB. This is the minimum allowed and is more than enough for what you need.
- Set its Name to www-data.
- Now you need to attach it to the ww VM.
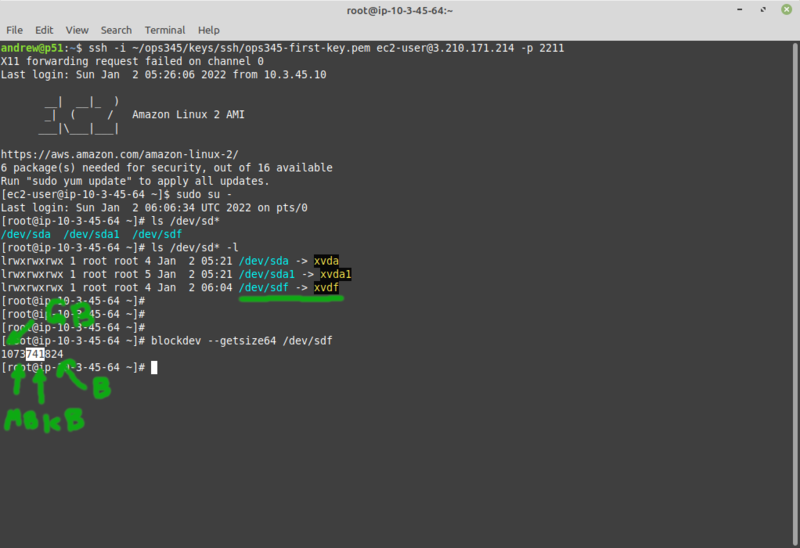
- The name of the device doesn't really matter. Mine turned out to be /dev/sdf.
Note that you don't need to shut down your VM nor even reboot it. The action you performed is the equivalent of plugging in a hot-pluggable storage device into a Linux desktop or laptop.
- In your ww terminal check that the new device showed up and is the correct size:
- before starting the service, we'll configure the server to store all webpages on a separate volume: https://docs.aws.amazon.com/AWSEC2/latest/UserGuide/ebs-attaching-volume.html
- attach to www (note reboot is not required)
- ls /dev/xvd* -l # note /dev/xvdf
- vgcreate vg_www /dev/xvdf
- lvcreate -n lv_www -l 100%FREE vg_www
- blkid
- ls /dev/mapper/vg_www-lv_www
- mkfs.ext4 -L www /dev/mapper/vg_www-lv_www
- vi /etc/fstab
- /dev/mapper/vg_www-lv_www /var/www ext4 defaults 0 0
- mount /var/www/
- ls /var/www/
- mount | grep /dev/xvd
- ls /var/www/
- mkdir /var/www/html
- vi /var/www/html/index.php
Hello. My web server still works.<br /> If this shows the current date and time, PHP works too:<br /> <?php system("date"); ?> - chown -R andrew /var/www/html
- systemctl start httpd
- On router: iptables -t nat -I PREROUTING -p tcp --dport 80 -j DNAT --to 10.3.45.11:80
- On www: iptables -I INPUT 3 -p tcp --dport 80 -j ACCEPT
- service iptables save
- Edit security group, allow HTTP
- ss -atnp on router and www
- install php, restart httpd
- make proper html page:
<html> <head> <style> body {background-color: powderblue;} table {border-spacing: 1cm 0cm;} h2 {color: blue;} th {text-align: left;} p {color: red; font-weight: bold;} </style> </head> <body> Hello. My web server still works.<br /> If this shows the current date and time, PHP works too:<br /><br /> <?php system("date"); ?> <h2>Instance Info</h2> <table> <tr><th>Configuration</th><th>Value</th></tr> <tr> <td><p>Private IP</p></td> <td><?php system("curl http://169.254.169.254/latest/meta-data/local-ipv4"); ?></td> </tr> <tr> <td><p>Public IP</p></td> <td><?php system("curl http://169.254.169.254/latest/meta-data/public-ipv4"); ?></td> </tr> </table> </body> </html> - Removing public ip doesn't work. Have to modify subnet and recreate the vm:
- Terminate www, rename it to www-deleted.
- Modify subnet to not auto-assign public IPs.
- Recreate the www instance with the same steps, except specify a primary ip.
- Install httpd, php
- To get yum install to work, allocate a new elastic ip "temporary" and associate with www
- Note that www-data was not deleted when the original www was terminated. Attach it to www now.
- All the data on the logical volume is still there, but fstab is gone, add lv-www back into there.
- Start httpd, everything should be back to as it was.
- Disasociate the public ip. Everything should keep working.
- Release the elastic ip.
- Add a 404 check for missing ip:
<?php
system("curl http://169.254.169.254/latest/meta-data/public-ipv4 2>&1| grep -q '404 - Not Found'", $rc);
if ($rc == 0)
  echo "None found";
else
  system("curl http://169.254.169.254/latest/meta-data/public-ipv4");
?>- If you feel curious you can see what other metadata you can get via http://169.254.169.254 here: https://docs.aws.amazon.com/AWSEC2/latest/UserGuide/instancedata-data-retrieval.html
- Move www to ops345sgprivate, and add port 80 from ops345sg as a second inbound rule there.


