Difference between revisions of "OPS235 Lab 4 - CentOS7 - SSD"
| Line 28: | Line 28: | ||
| − | {|width=" | + | {|width="80%" cellspacing="0" |
|- valign="top" | |- valign="top" | ||
Revision as of 09:43, 14 June 2016
Contents
LAB PREPARATION
Purpose / Objectives of Lab 4
There are many other tasks that a Linux system administrator must perform other than installing Linux and installing software.
A few additional tasks are user management and managing services.
Main Objectives:
- Administer (add, remove, modify) users on a Linux system.
- Save time while adding new users using a template of start-up files.
- Create and manage groups on a Linux system.
- Start and Stop services on a Linux system.
- Display the status of running services on a Linux system.
| Minimum Required Materials |
Linux Command Reference | ||||
| User Management
useradd |
Miscellaneous
/etc/passwd | ||||
INVESTIGATION 1: User/Group Management
User account management is a very important operation that a Linux sysadmin does on a consistent basis. The sysadmin not only needs to add or remove user accounts by issuing commands, but may need to automate user account creations a large number (batch) of potential employees. There are many features with the Linux command to create new users including: specification of a home directory, type of shell used, name, password and time-limit (referred to as "aging") for a new user account. Remove user accounts also have options such as removing the user account but keeping the home directory for reference or evidence of "wrong-doing"
In your ULI101 course, you learned to change permissions for directories and files relating to user, same group members and other group members. In this course, since you are the sysadmin with root privileges, you can create or remove groups as well as change the ownership of directories and files! We will now learn to perform key user account management operations in this section.
Part 1: The /etc/passwd file
- Look at the
/etc/passwdfile. - Make note of the contents of that file.
- Read about the file: http://man7.org/linux/man-pages/man5/passwd.5.html
- Make sure you know what information each field contains.
- Why do you think there are so many users?
- Look at the names of the users. What do you think these user names represent? Are they people?
- What is the numeric user ID (UID) of the root user?
- The user IDs of real users (people) are different from the user IDs of system accounts. What is the pattern?
Part 2: Adding, Removing, and Modifying Users
- Perform this part in your centos1 VM.
- Read the man page for the
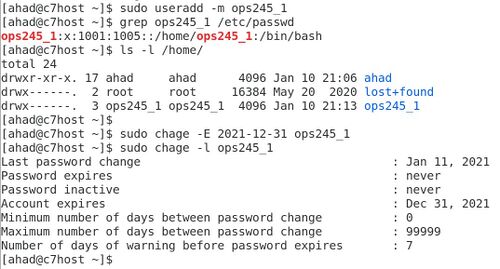
useraddcommand. - Create a new user called ops235_1 by issuing the command:
useradd ops235_1 - Issue the command:
grep ops235_1 /etc/passwdto see if that user account was created. - View the /home directory to view the contents. Is the user ops235_1's home directory there?
- Issue the following command to create the user called ops235_2:
useradd -m ops235_2 - View the /home directory to verify that the home directory for ops235_2 has been created. What does the -m option do for the useradd command?
- Issue the following command to remove the user called ops235_2:
userdel ops235_2 - Issue the grep command with the /etc/passwd file to verify that the username ops235_2 was removed.
- View the contents of the /home directory. Was the home directory for user ops235_2 removed? As root, remove that directory. What option do you need to use with the userdel command to automatically remove the user's home directory?
- Issue the userdel comamnd to remove the ops235_1 account with the -r option (and home directory regardless if it exists or not).
- Recreate the new user (with home directories automatically created) for ops235_1.
- Use the passwd command to set the password for the user ops235_1.
- View the contents for ops235_1's home directory and note the files.
- Look at the man page for /etc/shadow using the command:
man 5 shadow - Create a new file in the /etc/skel directory with the following command:
touch /etc/skel/foo - Recreate the new user (with home directories automatically created) for ops235_2.
- Set the password for the user ops235_2.
- View the contents for ops235_2's home directory and note the files. What do you notice that is different. What do you think is the purpose of the /etc/skel directory?
- Be sure to record your observations in your lab notes.
- Issue the man pages for the useradd command. Explain the purpose of using the -e option for the useradd command.
- Issue the following command:
chage -E 2018-05-31 ops235_1 - Issue the following command:
chmod -c "New Name" ops235_2. View ops235_2's account information in the /etc/passwd file. What do you notice is different? - Issue the following command to obtain information regarding the user called ops235_1:
chage -l ops235_1. What do you think is the purpose of the chage command and the useradd command with the -e option?
Part 3: Managing Groups
- Remain in your centos1 VM for this section.
- Switch to ops235_1's user account by issuing the following command:
login ops235_1 - Create a file called information.txt in home directory of that user.
- Issue the following command:
ls -l information.txt. Who owns that file? What primary group does that file belong to? - Issue the command
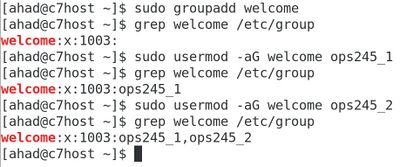
exitto return to your root account. - Issue the following command to create a group called welcome:
groupadd welcome - Issue the command:
grep welcome /etc/groupfile to confirm that group was created. - Read the man page for the
usermodcommand. Which option allow you to set the Group ID number (GID) when you create a new group? Which options allow you to both append and assign users to an existing group name? - Issue the usermod command to add both ops235_1 and ops235_2 to the newly-created welcome group.
Practical Example: Management has indicated that the "noobie" employee be on on probation for 3 months. As the Linux system administrator, they want you to perform the following steps:
- Use the useradd command to set the account for noobie to expire in 3 months from this date as part of the security policy of this organization. Set an appropriate password for this user account.
- Add this newly-created user to the welcome group.
- Examine
/etc/groupto verify that you made the correct operations. - Use the usermod command to change the full name of the user account noobie from "Really Green" to "Outstanding Employee". Examine the result of running that command in the
/etc/passwdfile. What has changed?
Unfortunately, you have been informed that this "noobie" employee was caught stealing from the company. They want you to perform the following operations:
- Remove this account, but keep "noobie's" home directory for police investigation purposes.
- Verify that you correctly issued the correct commands.
Answer INVESTIGATION 1 observations / questions in your lab log book.
INVESTIGATION 2: Managing System Services and Run-levels
Many students may think that the following topic is small and "not a big deal". Those students may say, "How hard is running and stopping services?"
The process may not be hard, but knowing how to stop, start, restart and check the status of services is absolutely critical to a Linux server. Aside from learning to trouble-shoot problems by checking the status of running services, understanding how to manage services is critical to help protect a Linux server from penetration (this term is referred to as "Hardening a system"). Sometimes it is "what we don't know" that can harm us. One key element in hardening a computer system is to disable non essential networkng services to allow IDSs (Intrusion Detection Systems) to focus on a narrower range of policy violations. A Debian-based penetration testing distribution called Kali (formerly referred to as "BackTrax") allows sysadmins and security professionals to identify vulnerabilities in their computer systems, and thus improve (harden) their systems against penetration. Learning to monitor the status, enable and disable networking services underlies the Backtrax motto:
"The quieter you are, then more you will hear..."
Part 1: How do we Manage System Services?
We have seen that maintaining unneeded packages can be a security risk due to the unnecessary increase in the complexity of your system. Similarly, it is also unnecessarily hazardous, and even more so, to leave unneeded services running. In this investigation, we will learn how to control services, and turn off those services that we think are not necessary to help reduce security risks.
Although there is a command called: service that may appear to manager services on your Linux system, it is considered deprecated (i.e. "obsolete"). It has been replaced by using the systemctl command.
- Use your centos2 VM for this part.
- Use the man pages to learn about the systemctl command.
- Issue the following Linux command:
systemctl list-units --all
- Note the services that are currently running.
- Use the command
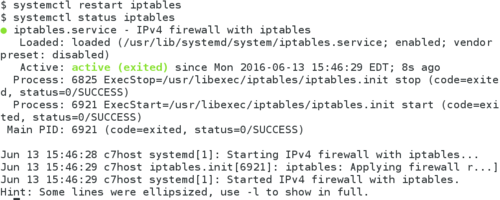
systemctl stop iptablesto stop the service named iptables - Run the following command to verify that the iptables service has stopped:
systemctl list-units iptables. - Issue the following command: systemctl disable iptables (disable iptables service so it does NOT run upon system startup)
- If you reboot now - the iptables service will NOT be turned on upon system boot-up. We don't want it on though at this point anyways since it causes students headaches.
- Use the systemctl command to verify that the iptables service is no longer running and is disabled.
Part 2: How do we Manage Runlevels?
Running servers in graphical mode will make your system most likely to be penetrated. The X-windows framework can be vulnerable to attacks when these servers are connected to the Internet. This is why when you install server versions of Linux, they work in text-based mode only. Desktop versions of Linux are then installed on workstations (working in graphical mode) that connect to the server (for security reasons).
The Linux sysadmin can also change the run-level (or state) of a graphical Linux server to run in text-based mode and run the graphical mode by issuing a command when graphic mode is required. The run-level term is now deprecated in Fedora, and will likely be deprecated in RHEL/CentOS at some point as well, but for now this is what the industry is using.
- Perform this part in both your centos2 and centos3 VMs.
- Issue the following Linux command:
runlevel
- Note the difference in output between centos2 and centos3.
- You can use the init command to change the current run-level. See a list of runlevels here.
- Use the man command to learn how to use the init command. Use this command to change the current run-level in centos2 to 3. What happened?
- Issue the following Linux command:
startx
- What happens?
- Log-off your graphical system. You should return to your shell prompt.
- Using systemd requires a different method of setting text mode and graphical mode. You can refer to this link for future reference: How to Change Run-Levels with Systemd
- Restart your centos2 machine, and make certain that it runs in graphical mode Why would you want to make a graphical Linux system run in text-based mode?
Answer INVESTIGATION 2 observations / questions in your lab log book.
INVESTIGATION 3: GETTING SHELL SCRIPTS TO ACT LIKE LINUX COMMANDS (GETOPTS)
Using getopts Function & case statement
We will now use shell scripting to help automate the task for a Linux adminstrator to create regular user accounts.
- You will be using your c7host machine for this section.
- Download, study, and run the following shell script. Issue the command:
wget https://scs.senecac.on.ca/~murray.saul/user-create.bash - Try to understand what these Bash Shell scripts do, and then run the script as root. After running the shell script, view the contents of the /home directory to confirm.
Although the zenity command is a "user-friendly" way to run shell scripts, Linux administrators usually create shell scripts that resemble common Linux commands. In this lab, you will learn to create a shell script using the getopts function to make your shell script behave more like actual Linux commands (including the use of options). Refer to the notes section on the right-hand-side for reference about the case statement and the getopts function.
- Open a Bash shell terminal and login as root.
- Use the wget command to download the input file called user-data.txt by issuing the command:
wget https://scs.senecac.on.ca/~murray.saul/user-data.txt - View the contents on the user-data.txt file to confirm there are 3 fields (username, fullname, and e-mail address)which are separated by the colon (:) symbol.
- Use a text editor (such as
viornano) to create a Bash Shell script called:createUsers.bashin /root's home directory. - Enter the following text content into your text-editing session:
#!/bin/bash


# createUsers.bash

# Purpose: Generates a batch of user accounts (user data stored in a text file)

#
# USAGE: /root/createUsers.bash [-i {input-path}]

#

# Author: *** INSERT YOUR NAME ***

# Date:   *** CURRENT DATE ***


if [ $PWD != "/root" ]   # only runs if in root's home directory

then
 echo "You must be in root's home directory." >&2

 exit 1

fi

if [ "$#" -eq 0 ] #  if no arguments after command

then

 echo "You must enter an argument" >&2

 echo "USAGE: $0 [-i {input-path}]" >&2

 exit 2

fi
- Save your editing session, but remain in the text editor.
- The code displayed below uses the getopt function set the input file pathname or check for invalid options or missing option text. Add the following code
outputFlag="n"

while getopts i: name

do

 case $name in

   i) inputFile=$OPTARG ;;

   :) echo "Error: You need text after options requiring text"

       exit 1 ;;

   \?) echo "Error: Incorrect option"

        exit 1 ;;

 esac

done
- Save your editing session, but remain in the text editor.
- The code displayed below uses logic to exit the script if the input file does not exist. Command substitution is used to store each line of the input file as a positional parameter. There is one subtle problem here: The full names of the users contain spaces which can create havoc when trying to set each line as a separate positional parameter. In this case the sed command is used to convert spaces to plus signs (+), which will be converted back later. Finally, a for loop is used to create each account (useradd) and mail the user their account information (mail). Add the following code:
if [ ! -f $inputFile ]

then

  echo "The file pathname \"$inputFile\" is empty or does not exist" >&2

  exit 2

fi


set $(sed 's/ /+/g' $inputFile)  # temporarily convert spaces to + for storing lines as positional parameters


for x

do

    userPassWd=$(date | md5sum | cut -d" " -f1)

    useradd -m -c "$(echo $x | cut -d":" -f2 | sed 's/+/ /g')" -p $userPassWd $(echo $x | cut -d":" -f1)

    mail -s "Server Account Information" $(echo $x | cut -d":" -f3) <<+

    Here is your server account information:

    servername: myserver.senecac.on.ca

    username:   $(echo $x | cut -d":" -f1)

    password: $userPassWd

    Regards,

    IT Department

+

done


echo -e "\n\nAccounts have been created\n\n"

exit 0
- Save, set permissions, and then run that shell script for the input text file user-data.txt. Did it work? Try running the script without an argument - What did it do?
- You have completed lab4. Proceed to Completing The Lab, and follow the instructions for "lab sign-off".
Answer INVESTIGATION 3 observations / questions in your lab log book.
LAB 4 SIGN-OFF (SHOW INSTRUCTOR)
Perform the Following Steps:
- Make certain that your c7host, centos1 and centos2 VMs are running.
- Switch to your centos1 VM.
- Open a shell terminal, and issue the Linux command:
wget http://matrix.senecac.on.ca/~murray.saul/ops235/lab4-check.bash - Give the lab4-check.bash file execute permissions (for the file owner).
- Run the shell script and if any warnings, make fixes and re-run shell script until you receive "congratulations" message.
- Arrange proof of the following on the screen:
✓ centos1 VM:
✓ centos2 VM:- Output from running the lab4-check.bash script with all OK messages
✓c7host machine- Display current run-level status on centos2 VM
✓ Lab4 log-book filled out.- Creation of your bash shell script called createUsers.bash
Practice For Quizzes, Tests, Midterm & Final Exam
- Describe all of the field in
/etc/passwd - What is the command to create a user? What option to create a home directory for that user?
- What is the command to change the full name of an already-created user?
- What is the command to delete a user account? What option allows for the user's home directory to be removed as well?
- What is the command to create a group? What is the command (or steps) to include a user in a newly-created group?
- What is the purpose of
/etc/shadow? - What is the purpose of
/etc/skel? - What does the term run-level mean?
- How to set the run-level of a Linux system to text-based only? How to set to graphical mode?
- What is the command to view the status of running services?
- What is the command to start a service (like httpd, or sshd)?
- What is the command to stop a service (like httpd, or sshd)?
- What is the difference between starting a service and enabling a service?
- Can a service be stopped and started by issuing just one command?
- What is the purpose of the case statement in shell scripting?
- What is the purpose of the getopts function in shell scripting?
- What type of shell script would be best to automatically create 1200 user accounts (which a list of usernames are stored in a text-file)?


