Difference between revisions of "OPS235 Lab 2 - Fedora17"
| Line 81: | Line 81: | ||
==Instructions== | ==Instructions== | ||
| − | + | === Preparation === | |
| − | |||
| − | |||
| − | |||
| − | + | {{Admon/tip|Update your Fedora Installation|It's a good idea to ensure that your Fedora installation is fully updated before proceeding. You can update your system with the graphical tool located on the menu at >System>Administration>Software Update (or type the command <code>gpk-update-view</code>), or by typing either of these commands: <code>pkcon update</code> or <code>yum update</code>}} | |
| − | {{Admon/ | ||
| − | + | # Install the Fedora virtualization software: <code>yum groupinstall "Virtualization"</code> or <code>pkcon install @virtualization</code> The virtualization software installed is in three parts: | |
| + | ## A system service named ''libvirtd'' that manages the VMs. | ||
| + | ## Tools to manage virtualization, including the <code>virt-manager</code> graphical tool and the <code>virsh</code> command-line tool. | ||
| + | ## The actual virtual machines themselves. | ||
| + | # Start the virtualization service: <code>service libvirtd start</code> | ||
| + | # The firewall configuration is altered by the addition of the virtualization software. Restart the firewall so that these changes become active: <code>service iptables restart</code> | ||
| + | # Start the graphical tool by selecting the menu option Applications>System Tools>Virtual Machine Manager or by typing the command <code>virt-manager</code> | ||
| + | {{Admon/important|Run virt-manager as a regular user|Running virt-manager as root may not work due to configuration issues.}} | ||
| − | + | {{Admon/caution|Reboot your fedora host|There appears to be an issue with supplying your VM's with a dynamic IP unless the host is restarted after installing "Virtualization". '''Reboot now to avoid this problem.'''}} | |
| − | |||
| − | |||
| − | |||
| − | |||
| − | |||
| − | |||
| − | |||
| − | |||
| − | |||
| − | |||
| − | |||
| − | |||
| − | |||
| − | |||
| − | |||
| − | |||
| − | |||
| − | |||
| − | |||
| − | |||
| − | |||
| − | |||
| − | |||
| − | |||
| − | |||
| − | + | === Investigation 1: Installing from a Live Disc === | |
| − | {{Admon/tip| | + | {{Admon/tip|Using an Image instead of a Live Disc|If you do not have a Live Disc available, you can download the .iso image file from http://belmont.senecac.on.ca/fedora/releases/13/Live/x86_64/Fedora-13-x86_64-Live.iso and then use the iso image file in place of the physical disk.}} |
| − | === | + | ==== Introduction ==== |
| − | + | In this investigation, you will install Fedora from your live disc, and observe the differences between this type of installation and the DVD installation previously performed. | |
| − | + | ==== VM Details ==== | |
| − | + | * Name: fedora1 | |
| − | + | * Boot media: Fedora Live CD | |
| − | + | * Installation source: Fedora Live CD | |
| − | + | * Memory: 512MB | |
| − | + | * Disk space: 10GB | |
| − | + | * CPUs: 1 | |
| − | |||
| − | |||
| − | |||
| − | |||
| − | |||
| − | |||
| − | |||
| − | |||
| − | |||
| − | |||
| − | |||
| − | |||
| − | |||
| − | |||
| − | |||
| − | + | ==== Steps ==== | |
| − | + | {{Admon/note|Fedora 12 Screen Shots|The following screen shots are from Fedora 12. The Fedora 13 version of virt-manager varies slightly -- there are a few extra controls on some dialogs which may be ignored.}} | |
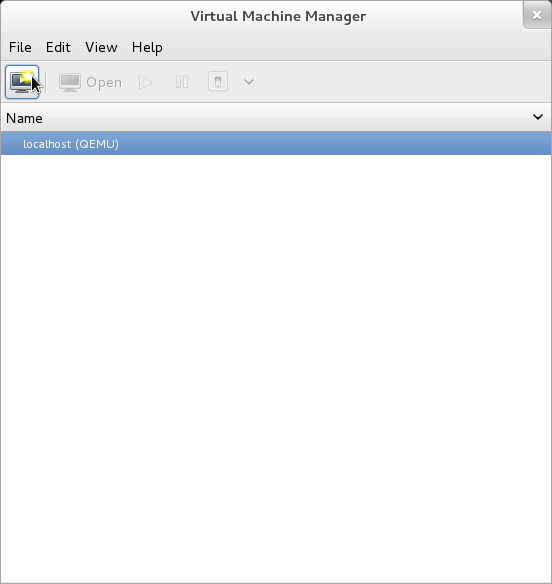
| − | + | # In the Virtual Machine Manger, click on the icon to ''Create a Virtual Machine'' in the upper-left corner: <br />[[Image:Virt-manager1.png]] | |
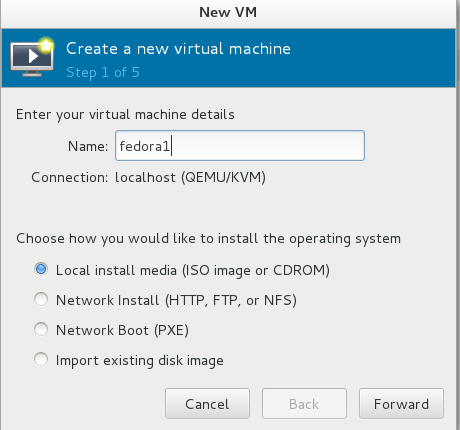
| + | # A window will appear with the title ''New VM''. There are five steps to be completed; click Forward after each step: | ||
| + | # Step 1 of 5: Enter the virtual machine name and select ''Local install media''.<br />[[Image:Virt-manager2.png]] | ||
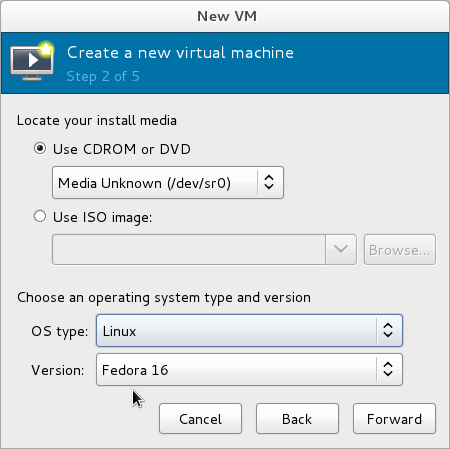
| + | # Step 2 of 5: Insert the CDROM or DVD containing the Fedora Live Disc image. Wait a moment for the disc to be recognized, then select it as the install media. Set the ''OS type'' to Linux and the ''Version'' to Fedora 13.<br />[[Image:Virt-manager3.png]] | ||
| + | <!-- {{Admon/tip|Using an ISO image|Instead of using a physical CD or DVD, you can use an ISO image of a CD or DVD. The virtualization software will make this ISO image appear like an actual CD within the virtual machine. Because hard disks are faster then optical discs, this will work faster than an actual CD/DVD.}}{{Admon/note|Choosing the operating system type and version|The purpose of the ''OS type'' and ''Version'' fields is to fine-tune some of the virtual machine settings for best performance. The VM will work even if these are set incorrectly.}} --> | ||
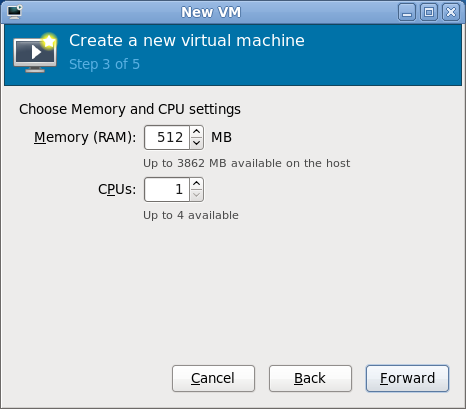
| + | # Step 3 of 5: Set the memory to 512 MB and the number of CPUs to 1.<br />[[Image:Virt-manager4.png]] | ||
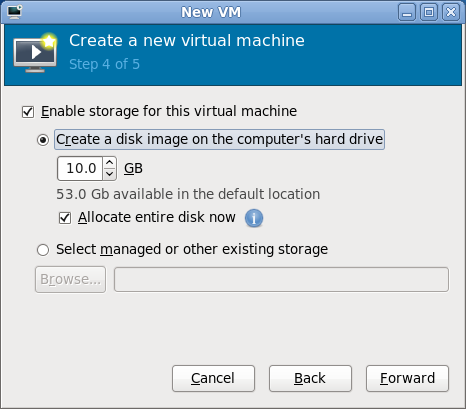
| + | # Step 4 of 5: This next step creates a disk file that will be used to simulate the virtual machine's disk drive. Select a size of 10 GB and checkmark the box labeled ''Allocate entire disk now''.<br />[[Image:Virt-manager5.png]] | ||
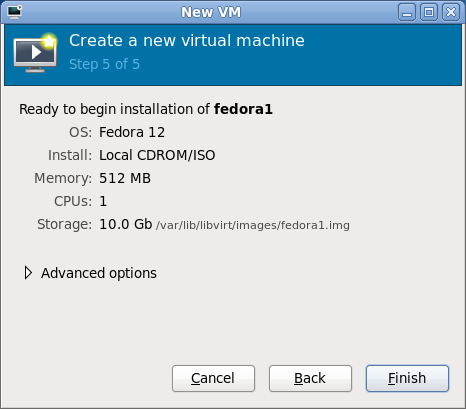
| + | # Step 5 of 5: Review the options that you have selected. '''Make a note of the storage location.''' If anything needs to be changed, use the ''Back'' button to go back and edit it; otherwise, click ''Finish''.<br />[[Image:Virt-manager6.png]] | ||
| + | # The virtual machine will now start. You will see a window which displays the virtual video card from the VM. It's important to note that the VM can (and often will) run even when this display is not present. The virtual machine is running from the live disc at this point, and no software has been installed on the ''hard drive'' of the virtual machine. | ||
| + | # Login to the VM and double-click on the ''Install to Hard Drive'' icon. The installation program, similar to the one used when installing Fedora in Lab 2, will appear. You will get a warning at one point during the installation process that the disk "may need to be re-initialized" -- this is simply a warning that the virtual disk is completely blank, and it is safe to select ''Re-initialize drive''. | ||
| + | # During the installation process, when prompted for the drive, select "Virtio Block Device", when prompted for the hostname, enter "fedora1", when prompted for the timezone, select ''America/Toronto'', and when asked about storage, select ''Use All Space''. '''Use the default values for all other fields.''' Notice that the installer does not ask you what software should be installed; compare the installation time to the amount of time it took to do your Lab 2 installation. | ||
| + | # When the installation is complete, select the menu option System>Shutdown to stop the Live Disc. | ||
| + | # Start the VM from its disk image by selecting Virtual Machine>Run from the virtual machine menu. You will get the ''Firstboot'' configuration questions during the boot process (asking you to create a user, set the date and time, and optionally send the hardware profile to the Fedora Project). Create a user with the same name as your Matrix account. | ||
| + | # Login using the new user account. | ||
| + | # Enable SSH access to your virtual machine with these commands: <code>service sshd start; chkconfig sshd on</code> | ||
| + | # Find out the IP address of your virtual machine: <code>ifconfig eth0</code> | ||
| + | # Enter the following command on your virtual machine to create a firewall exception to allow ssh traffic into the machine: <code>iptables -I INPUT -p tcp -s0/0 -d0/0 --dport 22 -j ACCEPT</code> | ||
| + | # Confirm that you can ssh to your virtual machine from the host (your main Fedora installation): <code>ssh ''IPaddress''</code> | ||
| − | + | === Investigation 2: Installing from the Network === | |
| − | + | {{Admon/tip|Authenticate to the network|The rest of this lab uses network access. Be sure to authenticate to the network using your browser before proceeding.}} | |
| − | {| | + | ==== Introduction ==== |
| − | ! | + | |
| − | + | It is possible to install Fedora entirely from the network. In this investigation, you will install Fedora from a webserver on Seneca's LAN. | |
| + | |||
| + | ==== VM details ==== | ||
| + | |||
| + | * Name: fedora2 | ||
| + | * Boot media: Network installation | ||
| + | * Installation source: http://belmont.senecac.on.ca/fedora/releases/13/Fedora/x86_64/os/ | ||
| + | * Memory: 512MB | ||
| + | * Disk space: 15GB | ||
| + | * CPUs: 1 | ||
| + | |||
| + | ==== Steps ==== | ||
| + | # Create the VM as you did with the ''fedora1'' virtual machine, except: | ||
| + | #* In step 1 of 5, set the installation type to "Network Install (HTTP, FTP, or NFS)" | ||
| + | #* In step 2 of 5, provide the URL http://belmont.senecac.on.ca/fedora/releases/13/Fedora/x86_64/os/ | ||
| + | #* In step 2 of 5, set the ''OS Type'' to "Linux" and ''Version'' to "Fedora 13" | ||
| + | # Observe the boot process. How is it different from booting from an optical disc (CD/DVD)? | ||
| + | # Start the installation process. When you get to the disk partitioning step, enable the checkbox labelled ''Review and modify partition layout''. On the next screen, change the logical volumes as follows: | ||
| + | #* Reduce the size of the root LV to 8000 MB. | ||
| + | #* Add a logical volume with a size of 2000 MB and a mountpoint of /home (you can name it whatever you want, and use ext3 or ext4 as the filesystem type). | ||
| + | # On the software selection screen, select ''Graphical Desktop''. | ||
| + | # On the same screen, select the "Fedora 13 - x86_64" and the "Fedora 13 - x86_64 - Updates". Leave "Installation Repo" selected. ''DO NOT'' enable the "Test Updates" repository. | ||
| + | # Complete the installation. Record the time taken to install, and compare this to the time taken by the previous installations. | ||
| + | |||
| + | === Investigation 3: Installing from the Network using Kickstart === | ||
| + | |||
| + | ==== Introduction ==== | ||
| + | |||
| + | When Fedora is installed using the techniques you have used so far, the user is asked a number of questions. In some situations, it is better to provide the answers to these questions in a file rather than answer them individually. This type of file is called a ''kickstart'' file. | ||
| + | |||
| + | In this investigation, a kickstart file is provided for you. You can also create or modify a kickstart file using a regular text editor or a graphical tool. | ||
| + | |||
| + | ==== VM details ==== | ||
| + | |||
| + | * Name: fedora3 | ||
| + | * Boot media: Network installation | ||
| + | * Installation source: http://belmont.senecac.on.ca/fedora/releases/13/Fedora/x86_64/os/ | ||
| + | * Kickstart location: http://zenit.senecac.on.ca/~chris.tyler/fedora13-vda-ks.cfg | ||
| + | * Memory: 512MB | ||
| + | * Disk space: 10GB | ||
| + | * CPUs: 1 | ||
| + | |||
| + | ==== Steps ==== | ||
| + | # Create the VM as you did with the ''fedora2'' virtual machine, specifying a network install as before, except: | ||
| + | #* In step 2 of 5, after entering the URL for the installation source, click on the ''URL Options'' control. | ||
| + | #* Enter the Kickstart URL: http://zenit.senecac.on.ca/~chris.tyler/fedora13-vda-ks.cfg | ||
| + | # Observe the installation. How is it different from booting from an optical disc (CD/DVD)? | ||
| + | # Complete the installation. Record the time taken to install, and compare this to the time taken by the previous installations. | ||
| + | # What happens when the installation is finished? | ||
| + | # Take a look at the kickstart file (using the URL you entered) to determine the root password as well as the name and password for the first user account. | ||
| + | # Boot the virtual machine and log in (use the user ID and password information from the previous step). Compare the experience to the first time you booted the other virtual machines. | ||
| + | |||
| + | === Investigation 4: Updating and Comparing the VMs === | ||
| + | |||
| + | # In each VM, run this command: <code>yum update</code> | ||
| + | # Record the answers to these questions in your log book: | ||
| + | #* How long did it take to run on each VM? How many packages were updated? | ||
| + | #* Why does it take longer in some VMs than others? | ||
| + | |||
| + | Complete the following table: | ||
| + | |||
| + | {|border="1" width="100%" | ||
| + | |- | ||
| + | ! ||f13host||fedora1||fedora2||fedora3 | ||
| + | |- | ||
| + | |'''Installation Method'''||Installation Disc||Live Disc||Network Installation||Network Installation + Kickstart | ||
| + | |- | ||
| + | |'''Packages Installed'''|| || || || | ||
| + | |- | ||
| + | |'''Updates Installed immediately after installation'''|| || || || | ||
| + | |- | ||
| + | |'''Software could be selected during installation'''|| || || || | ||
| + | |- | ||
| + | |'''Disk layout could be selected during installation'''|| || || || | ||
|- | |- | ||
| − | | | + | |'''No questions asked during installation'''|| || || || |
| − | | | ||
|- | |- | ||
| − | | | + | |'''Total installation time''' (after installation questions)|| || || || |
| − | | | ||
|- | |- | ||
| − | | | + | |'''Amount of disk space used'''|| || || || |
| − | |||
|- | |- | ||
| − | | | + | |'''Questions asked during first boot'''|| || || || |
| − | | | ||
|- | |- | ||
| − | | | + | |'''Advantages of this type of installation'''|| || || || |
| − | |||
|- | |- | ||
| − | | | + | |'''Disadvantages of this type of installation'''|| || || || |
| − | | | ||
|- | |- | ||
| − | | | + | |'''This type of installation is recommended for...'''|| || || || |
| − | | | ||
|} | |} | ||
| − | + | === Investigation 5: Managing Virtual Machines from the Command Line === | |
| − | |||
| − | |||
| − | + | {{Admon/note|Manage virtual machines from the host|The commands used to manage virtual machines must be executed on the host (your disk pack) and not inside a virtual machine.}} | |
| − | |||
| − | + | # Start the ''fedora1'' virtual machine, and stop the ''fedora2'' and ''fedora3'' virtual machines. | |
| + | # Enter these commands and note the result: | ||
| + | #* <code>virsh list</code> | ||
| + | #* <code>virsh list --all</code> | ||
| + | #* <code>virsh list --inactive</code> | ||
| + | # Start the ''fedora3'' virtual machine from the command line: <code>virsh start fedora3</code> | ||
| + | # Repeat the commands from step 2 and notice any changes. | ||
| + | # Stop the ''fedora3'' virtual machine: <code>virsh shutdown fedora3</code> | ||
| + | # Confirm that ''fedora3'' has been shut down. | ||
| + | # Execute this command: <code>virsh dumpxml fedora3 >fedora3.xml</code> | ||
| + | # Examine the file <code>fedora3.xml</code>. What does it contain? What format is it in? | ||
| + | # Edit the file fedora3.xml, making the following changes: | ||
| + | #* Change the name to <code>fedora3a</code> | ||
| + | #* Change at least one of the hexadecimal characters in the UUID. Do not change the length of the UUID. Valid hexadecimal characters are 0-9 and a-f. | ||
| + | # Issue this command: <code>virsh define fedora3a.xml</code> | ||
| + | # Issue the command <code>virsh list --all</code> and record any changes. | ||
| + | # Issue the command: <code>virsh undefine fedora3a</code> | ||
| + | # List all of the virtual machines again, and note any changes. | ||
| − | + | === Investigation 6: How do I backup a virtual machine? === | |
| − | |||
| − | |||
| − | |||
| − | |||
| − | |||
| − | |||
| + | # Shut down all of the virtual machines. | ||
| + | # Change to the directory <code>/var/lib/libvirt/images/</code>. Note the size of the files in this directory. What do these files contain? | ||
| + | # Make a compressed backup of the <code>fedora3.img</code> file with this command: <code>gzip <fedora3.img >fedora3.img.backup.gz</code> | ||
| + | {{Admon/caution|Make sure the backup is successful!|If there are any error messages, '''DO NOT''' proceed past this point. You're going to destroy your fedora3 virtual machine and restore it using the backup you have created -- if there are any problems with the backup, you will not have a working virtual machine, and will have to re-install it.}} | ||
| + | # Compare the size of the compressed and original files. | ||
| + | # Start the ''fedora3'' VM. | ||
| + | # '''Make certain that you are in your fedora VM, and <u>not</u> in your Fedora main system.''' | ||
| + | # Wreck <u>only</u> your fedora 3 system! Try this command inside the fedora3 virtual machine ('''DO NOT''' do this on your main Fedora system, or you will have to repeat your '''lab2''' and portions of your '''lab3'''!): <code>rm -rf /*</code> | ||
| + | # Shut down the VM. | ||
| + | # Restore the original image from backup (type this command carefully): <code>gunzip <fedora3.img.backup.gz >fedora3.img</code> | ||
| + | # Restart the VM. Is it working normally? | ||
| + | # Create compressed backups of your other virtual machines. | ||
| + | # Answer this question in your log book: | ||
| + | #* In order to fully back up a virtual machine, what information should be saved in addition to the virtual machine image? | ||
| + | # Write the answer to the Investigation 6 question in your lab book. | ||
| − | + | {{Admon/important|Backing up VMs|It's a good idea to back up your VMs at the end of each lab, so you can easily restore them if something goes wrong in the next lab.}} | |
| − | + | {{Admon/tip|Shutting Down the Host while Virtual Machines are Running|If you shut down your host system while virtual machines are running, they will be suspended, and will resume the next time you boot your host system.}} | |
| − | + | === Investigation 7: Kickstart Files === | |
| − | |||
| − | |||
| − | |||
| − | |||
| − | |||
| − | |||
| − | |||
| − | |||
| − | |||
| − | + | {{Admon/tip|SSHD and Firewall|If you have restarted your virtual machine ''fedora1'', the sshd server you started in section 1-16 will no longer be running. In addition, the firewall will have reverted to its original state. In order to use ''scp'', below, you will need to restart ssh and adjust the firewall again.}} | |
| − | + | When you perform a non-Kickstart installation, the installation program creates a Kickstart file in the <code>/root</code> directory for reference. | |
| − | + | # Obtain the kickstart files for all four of your installations (your disk pack ''f13host'', plus the ''fedora1'', ''fedora2'', and ''fedora3'' virtual machines). Copy them all to your f13host system (tip: use <code>scp</code>). | |
| − | + | # Compare these files. What are the differences? Similarities? (Tip: you may want to use tools such as <code>sdiff</code> to help with the comparison). | |
| − | + | # How could you use the kickstart file produced by the installation program to perform additional, identical installations? | |
| − | |||
| − | |||
| − | |||
| − | |||
| − | |||
| − | |||
| − | |||
| − | |||
| − | |||
| − | |||
| − | |||
| − | |||
| − | |||
| − | |||
| − | |||
| − | |||
| − | |||
| − | |||
| − | |||
| − | |||
| − | |||
| − | |||
| − | |||
| − | |||
| − | |||
| − | # | ||
| − | # | ||
| − | |||
| − | |||
== Completing the Lab == | == Completing the Lab == | ||
| − | + | {{Admon/important | Important! | Arrange evidence of each of the following items on the screen, and then ask your professor or lab monitor to check them:}} | |
| − | + | # Three working virtual machines created. | |
| − | + | # Four kickstart files. | |
| − | + | # All virtual machines fully updated. | |
| − | + | # All virtual machines backed up. | |
| − | + | # Installation comparison table filled in. | |
| − | |||
| − | |||
| − | |||
| − | |||
| − | |||
| − | |||
| − | |||
| − | |||
| − | |||
| − | |||
| − | |||
| − | |||
| − | |||
| − | |||
== Preparing for the Quizzes == | == Preparing for the Quizzes == | ||
| − | # | + | # What is the name of the Fedora installation program? |
| − | # | + | # Which factors recorded in your table (above) were due to the type of installation performed, and which factors were due to the amount of software installed? |
| − | # | + | # Which type of installation works best for confirming compatibility with hardware before installation? Why? |
| − | # | + | # Which type of installation works best for installing large numbers of computers? Why? |
| − | # What | + | # What factors affect installation time? |
| − | # | + | # How can you reduce the number of software updates required immediately after installation? |
| − | # What | + | # Why would you enable additional repositories during installation? |
| − | # How do you | + | # What does the file <code>/root/anaconda-ks.cfg</code> contain, and how is it created? |
| − | # What | + | # How do you start and stop virtual machines? |
| − | # | + | # How do you SSH into your virtual machines? |
| − | + | # What is the purpose of and relationship between these pieces of software? | |
| − | + | #* libvirt | |
| + | #* libvirtd | ||
| + | #* virsh | ||
| + | #* virt-manager | ||
| + | #* virt-install | ||
| + | #* vncviewer | ||
| + | #* kvm | ||
Revision as of 12:51, 13 January 2012
Contents
- 1 OPS235 Lab 2: Fedora 16 Installation Methods (on Virtual Machines)
- 1.1 Introduction
- 1.2 Objectives
- 1.3 Required Materials (Bring to All Labs)
- 1.4 Prerequisite
- 1.5 Linux Command Online Reference
- 1.6 Reesources on the Web
- 1.7 Instructions
- 1.7.1 Preparation
- 1.7.2 Investigation 1: Installing from a Live Disc
- 1.7.3 Investigation 2: Installing from the Network
- 1.7.4 Investigation 3: Installing from the Network using Kickstart
- 1.7.5 Investigation 4: Updating and Comparing the VMs
- 1.7.6 Investigation 5: Managing Virtual Machines from the Command Line
- 1.7.7 Investigation 6: How do I backup a virtual machine?
- 1.7.8 Investigation 7: Kickstart Files
- 1.8 Completing the Lab
- 1.9 Preparing for the Quizzes
OPS235 Lab 2: Fedora 16 Installation Methods (on Virtual Machines)
Introduction
A virtual machine is a software simulation of a computer which can be used as though it were actual hardware. It's possible to run multiple virtual machines on one computer, reducing hardware requirements and introducing flexibility. Some common uses of virtualization include:
- Software testing -- Using multiple operating systems simultaneously on a single computer for testing and experimentation.
- Network simulation -- Testing network services, protocols, and security scenarios with a small number of computers.
- Isolation -- Protecting multiple sets of data by storing them on multiple virtual machines. If one of the virtual machines is compromised, the data on other virtual machines is still protected.
- Server consolidation -- Reducing the number of physical servers in a network by moving physical machines to virtual machines. This saves hardware, administration, cooling, and electricity costs, and it can increase the utilization of hardware (by ensuring that the hardware is not under-loaded).
- Load-balancing and disaster recovery -- It is possible to migrate virtual machines between different physical machines, to ensure that a workload is balanced across multiple computers, to allow routine hardware maintenance and upgrading, and to compensate for hardware failure or other disasters.
In this lab, you will create three virtual machines. This also gives you an opportunity to experiment with different ways of installing Fedora. Later in this course you will install another operating system distribution in a virtual machines.
You should already have both a Fedora installation DVD and a Fedora LIVE CD. In both cases, the boot media (which you used to load the installation software) and the installation source (where the software that got installed came from) were the same: your CD/DVD provides both. However, the Fedora (and most other Linux distributions) permits you to use any combination of boot media and installation media:
- Boot Media:
- CD or DVD
- Hard disk
- USB flash drive
- Network boot
- Installation Source:
- CD or DVD
- Hard disk
- USB flash drive
- Network HTTP or NFS software repository
Objectives
- Understand Virtualization
- Use KVM virtualization on Fedora
- Use a variety of installation methods:
- Live Image Installation
- Network Installation
- Kickstart Installation
Required Materials (Bring to All Labs)
- Fedora 16 LIVE CD - You can burn this onto a CD-R in the Open Lab
- Fedora 16 x_64 Installation DVD - You can burn this onto a DVD-R in the Open Lab (or burn image onto a DVD+R if you are using the Freedom Toaster).
- SATA Hard Disk (in removable disk tray)
- USB Memory Stick (minimum 64M)
- Lab Logbook (Lab1 Reference Sheet) (to make notes and observations).
Prerequisite
- Completion and Instructor "Sign-off" of Lab 1: OPS235 Lab 1
Linux Command Online Reference
Each Link below displays online manpages for each command (via http://linuxmanpages.com):
- virsh (Refer to Fedora Virtualization Guide below)
- gzip / gunzip
Reesources on the Web
Virtualization:
Installation Methods:
- Live Image Installation
- Network Installation:
- Kickstart Installation:
Instructions
Preparation
- Install the Fedora virtualization software:
yum groupinstall "Virtualization"orpkcon install @virtualizationThe virtualization software installed is in three parts:- A system service named libvirtd that manages the VMs.
- Tools to manage virtualization, including the
virt-managergraphical tool and thevirshcommand-line tool. - The actual virtual machines themselves.
- Start the virtualization service:
service libvirtd start - The firewall configuration is altered by the addition of the virtualization software. Restart the firewall so that these changes become active:
service iptables restart - Start the graphical tool by selecting the menu option Applications>System Tools>Virtual Machine Manager or by typing the command
virt-manager
Investigation 1: Installing from a Live Disc
Introduction
In this investigation, you will install Fedora from your live disc, and observe the differences between this type of installation and the DVD installation previously performed.
VM Details
- Name: fedora1
- Boot media: Fedora Live CD
- Installation source: Fedora Live CD
- Memory: 512MB
- Disk space: 10GB
- CPUs: 1
Steps
- In the Virtual Machine Manger, click on the icon to Create a Virtual Machine in the upper-left corner:
- A window will appear with the title New VM. There are five steps to be completed; click Forward after each step:
- Step 1 of 5: Enter the virtual machine name and select Local install media.
- Step 2 of 5: Insert the CDROM or DVD containing the Fedora Live Disc image. Wait a moment for the disc to be recognized, then select it as the install media. Set the OS type to Linux and the Version to Fedora 13.
- Step 3 of 5: Set the memory to 512 MB and the number of CPUs to 1.
- Step 4 of 5: This next step creates a disk file that will be used to simulate the virtual machine's disk drive. Select a size of 10 GB and checkmark the box labeled Allocate entire disk now.
- Step 5 of 5: Review the options that you have selected. Make a note of the storage location. If anything needs to be changed, use the Back button to go back and edit it; otherwise, click Finish.
- The virtual machine will now start. You will see a window which displays the virtual video card from the VM. It's important to note that the VM can (and often will) run even when this display is not present. The virtual machine is running from the live disc at this point, and no software has been installed on the hard drive of the virtual machine.
- Login to the VM and double-click on the Install to Hard Drive icon. The installation program, similar to the one used when installing Fedora in Lab 2, will appear. You will get a warning at one point during the installation process that the disk "may need to be re-initialized" -- this is simply a warning that the virtual disk is completely blank, and it is safe to select Re-initialize drive.
- During the installation process, when prompted for the drive, select "Virtio Block Device", when prompted for the hostname, enter "fedora1", when prompted for the timezone, select America/Toronto, and when asked about storage, select Use All Space. Use the default values for all other fields. Notice that the installer does not ask you what software should be installed; compare the installation time to the amount of time it took to do your Lab 2 installation.
- When the installation is complete, select the menu option System>Shutdown to stop the Live Disc.
- Start the VM from its disk image by selecting Virtual Machine>Run from the virtual machine menu. You will get the Firstboot configuration questions during the boot process (asking you to create a user, set the date and time, and optionally send the hardware profile to the Fedora Project). Create a user with the same name as your Matrix account.
- Login using the new user account.
- Enable SSH access to your virtual machine with these commands:
service sshd start; chkconfig sshd on - Find out the IP address of your virtual machine:
ifconfig eth0 - Enter the following command on your virtual machine to create a firewall exception to allow ssh traffic into the machine:
iptables -I INPUT -p tcp -s0/0 -d0/0 --dport 22 -j ACCEPT - Confirm that you can ssh to your virtual machine from the host (your main Fedora installation):
ssh IPaddress


Investigation 2: Installing from the Network
Introduction
It is possible to install Fedora entirely from the network. In this investigation, you will install Fedora from a webserver on Seneca's LAN.
VM details
- Name: fedora2
- Boot media: Network installation
- Installation source: http://belmont.senecac.on.ca/fedora/releases/13/Fedora/x86_64/os/
- Memory: 512MB
- Disk space: 15GB
- CPUs: 1
Steps
- Create the VM as you did with the fedora1 virtual machine, except:
- In step 1 of 5, set the installation type to "Network Install (HTTP, FTP, or NFS)"
- In step 2 of 5, provide the URL http://belmont.senecac.on.ca/fedora/releases/13/Fedora/x86_64/os/
- In step 2 of 5, set the OS Type to "Linux" and Version to "Fedora 13"
- Observe the boot process. How is it different from booting from an optical disc (CD/DVD)?
- Start the installation process. When you get to the disk partitioning step, enable the checkbox labelled Review and modify partition layout. On the next screen, change the logical volumes as follows:
- Reduce the size of the root LV to 8000 MB.
- Add a logical volume with a size of 2000 MB and a mountpoint of /home (you can name it whatever you want, and use ext3 or ext4 as the filesystem type).
- On the software selection screen, select Graphical Desktop.
- On the same screen, select the "Fedora 13 - x86_64" and the "Fedora 13 - x86_64 - Updates". Leave "Installation Repo" selected. DO NOT enable the "Test Updates" repository.
- Complete the installation. Record the time taken to install, and compare this to the time taken by the previous installations.
Investigation 3: Installing from the Network using Kickstart
Introduction
When Fedora is installed using the techniques you have used so far, the user is asked a number of questions. In some situations, it is better to provide the answers to these questions in a file rather than answer them individually. This type of file is called a kickstart file.
In this investigation, a kickstart file is provided for you. You can also create or modify a kickstart file using a regular text editor or a graphical tool.
VM details
- Name: fedora3
- Boot media: Network installation
- Installation source: http://belmont.senecac.on.ca/fedora/releases/13/Fedora/x86_64/os/
- Kickstart location: http://zenit.senecac.on.ca/~chris.tyler/fedora13-vda-ks.cfg
- Memory: 512MB
- Disk space: 10GB
- CPUs: 1
Steps
- Create the VM as you did with the fedora2 virtual machine, specifying a network install as before, except:
- In step 2 of 5, after entering the URL for the installation source, click on the URL Options control.
- Enter the Kickstart URL: http://zenit.senecac.on.ca/~chris.tyler/fedora13-vda-ks.cfg
- Observe the installation. How is it different from booting from an optical disc (CD/DVD)?
- Complete the installation. Record the time taken to install, and compare this to the time taken by the previous installations.
- What happens when the installation is finished?
- Take a look at the kickstart file (using the URL you entered) to determine the root password as well as the name and password for the first user account.
- Boot the virtual machine and log in (use the user ID and password information from the previous step). Compare the experience to the first time you booted the other virtual machines.
Investigation 4: Updating and Comparing the VMs
- In each VM, run this command:
yum update - Record the answers to these questions in your log book:
- How long did it take to run on each VM? How many packages were updated?
- Why does it take longer in some VMs than others?
Complete the following table:
| f13host | fedora1 | fedora2 | fedora3 | |
|---|---|---|---|---|
| Installation Method | Installation Disc | Live Disc | Network Installation | Network Installation + Kickstart |
| Packages Installed | ||||
| Updates Installed immediately after installation | ||||
| Software could be selected during installation | ||||
| Disk layout could be selected during installation | ||||
| No questions asked during installation | ||||
| Total installation time (after installation questions) | ||||
| Amount of disk space used | ||||
| Questions asked during first boot | ||||
| Advantages of this type of installation | ||||
| Disadvantages of this type of installation | ||||
| This type of installation is recommended for... |
Investigation 5: Managing Virtual Machines from the Command Line
- Start the fedora1 virtual machine, and stop the fedora2 and fedora3 virtual machines.
- Enter these commands and note the result:
-
virsh list -
virsh list --all -
virsh list --inactive
-
- Start the fedora3 virtual machine from the command line:
virsh start fedora3 - Repeat the commands from step 2 and notice any changes.
- Stop the fedora3 virtual machine:
virsh shutdown fedora3 - Confirm that fedora3 has been shut down.
- Execute this command:
virsh dumpxml fedora3 >fedora3.xml - Examine the file
fedora3.xml. What does it contain? What format is it in? - Edit the file fedora3.xml, making the following changes:
- Change the name to
fedora3a - Change at least one of the hexadecimal characters in the UUID. Do not change the length of the UUID. Valid hexadecimal characters are 0-9 and a-f.
- Change the name to
- Issue this command:
virsh define fedora3a.xml - Issue the command
virsh list --alland record any changes. - Issue the command:
virsh undefine fedora3a - List all of the virtual machines again, and note any changes.
Investigation 6: How do I backup a virtual machine?
- Shut down all of the virtual machines.
- Change to the directory
/var/lib/libvirt/images/. Note the size of the files in this directory. What do these files contain? - Make a compressed backup of the
fedora3.imgfile with this command:gzip <fedora3.img >fedora3.img.backup.gz
- Compare the size of the compressed and original files.
- Start the fedora3 VM.
- Make certain that you are in your fedora VM, and not in your Fedora main system.
- Wreck only your fedora 3 system! Try this command inside the fedora3 virtual machine (DO NOT do this on your main Fedora system, or you will have to repeat your lab2 and portions of your lab3!):
rm -rf /* - Shut down the VM.
- Restore the original image from backup (type this command carefully):
gunzip <fedora3.img.backup.gz >fedora3.img - Restart the VM. Is it working normally?
- Create compressed backups of your other virtual machines.
- Answer this question in your log book:
- In order to fully back up a virtual machine, what information should be saved in addition to the virtual machine image?
- Write the answer to the Investigation 6 question in your lab book.
Investigation 7: Kickstart Files
When you perform a non-Kickstart installation, the installation program creates a Kickstart file in the /root directory for reference.
- Obtain the kickstart files for all four of your installations (your disk pack f13host, plus the fedora1, fedora2, and fedora3 virtual machines). Copy them all to your f13host system (tip: use
scp). - Compare these files. What are the differences? Similarities? (Tip: you may want to use tools such as
sdiffto help with the comparison). - How could you use the kickstart file produced by the installation program to perform additional, identical installations?
Completing the Lab
- Three working virtual machines created.
- Four kickstart files.
- All virtual machines fully updated.
- All virtual machines backed up.
- Installation comparison table filled in.
Preparing for the Quizzes
- What is the name of the Fedora installation program?
- Which factors recorded in your table (above) were due to the type of installation performed, and which factors were due to the amount of software installed?
- Which type of installation works best for confirming compatibility with hardware before installation? Why?
- Which type of installation works best for installing large numbers of computers? Why?
- What factors affect installation time?
- How can you reduce the number of software updates required immediately after installation?
- Why would you enable additional repositories during installation?
- What does the file
/root/anaconda-ks.cfgcontain, and how is it created? - How do you start and stop virtual machines?
- How do you SSH into your virtual machines?
- What is the purpose of and relationship between these pieces of software?
- libvirt
- libvirtd
- virsh
- virt-manager
- virt-install
- vncviewer
- kvm