Today's Objective
- Course Introduction
- Course Policies
- Required Materials
- Purpose of Lab 1
- How to Prepare for Lab 1
Basic Information
- Course Code: OPS235
- Course Name: Introduction to Open System Servers
Course Resources
- Instructor Online Resource (Check Announcements from instructor, etc):
Requirements for Successful Completion of Course
Purpose of Lab1
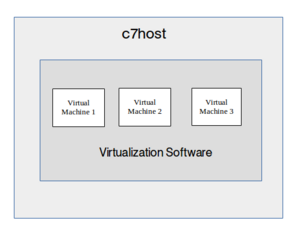
The c7host Linux server will run virtualization software to install and run 3 virtual machines (installed in lab2).
You need to install a Linux OS to be a host or "platform" to install and use other Linux VMs (Virtual Machines) during this course.
The Linux OS you will be installing in this lab will be a Host Machine (hostname: c7host) that will allow you to run Virtualization Software to create 3 separate virtual machines (to be performed in lab2). It is important to install this host machine correctly since other labs will depend on the stability of this host machine.
Main objectives:
- Correctly install the CentOS 7 FULL INSTALL DVD (not LIVE DVD) on your removable hard disk.
- Record installation characteristics of CentOS 7 FULL INSTALL in a chart (contained in lab2 logbook chart) to compare with other installation methods performed in lab2.
- Verify correct settings prior to proceeding with host installation stages.
- Obtain Linux server information after installation to create a software asset report for later access.
- Disable Linux Kernel security enhancements to allow easier internal networking connections (to be reactivated in a later lab).
- Observe that Bash Shell Scripts can automate routine tasks.
Minimum Required Materials
|
|
 Removable Hard Disk Pack (SATA) |
|
|
Access to Instructions for Lab1Since you will performing a full install on your computer, you cannot use that computer to simultaneously view instructions while you perform the full install. Here are some suggestions to make this process easier: - Printout Lab1 instructions at home prior to performing Lab1
- Use a smart-phone, notebook, or netbook computer to view lab instructions (highly recommended)
- If lab space availability is not an issue, use another computer termimal to view lab instructions while performing install
- Follow step-by-step instructions from your OPS235 instructor (if demonstrated by instructor)
|
Do's and Don'ts
Bring all of these supplies to each class.
Even after installation, the Live CD and Installation DVD may be required.
Place your Full Name and Contact Information on the hard disk tray cover and directly on the disk drive.
Use an adhesive label and permanent marker, or a white marker on the black cover. No label - no marks for your labs.
Always "double-check" that you have removed your hard disk tray prior to exiting the lab room.
You may have your hard drive tray stolen which will result in lost work!
Do not share your OPS235 disk drive with another course.
The work you do in other courses may damage the Linux parts on your drive.
Earlier labs become the foundation for later labs.
Seemingly "small errors", or "skipping instructions" in earlier labs can have negative consequences when performing other dependent labs. Make backups when requested at the end of labs for "restoration points" in case something goes wrong while performing a lab.
Always shut down your system under software control, rather than using the reset or power buttons.
You can shutdown using the GUI or with the poweroff, reboot, init, or shutdown commands. Shut down your virtual machines before shutting down your main system.
|
 Failure to listen to lab "suggestions" by this resource could result in loss of work... |


