Difference between revisions of "Lab 6 Warnings / Debrief"
| Line 14: | Line 14: | ||
# Gain initial exposure to the '''iptables''' command used to configure and maintain a firewall for protection and troubleshooting | # Gain initial exposure to the '''iptables''' command used to configure and maintain a firewall for protection and troubleshooting | ||
# Configure '''iptables''' to '''allow/disallow/forward''' different types of network traffic | # Configure '''iptables''' to '''allow/disallow/forward''' different types of network traffic | ||
| + | |||
| + | == Investigation 1 == | ||
| + | |||
| + | For the remainder of this course, we will focus on networking involving our VMs and our c7host machine. This lab will focus on setting up a virtual private network ('''VPN'''), connecting our VMs and c7host machine to the VPN, and configuring our VPN to make more convenient to use, troubleshoot and protect. '''Lab 7''' will focus more on configuring SSH and making access to the VPN more secure. Finally, '''lab 8''' will focus on configuring the network for fixed workstations, mobile devices, or both at the same time. | ||
| + | |||
| + | There are several reasons for creating '''VPNs'''. The main reason is to '''safely connect servers together''' (i.e. to safely limit but allow share information among computer network users). This allows for a secure connection of computers yet controlling access to and monitoring (protecting) access to permitted users (discussed in more depth in lab7). | ||
| + | |||
| + | |||
| + | <u>Configuring a Private Network (Via Virtual Machine Manager)</u> | ||
| + | |||
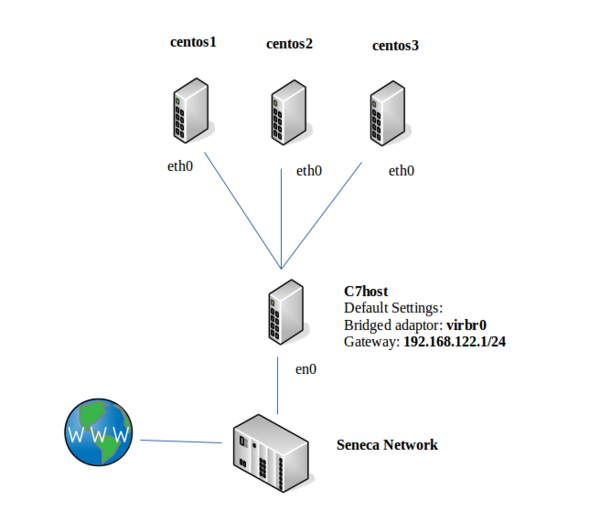
| + | [[Image:network-config-centos.png|thumb|600px|right|This diagram shows the current network configuration of your '''c7host''' machine in relation to your '''Virtual Machines'''. In this section, you will be learning to change the default network settings for both your '''c7host''' machine and '''VMs''' to belong to a '''virtual network''' using fixed IP Addresses. ]] | ||
| + | If we are going to setup a private network, we must do 2 major operations: First, '''define a new private network in the Virtual Manager application'''; and second, '''configure each of our VMs to connect to this new private network'''. In Part 1, we will be perform the first operation. In parts 2, 3, and 4, we will be performing the second operation for all VMS (graphical and command-line). | ||
| + | |||
Revision as of 11:28, 14 July 2015
Contents
Purpose / Objectives of Lab 6
In this lab, you will learn the basics of networking by using your Virtual Machines and your c7host machine. You will first set up a virtual private network among those machines. In addition, you will learn to set up network names (to associate with server's IP Addresses), associate network services with port numbers for troubleshooting purposes, and setup firewall policies via the iptables command.
Main Objectives
- Configure a private (virtual) network for your VMs and your c7host machine
- Configure network interfaces for your Virtual Machines using both graphical and command-line utilities.
- Use local hostname resolution to resolve simple server names with their corresponding IP Addresses
- Backup more recent files (eg. incremental backup) using the find command and a date/time-stamp file
- Use common networking utilities to associate network services with port numbers for troubleshooting purposes
- Gain initial exposure to the iptables command used to configure and maintain a firewall for protection and troubleshooting
- Configure iptables to allow/disallow/forward different types of network traffic
Investigation 1
For the remainder of this course, we will focus on networking involving our VMs and our c7host machine. This lab will focus on setting up a virtual private network (VPN), connecting our VMs and c7host machine to the VPN, and configuring our VPN to make more convenient to use, troubleshoot and protect. Lab 7 will focus more on configuring SSH and making access to the VPN more secure. Finally, lab 8 will focus on configuring the network for fixed workstations, mobile devices, or both at the same time.
There are several reasons for creating VPNs. The main reason is to safely connect servers together (i.e. to safely limit but allow share information among computer network users). This allows for a secure connection of computers yet controlling access to and monitoring (protecting) access to permitted users (discussed in more depth in lab7).
Configuring a Private Network (Via Virtual Machine Manager)
If we are going to setup a private network, we must do 2 major operations: First, define a new private network in the Virtual Manager application; and second, configure each of our VMs to connect to this new private network. In Part 1, we will be perform the first operation. In parts 2, 3, and 4, we will be performing the second operation for all VMS (graphical and command-line).
Common Mistakes / Warnings
Preparing for Lab Sign-Off
In order to properly complete your lab and move to the next lab, you must have your instructor "sign-off" on your lab
- Each "signed-off" lab (before due date) is worth 1% of your final grade.
- Signing-off on labs help to spot errors that can cause problems with future labs.
- Do you ask the instructor what to check for! Read at the bottom of the lab the requirements, and have all proof available for instructor to view at same time.
- Failing to be prepared and asking instructor what to check when assignment is mark will result in deduct of marks!
- For example, open multiple terminals with command results. If properly set-up ahead of sign-off, the process should only take instructor approx 20 seconds to sign-off your lab.
- If you do not have your lab-logbook, you MUST show your work and your lab log-book to your instructor for sign-off in the next class. This may cause a late penalty if past the required due date.


